L’Église Saint-Étienne de Waha (of Sint-Stefanuskerk) is een kleine kerk uit de 11de eeuw, gelegen in het dorpje Waha, bij Marche-en-Fammene (provincie Luxemburg). In 2003 verwezenlijkte Jean-Michel Folon de nieuwe glasramen voor de kerk.


Mathias Beke
L’Église Saint-Étienne de Waha (of Sint-Stefanuskerk) is een kleine kerk uit de 11de eeuw, gelegen in het dorpje Waha, bij Marche-en-Fammene (provincie Luxemburg). In 2003 verwezenlijkte Jean-Michel Folon de nieuwe glasramen voor de kerk.


Apple announced that Swift would become open source at the WWDC keynote (earlier this week). The perfect moment for me to create my very first iOS app (in the newly released Swift 2 and Xcode 7 beta). So I spent a few hours yesterday and created a real-time live blog app as a front-end for the WebSocket Liveblog back-end I’ve written in Go.
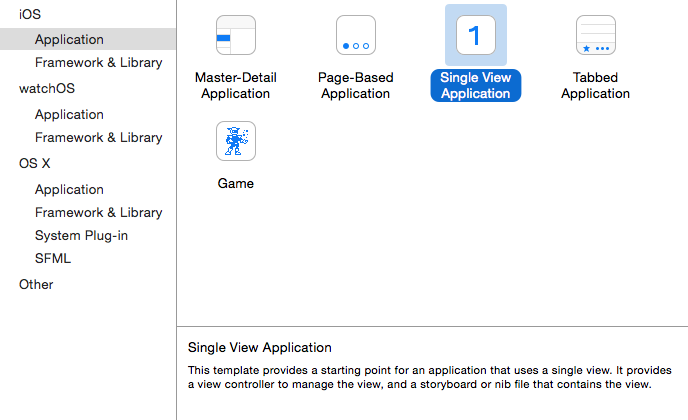
First I downloaded the new Xcode 7 beta, and created a new application. File, New, Project. Select iOS, Single View Application. Fill in the needed information (make sure the select Swift as programming language and not Objective-C) and create the project.
Since I didn’t really figured out how to import external modules from Github (and didn’t want to lose time on doing so) I used the CocoaPods tool. This handy tool manages the dependencies for you. (Comparable to Composer for PHP)
Installing CocoaPods is very simple using the Terminal:
$ sudo gem install cocoapods
In Terminal navigate to your project folder and execute pod init (This will create the Podfile file in the root directory of your project), and append the following content the Podfile:
use_frameworks!
target 'Liveblog' do
pod 'Starscream', '~> 0.9'
end
Now open the Liveblog.xcworkspace Workspace in Xcode. Since Starscream isn’t yet coded in Swift 2, Xcode 7 will ask the convert the code to Swift 2. After the automatic conversion, there will still be some compile errors to fix. You can fix them with auto-fix in Xcode.
Next step is designing our iPhone app. (I’m not a designer, nor an UX expert, so I’ll keep it simple, KISS). All of this happens in the Main.storyboard file.
At the bottom of the right sidebar, there are some switches with pre-made things you can include into your project (including code snippets, or creating new files). We need the third tab of that panel, i.e. the panel with UX elements.
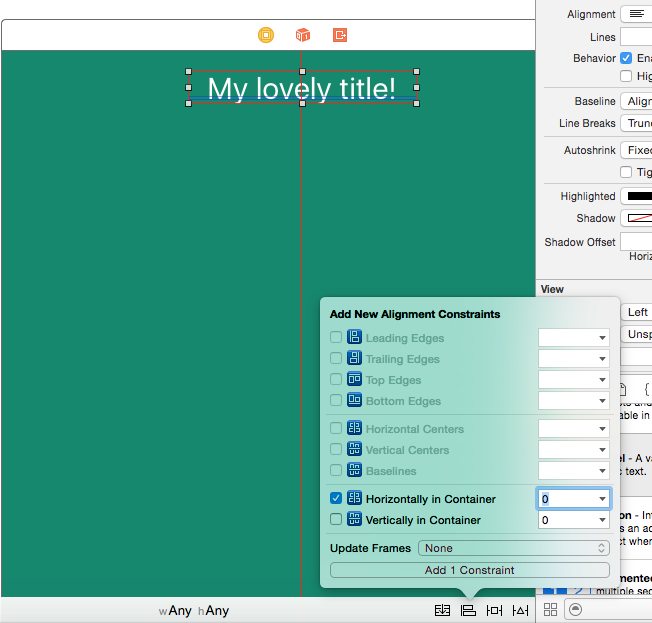
Our storyboard will already consist of a View, which we can style. I chose to give the main view a sea green background.
Now it’s time to create a title at the top of the view. Drag a label from the right bottom UX panel to the view. Again you can do some styling at the right panel. (I increased the font size a lot, and opted for a white font)
Now we want to center the label on all screen sizes. Therefor you can add ‘responsive’ constraints to your storyboard elements. At the right bottom corner of the storyboard panel, there are 4 buttons. Click on the second button to add aligning constraints: select the horizontal constraint and click on “Add 1 constraint”.
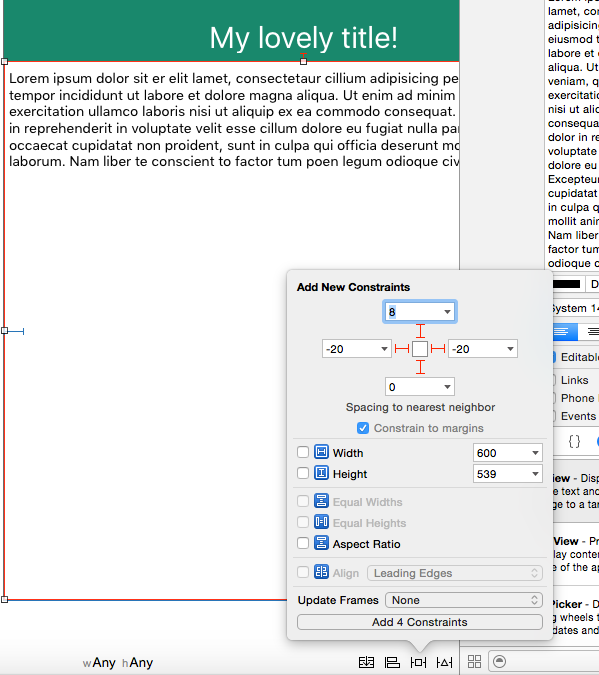
The same steps need to be followed to create a Text View on the storyboard. Drag the Text View element from the right bottom panel to the storyboard and resize it so it fills the whole view (except the top bar). Again, we want this UI element to fit all screen sizes, so we must add some constraints so it will always cover the whole screen.
Click on the red dashed lines in the constraints panel to ‘enable’ the constraints, and then click on “Add 4 constraints”.
Now launch the app in the iOS simulator and make sure everything is responsive. If everything looks fine, you can remove the sample text from the TextView (since we will load WebSocket data in it)
If we want to actually do something with the TextView, we need to create a referencing outlet for it in the ViewController.swift file. In the right top navigation click on the editor icon (the two overlapping rings). This will open a second, split view with the code of the ViewController. Now press the ctrl key and drag the TextView into the code at the right side and give the outlet a name.
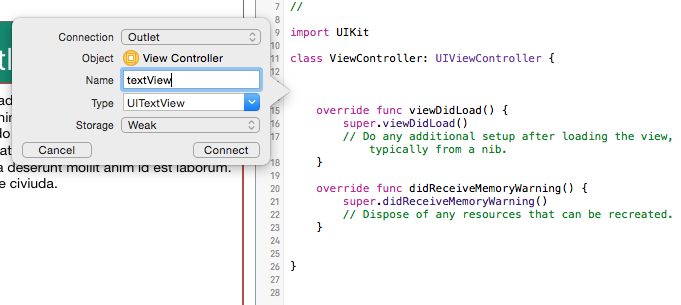
If completed successfully, your ViewController class will look like this:
class ViewController: UIViewController {
@IBOutlet weak var textView: UITextView!
override func viewDidLoad() {
super.viewDidLoad()
// Do any additional setup after loading the view, typically from a nib.
}
override func didReceiveMemoryWarning() {
super.didReceiveMemoryWarning()
// Dispose of any resources that can be recreated.
}
}
Now we can finally implement the actual WebSockets for our app. Well, not really implementing, because we will be using Starscream’s WebSocket client (as mentioned above in the section of the CocoaPods)
First thing to do is import Starscream above the ViewController class. Next add WebSocketDelegate in the class declaration line to indicate we are implementing the Starscream WebSocketDelegate interface (so we can delegate the WebSocket to the ViewController).
class ViewController: UIViewController, WebSocketDelegate {
// ...
}
Since we defined that ViewController implements the WebSocketDelegate interface, you need to add the functions of that interface to the ViewController:
// websocketDidConnect is called as soon as the client connects to the server.
func websocketDidConnect(socket: WebSocket) {
println("websocket is connected")
}
// websocketDidDisconnect is called as soon as the client is disconnected from the server.
func websocketDidDisconnect(socket: WebSocket, error: NSError?) {
println("websocket is disconnected: \(error!.localizedDescription)")
}
// websocketDidReceiveMessage is called when the client gets a text frame from the connection.
func websocketDidReceiveMessage(socket: WebSocket, text: String) {
println("got some text: \(text)")
}
// websocketDidReceiveData is called when the client gets a binary frame from the connection.
func websocketDidReceiveData(socket: WebSocket, data: NSData) {
println("got some data: \(data.length)")
}
Next create the websocket client with the url and the port of your back-end. Append the following code to the viewDidLoad function:
let socket = WebSocket(url: NSURL(scheme: "ws", host: "labs.denbeke.be:1234", path: "/")!)
socket.delegate = self
socket.connect()
At this stage we have everything in place to actually handle the incoming WebSocket messages, which are marshalled in the following JSON format:
{
"Content":"But even cooler, a native iPhone app written in Swift!",
"Time":1433942629
}
To do this you need to implement the websocketDidReceiveMessage function:
func websocketDidReceiveMessage(ws: WebSocket, text: String) {
let json: NSDictionary
do {
// Parse JSON request
try json = NSJSONSerialization.JSONObjectWithData(text.dataUsingEncoding(NSUTF8StringEncoding)!, options: NSJSONReadingOptions.MutableContainers) as! NSDictionary
// Do something with the parsed JSON data
if (json["Content"] != nil) {
textView.text = (json["Content"] as! String) + "\n\n" + textView.text
}
}
catch {
print("Could not parse json message")
}
print("Received text: \(text)")
}
The above snippet will try to parse the JSON request into a Swift dictionary/map. If this goes without any error, the content of the message will be prepended in the TextView we created earlier.
All together your ViewController should look like this:
import UIKit
import Starscream
class ViewController: UIViewController, WebSocketDelegate {
@IBOutlet weak var textView: UITextView!
override func viewDidLoad() {
super.viewDidLoad()
// Do any additional setup after loading the view, typically from a nib.
// padding of TextView: top, left, bottom, right
textView.textContainerInset = UIEdgeInsetsMake(8,8,4,8);
// Setup WebSocket
let socket = WebSocket(url: NSURL(scheme: "ws", host: "denbeke.be:1234", path: "/")!)
socket.delegate = self
socket.connect()
}
override func didReceiveMemoryWarning() {
super.didReceiveMemoryWarning()
// Dispose of any resources that can be recreated.
}
// Interface for WebSockets
func websocketDidConnect(ws: WebSocket) {
print("websocket is connected")
}
func websocketDidDisconnect(ws: WebSocket, error: NSError?) {
if let e = error {
print("websocket is disconnected: \(e.localizedDescription)")
}
}
func websocketDidReceiveMessage(ws: WebSocket, text: String) {
let json: NSDictionary
do {
// Parse JSON request
try json = NSJSONSerialization.JSONObjectWithData(text.dataUsingEncoding(NSUTF8StringEncoding)!, options: NSJSONReadingOptions.MutableContainers) as! NSDictionary
// Do something with the parsed JSON data
if (json["Content"] != nil) {
textView.text = (json["Content"] as! String) + "\n\n" + textView.text
}
}
catch {
print("Could not parse json message")
}
print("Received text: \(text)")
}
func websocketDidReceiveData(ws: WebSocket, data: NSData) {
print("Received data: \(data.length)")
}
}
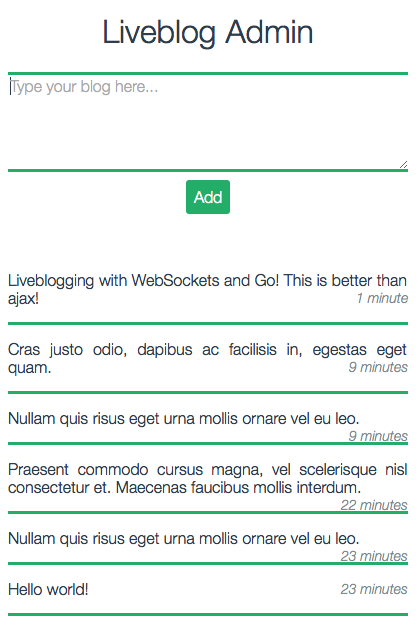
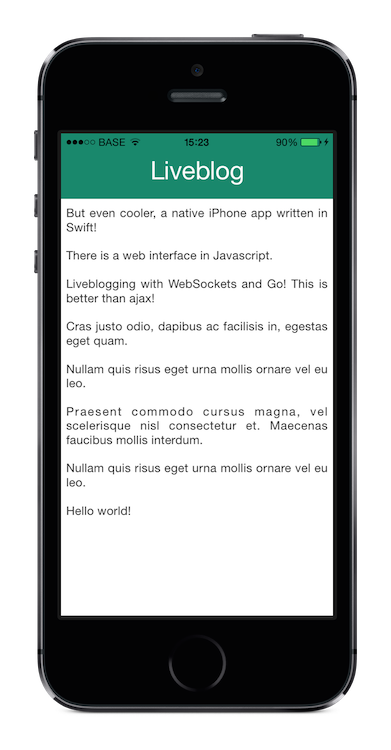
The complete iPhone app should look like this:
I have uploaded the source code of the app to Github: Liveblog-iOS-App
Yesterday I had some time left and thought it was the perfect moment to write a very simple live blog to learn more about WebSockets (in Go).
WebSockets are actually very easy in Go, they work just like the http handler. The required websocket package is not installed by default, but you can easily install the (by Go maintained) package: go get code.google.com/p/go.net/websocket.
Time to create a websocket handler:
func main() {
http.Handle("/", websocket.Handler(HandleSocket))
if err := http.ListenAndServe(":1234", nil); err != nil {
log.Fatal("ListenAndServe:", err)
}
}
In the above snippet, HandleSocket is the name of your own defined handler function. In this easy example I created a handler function that will just send all received message on a socket back:
func HandleSocket(ws *websocket.Conn) {
// Wait for incoming websocket messages
for {
var reply string
if err := websocket.Message.Receive(ws, &reply); err != nil {
log.Println("Can't receive from socket:", err)
break
}
log.Println("Received back from client: " + reply)
msg := "Received: " + reply
log.Println("Sending to client: " + msg)
if err := websocket.Message.Send(ws, msg); err != nil {
log.Println("Can't send to socket:", err)
break
}
}
}
Of course I enhanced this Go code to create an actual liveblog demo.
Now we have our websocket, we must actually do something with it in Javascript. The most simple implementation will prepend any new message to an html list with id messages:
var sock = null;
var wsuri = "ws://localhost:1234";
window.onload = function() {
sock = new WebSocket(wsuri);
sock.onopen = function() {
console.log("connected to " + wsuri);
}
sock.onclose = function(e) {
console.log("connection closed (" + e.code + ")");
}
sock.onmessage = function(e) {
$('<li>' + e.data '</li>').hide().prependTo('#messages').fadeIn(1000);
}
};
We must also be able to send messages from an admin panel:
function send() {
var msg = document.getElementById('new_message').value;
document.getElementById('new_message').value = '';
sock.send(msg);
};
I combined the above little pieces to create a simple liveblog. The blog has an admin page on which someone can add messages, which are then broadcasted to all the other sockets.

The source code of the demo is available on Github: github.com/DenBeke/Liveblog
Deze week de kans gekregen om wat foto’s te nemen vanop de hoogste verdieping van de KBC Boerentoren.
Het resultaat: een aantal mooie panorama foto’s van Antwerpen…


Fuzzy logics (especially fuzzy numbers and fuzzy intervals) can be beautifully plotted on a graph, …. aaaand of course, you can also do this using LaTeX and pgfplots!
\begin{tikzpicture}
\begin{axis}[
height=3.5cm,
width=\textwidth/2,
ytick={0,1},
xtick={4,6},
area style,
xlabel={$$},
xmin=0,xmax=10,
axis x line=bottom,
axis y line=left,
%ylabel={$$},
enlarge x limits=false
]
\addplot[fill, red, opacity=0.2] coordinates
{(2.5,0)(4,1)(6,1)(7.5,0)}
\closedcycle;
\addplot [red, mark = none, nodes near coords=\textbf{Fuzzy interval},every node near coord/.style={anchor=90,rotate=0,anchor=south,align=center}] coordinates {( 5, 1.1)};
\end{axis}
\end{tikzpicture}

There are some apps available to setup an SSH tunnel on OS X, but you can do it very easily in the terminal.
Just start a SOCKS web proxy using this SSH command:
$ ssh -D 8080 -C -N username@myserver.com -p 22
Once your proxy is running you must tell OS X to use this web proxy. Go to System preferences, Network, Advanced. Open the Proxies tab and select SOCKS-proxy.
Set the server: 127.0.0.1, set the port: 8080. Save and apply the settings, and everything should work!
Update: I updated the blogpost for PHP 7 instead of PHP 5. If you want to update your current PHP 5 installation to a PHP 7 installation, see this blogpost: Migrating/updating from PHP 5 to PHP 7 on OS X (MacPorts).
MacPorts is a BSD ports like package management system for OS X.
The MacPorts Project is an open-source community initiative to design an easy-to-use system for compiling, installing, and upgrading either command-line, X11 or Aqua based open-source software on the OS X operating system.
The tool is very handy when it comes to installing command line tools for Mac. In this guide I will use it to install Apache, MariaDB and PHP. You could also install them using Homebrew, or use the packages that come with your Mac, but I prefer MacPorts… So if you don’t have MacPorts installed, follow the installation instruction on their website.
Before installing any ports, make sure you have the latest version of the ports tree:
$ sudo port selfupdate
If you have web sharing enabled on your Mac, you should disable it before continuing. Web sharing can be found under ‘System preferences’, ‘Sharing’, …
Time to install Apache:
$ sudo port install apache2
Whenever your installation is completed, you can edit Apache’s configuration file: /opt/local/apache2/conf/httpd.conf. Probably you want to set DocumentRoot to your local Sites folder. To do this change /opt/local/apache2/htdocs to your local sites folder e.g. /Users/Mathias/Sites.
You must also allow traffic to go to your webserver otherwise you will get “Permission denied” errors. By default you have a block like this in your Apache config:
<Directory />
Order deny,allow
Deny from all
</Directory>
Replace it with the following directive:
<Directory /path/to/webroot>
Order allow,deny
Allow from all
</Directory>
Don’t forget to verify your changes after every modification you do to httpd.conf!
$ /opt/local/apache2/bin/apachectl -t
When everything is configured, you can start Apache using MacPorts services:
$ sudo port load apache2
Stopping services can be done using the unload statement.
Apache should be functioning right now, more configuration details can be found everywhere on the internet, I’m not gonna explain the whole config file here…
Again, we use MacPorts:
$ sudo port install mariadb-server
Once MariaDB is installed, we need to create the main databases:
$ sudo -u _mysql /opt/local/lib/mariadb/bin/mysql_install_db
Time to start MariaDB:
$ sudo port load mariadb-server
Next we need to create a password for the root user, don’t forget to do this step! This procedure will interactively ask you some security details:
$ /opt/local/lib/mariadb/bin/mysql_secure_installation
If you work a lot with sockets for MySQL/MariaDB, you can create a symbolic link from the default socket path to MacPort’s path:
$ sudo ln -s /opt/local/var/run/mariadb/mysqld.sock /tmp/mysql.sock
You can also specify the socket path in your PHP config file: see below…
Note: MacPorts MariaDB has skip-networking enabled by default in /opt/local/etc/mariadb/macports-default.cnf. If you want to use 172.0.0.1 for your MySQL connections, you should comment out that line.
If you want to use mysql on the command line, you can link mysql to MariaDB:
$ sudo port select --set mysql mariadb
Last step is installing PHP:
$ sudo port install php70-apache2handler
$ sudo port install php70-mysql
You might also need the following PHP extensions:
$ sudo port install \
php70-curl \
php70-exif \
php70-gd \
php70-gettext \
php70-iconv \
php70-imap \
php70-mbstring \
php70-mcrypt \
php70-openssl \
php70-zip
Set up your PHP configuration files. For development purposes use:
$ cd /opt/local/etc/php70
$ sudo cp php.ini-development php.ini
For production use:
$ cd /opt/local/etc/php70
$ sudo cp php.ini-production php.ini
Enable the PHP module in Apache
$ cd /opt/local/apache2/modules
$ sudo /opt/local/apache2/bin/apxs -a -e -n "php7" mod_php70.so
in Apache’s config file /opt/local/apache2/conf/httpd.conf, add index.php to the DirectoryIndex:
<IfModule dir_module>
DirectoryIndex index.php index.html
</IfModule>
Make sure that Apache includes the PHP config, check your httpd.conf file for the following lines:
# Include PHP configurations
Include conf/extra/mod_php70.conf
Also verify that the .so shared object for PHP is included:
# Load the PHP module
LoadModule php7_module modules/mod_php70.so
Before we can use MySQL in our PHP code, we must set the default socket path in /opt/local/etc/php70/php.ini. Search for mysql.default_socket, mysqli.default_socket and pdo_mysql.default_socket and assign the MariaDB socket to them: /opt/local/var/run/mariadb/mysqld.sock.
If you regularly use PHP from the command line, you also want to link the php command to the MacPorts PHP version:
$ sudo port select --set php php70
If you want to have colored PHP CLI output, you must enable it by installing php posix.
$ sudo port install php70-posix
Verify your Apache config, restart Apache, restart MariaDB and everything should work correctly!
In a perfect world, every software developer writes tons of unit tests, and uses continuous integration to make sure everything keeps working. Travis, PHPUnit and Composer are there to save you a lot of time!
In this blogpost I will explain how to setup Travis and run PHPUnit to run unit tests in a PHP project with Composer.

Composer is a super awesome dependency manager for PHP. If you don’t use it yet, you are doing it wrong! 🙂 For this guide I assume you already have a working composer.json file and you know the basics of Composer.
Before you can actually test something you must of course run composer install to download all the dependencies.
PHPUnit is the ultimate unit testing framework for PHP. Installation instructions can be found here.
Next thing to do is create the phpunit.xml file. This file will contain your PHPUnit configuration and will make it very easy to run the unit tests from the command line.
<?xml version="1.0" encoding="UTF-8"?>
<phpunit backupGlobals="false"
backupStaticAttributes="false"
bootstrap="vendor/autoload.php"
colors="true"
convertErrorsToExceptions="true"
convertNoticesToExceptions="true"
convertWarningsToExceptions="true"
processIsolation="false"
stopOnFailure="false"
syntaxCheck="false"
>
<testsuites>
<testsuite name="My package's test suit">
<directory>./tests/</directory>
</testsuite>
</testsuites>
</phpunit>
In this phpunit.xml file I have set some basic variables which might be different for your project. But note the bootstrap argument. Assign the path to your Composer autoload.php file to the bootstrap variable.
Next you must specify the directory where your PHP test files are located.
Run your unit tests (and check if PHPUnit is correctly configured): phpunit
This should yield an output like this:
~/S/MyPackage (master) $ phpunit
PHPUnit 4.5.0 by Sebastian Bergmann and contributors.
Configuration read from /Path/To/My/Package/phpunit.xml
.......
Time: 92 ms, Memory: 3.50Mb
OK (7 tests, 24 assertions)

Composer and PHPUnit configured, it’s time to create the .travis.yml file to configure Travis.
language: php
php:
- 5.4
- 5.5
- 5.6
install:
- composer install --no-interaction
The Travis configuration is just a normal PHP config, but before installing, Travis must run composer install.
Push everything to Github and let Travis run your unit tests.
If you want strict synchronization between your local Composer dependencies and remote installations, you must also commit the composer.lock file to your repo. Most people place it in their .gitignore, but it is actually meant to be committed to Git.
If you need a live example of such a configuration, take a look at my ORM (Github / Travis) package. In this package I specified an other Composer vendor directory (core/lib), so I also changed the bootstrap variable in the PHPUnit configuration. You may also ignore the database section in the .travis.yml file…
Na de examens even gaan uitwaaien in de haven en wat treinen gaan fotograferen (vergezeld van een ‘professionele’ trainspotter!).