Create beautiful photo galleries with ‘Justified Gallery’

Organizing pictures of different sizes into a gallery can be a hard task, but using ‘Justified Gallery’, you can make good-looking — and responsive — photo galleries in minutes. ‘Justified Gallery’ is written in javascript, and renders the photos the same way as Flickr.

Example of 'Justified Gallery'
Example of ‘Justified Gallery’

First of all, you need to include the script and stylesheet, which you can find on the project homepage. Since this is a jQuery plugin, you must also include jQuery…

Now you’re ready to go.
The basic HTML code for the gallery looks like this:

<div id="gallery">
    <a href="path/to/image1.jpg">
        <img alt="Caption for my image" src="path/to/image1_thumbnail.jpg" />
    </a>
    <a href="path/to/image2.jpg">
    	    <img alt="Another caption" src="path/to/image2_thumbnail.jpg" />
    </a>
    ...
</div>

After you’ve created the HTML for your gallery,  you need to run justifiedGallery on that div.
Somewhere on the page you put a script tag, or you make a separate javascript file for it.

$( document ).ready(function() {
    $("#gallery").justifiedGallery(
    {
    	    rowHeight : 250,
    	    lastRow : 'nojustify',
    	    margins : 5
    }
    );
});

The rowHeight defines the height that ‘Justified Gallery’ will match. Depending on the set of images it may be a bit different:

However, the justification may resize the images, and, as a consequence, the row height may be a little bit different than 160px. This means that the row height is intended as your preferred height, and it is not an exact measure. If you want that the row height remains strictly fixed, you can use the fixedHeight option: this option will crop the images a little bit to make sure that the row height doesn’t change.

lastRow defines how the last row will be handled. If you want empty space after the last image, use nojustify. If you want the last row to fill the whole page width, use justify. You can also hide the row using hide.

Obviously margins sets the margin (in pixels) between the images.

‘Justified Gallery’ is very well documented on the project homepage. Take a look there for the various other options!

Backup your databases in Git

Storing backups of the database is import for any possible service on the internet. Git can be the right tool to backup databases.

Like other version control systems, Git tracks the changes, and will only push the changes in files to the remote. So if one line in a 1 million database dump is changed, we don’t need to transfer the whole dump to our backup server. This economization is done by Gits delta compression mechanism.1

Configuring Git

Generating SSH keys:

$ ssh-keygen -t rsa -C "your_email@example.com"
Generating public/private rsa key pair.
Enter file in which to save the key (/Users/you/.ssh/id_rsa): [Press enter]
Enter passphrase (empty for no passphrase): [Type a passphrase]
Enter same passphrase again: [Type passphrase again]
Your identification has been saved in /Users/you/.ssh/id_rsa.
Your public key has been saved in /Users/you/.ssh/id_rsa.pub.
The key fingerprint is:
01:0f:f4:3b:ca:85:d6:17:a1:7d:f0:68:9d:f0:a2:db your_email@example.com

If you want to execute the backup script automatically, leave the passphrase blank. This way SSH won’t ask for it. Note that this might be insecure!

Now create a remote Git repository, and add the public key to this Git service, e.g. Github, Gogs, ….

Init a new local repo with the SSH remote address, and commit/push an initial commit.

Backup script

#! /bin/sh

TIMESTAMP=$(date +"%F")
BACKUP_DIR="/home/mathias/backup/mysql_git"
MYSQL_USER="Mathias"
MYSQL=/usr/bin/mysql
MYSQL_PASSWORD="yourpassword"
MYSQLDUMP=/usr/bin/mysqldump

cd $BACKUP_DIR

echo "Backupping databases"

databases=`$MYSQL --user=$MYSQL_USER -p$MYSQL_PASSWORD -e "SHOW DATABASES;" | grep -Ev "(Database|information_schema|performance_schema)"`

for db in $databases; do

        echo "  > Dumping $db to disk"
        $MYSQLDUMP --force --opt --user=$MYSQL_USER -p$MYSQL_PASSWORD --skip-extended-insert --databases $db > "$BACKUP_DIR/$db.sql"

        echo "  > Saving $db changes on Git server"
        git add $BACKUP_DIR/$db.sql
        git commit -m "$db `date +"%m-%d-%Y"`"
        git push

done

echo "Done"

The script will loop through all MySQL databases, and dump them to a .sql file (with their name).  After it is dumped, the file will be added to the local git repo and will be committed.

After each commit, the changes are pushed to the remote repo. This avoids having very big pushes to do, when working with large databases. If you want to push only once, just place the push at the end of the script.

Running the backup script

Running this script manually isn’t the best solution. Making an automated backup service of this is straightforward, just make a cronjob that executes the script every day (or any timespan you want).

Type crontab -e in the console, this will open your personal cron configuration in your favorite editor. Now add the cronjob to the crontab:

30 2 * * * /home/mathias/backup/mysql_git/backup.sh >> /home/mathias/backup_git_cron.log

This particular example will run the backup script every day at 2h30, and append the output of the script to a backup_git_cron.log file in my home directory. (Of course you are absolutely free to create any exotic cronjob that runs the backup script at your desired moment)

Big data and low-end hardware

Git works very well for small programming source files and small text files. Those database dumps, however,  aren’t always that small. On my VPS I have 200MB of database dumps, which each have to be compressed and packed for every commit. This takes a lot of time on a machine with 512MB ram, and even crashes sometimes on the largest files. While pushing I’ve seen this error way too much: error: pack-objects died of signal 9.

Some other Git users with larger files have reduced the limits regarding packing, which resulted in fewer problems packing those files:

git config --global pack.windowMemory "100m"
git config --global pack.packSizeLimit "100m"
git config --global pack.threads "1"

On my server that didn’t really seem to work (apparently I still haven’t got enough free ram): I noticed fewer problems while compressing the objects, but it still took quite some time (and crash) for the large dumps.
The solution for me seemed to be turning of the delta compression.2

echo '*.sql -delta' > .gitattributes

The above solution writes the setting to the .gitattributes file. If you commit this file, it will be turned of on any clone of the repo.

Another solution would be to migrate from Git to Mercurial. From what I’ve read, Mercurial stores diffs in stead of object packs.

There’s one huge difference between git and mercurial; the way the represent each commit. git represents commits as snapshots, while mercurial represents them as diffs.

Changesets (diffs) advantage is in taking up less space. Git recovers the space used for commits by using compression, but this requires an occasional explicit recompress step (“git pack”).

When the history of the repository become too large, it is useful to do a shallow clone of the remote: git clone --depth <depth> <remote-url>. This way you don’t keep large local history, but let the remote keep it.

Conclusion

Git might not be the perfect system for backups, but using it with care (and good hardware) it can provide a decent backup system.

And it’s always better than having no backup at all!


1 Later in this blogpost I have pointed out that disabling delta compression is better on low memory machines to use less memory. Note that without delta compression Git needs to send a lot more data to the remote.2

2 Note that disabling delta compression makes that Git needs to push the full packs of large files, and can therefore not rely on delta compression. So If you change one line of  500MB file, that is packed in 100MB pack, you will always need to send that 100MB pack to the remote (instead of just 15KB) when delta compression is turned off. Without delta compression Git also needs to store all the objects of the files. After 65 commits (of some large databases), I had a repo of almost 1GB. Running git gc shrank that repo to less than 100MB. (Unfortunately, running git gc on my 512MB ram server results in those well-known issues:  error: pack-objects died of signal 9, warning: suboptimal pack - out of memory and fatal: inflateInit: out of memory)

PHP fragments in Markdown

Ever wanted to use PHP variables and functions in a markdown file and use that file to generate HTML code from the Markdown syntax? Well, it isn’t too hard…

Assume you want to parse the following file as Markdown, after executing the PHP fragment:

<?php echo $var; ?> 
-------------------

Some text...

> Maecenas sed diam eget risus varius blandit sit amet non magna.

If you simply use file_get_contents($file);, it will just show the PHP string, in stead of replacing it with the value of the variable. So we want to grab the executed code in a variable and use that variable to generate HTML.

This is done using Output Buffering Control in PHP. We start an output buffer, include the file, and close the output buffer. Everything that would normally be outputted, is now stored in the output buffer.

<?php
// start output buffer
ob_start();

// include the markdown file
// working with the output buffer allows us to use php code in the md file.
include $file;

// get the generated content from the output buffer
$md = ob_get_clean();

// parse markdown
$html = md_to_html($md);
?>

Note: If you need newlines in Markdown, you must add a space after the PHP closing tag. I have e.g. added a space after the ?> on the first line to make the markdown parser work.

Git: ignore changes in tracked file

Sometimes you have changes on a tracked file, but you want to ignore that file (but keep it in the Git tree). Adding those files to a .gitignore file will not work, because Git will not ignore tracked files.

However… You can ignore tracked files using the following command:

git update-index --assume-unchanged <file>

To stop ignoring the files, use the following command:

git update-index --no-assume-unchanged <file>

LaTeX: graphs with coordinates input

In one of my previous posts I wrote about plotting LaTeX function graphs using pgfplots. But sometimes you don’t have a function rule, but just a set of data points.

Using pgfplots you can easily plot a function using those coordinates. The following Tex code will draw a line through each of the data points.

\begin{tikzpicture}[>=stealth]
    
    \begin{axis}[
        height=\textwidth/1.5,
        width=\textwidth/1.5,
        xmin=0,xmax=4,
        ymin=0,ymax=9,
        axis x line=middle,
        axis y line=middle,
        axis line style=->,
        xlabel={$x$},
        ylabel={$y$},
    ]
        
  
    % plot some coordinates    
    \addplot[mark=*, blue, line width=1pt] coordinates {
        (0,   4)
        (0.5, 6)
        (1,   2)
        (1.5, 3.5)
        (2,   4)
        (2.5, 6)
        (3,   5)
        (3.5, 3)
        (4,   5.5)
       };
       
   \end{axis}
        
\end{tikzpicture}

Which will yield the following result:

Coordinates plotted using LaTeX pgfplots (with marker)


Naturally you can draw a line without printing dots in the points, you just set mark=none.

Coordinates plotted using LaTeX pgfplots (without marker)

Go: Interface (example)

An Interface in Go defines a behavior. Interfaces are defined with a number of methods that a type must implement. Once the methods are implemented, the type can be used wherever the interface type is needed.

Let’s for example define a Phone interface:

type Phone interface {
	Call()
}

We also define a Nokia type that implements the Phone interface. We simply need to implement the Call() function to implement the Phone interface. Languages such as Java or C# need an explicit statement that they are implementing the interface: public class Nokia implements Phone { }. In Go you just need to implement the functions:

type Nokia struct {
    //...
}

func (n Nokia) Call() {
    fmt.Println("Calling someone with my Nokia")
}

Besides the Nokia we also want an Iphone:

type Iphone struct {
    //...
}

func (n Iphone) Call() {
    fmt.Println("Calling someone with my iPhone")
}

Now we define a more generic UseMyPhone function that will use the Phone interface:

func UseMyPhone(p Phone) {
    p.Call()
}

This allows us to call the UseMyPhone function with any Phone type:

n := Nokia{}
i := Iphone{}

UseMyPhone(n)
UseMyPhone(i)

Go Playground

The ability to implement interfaces by just implementing the needed functions is called duck-typing (i.e. signature based polymorphism).

LaTeX grafieken tekenen

LaTeX is een opmaaktaal die vaak door wetenschappers gebruikt wordt. TeX is nogal handig om wiskundige formules e.d. in te voegen.

Daarnaast is het plotten van functie grafieken iets dat elke wetenschapper al wel eens moet doen. Door gebruik te maken van het pgfplots pakket, kan je mooie grafieken genereren.

Een eenvoudig voorbeeld van een grafiek ziet er als volgt uit:

\documentclass{article}
\usepackage{pgfplots}

\begin{document}

    \begin{tikzpicture}[>=stealth]
        \begin{axis}[
            xmin=-4,xmax=4,
            ymin=-2,ymax=2,
            axis x line=middle,
            axis y line=middle,
            axis line style=,
            xlabel={$x$},
            ylabel={$y$},
            ]
            \addplot[no marks,blue,] expression[domain=-pi:pi,samples=100]{sin(deg(2*x))+1/2} 
                        node[pos=0.65,anchor=south west]{$y=\sin(2x)+\frac{1}{2}$}; 
        \end{axis}
    \end{tikzpicture}

\end{document}

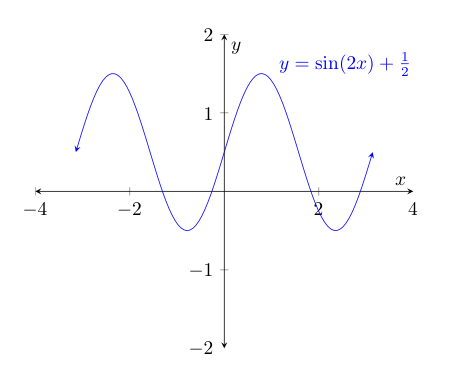
Hierbij worden eerst de assen gedefinieerd, en vervolgens de ‘plots’ die op de grafiek moeten terecht komen. In dit geval is dat de functie: f(x) = sin(2x)+1/2. Daarnaast wordt er ook nog een ‘node’ toegevoegd om de naam van de functie weer te geven. (Dit kan uiteraard weggelaten, of ergens anders gezet worden).

Bovenstaande code genereert deze grafiek:

LaTeX functiegrafiek met pgfplots
Grafiek van functie geplot met pgfplots


In het code voorbeeld is grafiek inline gedefinieerd. Je positioneert dus zelf de grafiek door de code in te voegen op de juiste plaats in de tekst. Wil je dit overlaten aan de LaTeX typesetter, dan moet je er een ‘float’ van maken. Dit doe je door er een ‘figure’ van te maken:

\begin{figure}[h!]
    
    \center
    
    %grafiek...
    
    \caption{$y=\sin(2x)+\frac{1}{2}$}
 
\end{figure}

Nginx SSL certificaat: “bad end line error”

Wanneer je een certificaat bundel creëert voor SSL in Nginx (zie vorige post), kan het zijn dat Nginx een “bad end line error” geeft. Je krijgt dan zo’n error:

nginx: [emerg] PEM_read_bio_X509_AUX("/home/mathias/Sites/certificaat/mactua/ssl_bundle.cert") failed (SSL: error:0906D066:PEM routines:PEM_read_bio:bad end line)

Dit komt meestal doordat één van de SSL certificaten die je concateneert geen newline heeft op het einde van het bestand. Ergens in het bestand staan de -----END CERTIFICATE----- en -----BEGIN CERTIFICATE----- dan op dezelfde lijn:

-----END CERTIFICATE----------BEGIN CERTIFICATE-----
MIIEYDCCA0igAwIBAgIDAjp7MA0GCSqGSIb3DQEBCwUAMEIxCzAJBgNVBAYTAlVT
MRYwFAYDVQQKEw1HZW9UcnVzdCBJbmMuMRswGQYDVQQDExJHZW9UcnVzdCBHbG9i
YWwgQ0EwHhcNMTQwOTA4MjIyMTAxWhcNMjIwNTIwMjIyMTAxWjCBgTELMAkGA1UE
BhMCTkwxITAfBgNVBAoTGEludGVybWVkaWF0ZSBDZXJ0aWZpY2F0ZTEdMBsGA1UE
CxMURG9tYWluIFZhbGlkYXRlZCBTU0wxMDAuBgNVBAMTJ0ludGVybWVkaWF0ZSBD
ZXJ0aWZpY2F0ZSBEViBTU0wgQ0EgLSBHMjCCASIwDQYJKoZIhvcNAQEBBQADggEP
GkpNxwiDmGZ63GNdIQh7ogwUVVcp7gGVJiafnWs2JbQ4BJjHoKKNCAG2abpX9hK4
NmWFjOQSWTD+CICx/w1Nrln016P6IaWpm06Dahvf/V0eHwYIRoOAs0yQpYpTx0bv
h42NfwQ1t0B6e0oegaPWqSk174u3g9f2q6UF2J6oEPhHXYM9WSW0yDkvB8BCDboR
Qfg6VhFW8bMT3NglYYQ1+VndfdV0nv4pnn0A/Ueb3OWQ6Ercfjgk3fDPib0PSM3d
+tkygLHpQjbP5vimhYdUR8v3lJGZ97RyO8sCAwEAAaOCAR0wggEZMB8GA1UdIwQY
MBaAFMB6mGiNifurBWQMEX2qfWW4ysxOMB0GA1UdDgQWBBRjHKinsZM1jxZ2nuX6
X8jmrb8vuTASBgNVHRMBAf8ECDAGAQH/AgEAMA4GA1UdDwEB/wQEAwIBBjA1BgNV
HR8ELjAsMCqgKKAmhiRodHRwOi8vZy5zeW1jYi5jb20vY3Jscy9ndGdsb2JhbC5j
cmwwLgYIKwYBBQUHAQEEIjAgMB4GCCsGAQUFBzABhhJodHRwOi8vZy5zeW1jZC5j
b20wTAYDVR0gBEUwQzBBBgpghkgBhvhFAQc2MDMwMQYIKwYBBQUHAgEWJWh0dHA6
Ly93d3cuZ2VvdHJ1c3QuY29tL3Jlc291cmNlcy9jcHMwDQYJKoZIhvcNAQELBQAD
ggEBAD9XFBXM6iyefu/EIo19K8MivUbCNVXCSDcvV/nqRNP65ulo1B1bZbPK85+8
1nEDXCFCUeVsHkkSwMM8SCCm9qytdmWzK6rwsQkaJdfNyixsGVLH0kwUvHR/plTj
9/A2+VZpcdIhPQwS6PR8BULwXAU/oRzPekEJnehEbBR1mo8UJfdZSCJTShsIuSQB
Qx275wDIVMH7A5O9GXN/e7WVTxUa8wKWCruzZ9pS7gpifkcsTUH+c1a5C2vQNqRh
vPM2w6gkpyaonh9mKO0F4Z5iqvE=
-----END CERTIFICATE----------BEGIN CERTIFICATE-----

Dit los je op door zelf even met Vim (of je lievelingseditor) de end line in orde te brengen.

Nginx even herstarten en alles zou geregeld moeten zijn…

SSL certificaten installeren in Nginx (Comodo)

Sinds vandaag is denbeke.be beveiligd met een SSL certificaat. In deze blogpost leg ik uit hoe je zo’n certificaat (in dit geval een Comodo PositiveSSL) moet installeren in een Nginx configuratie.

Een SSL certificaat, de defacto standaard in het beveiligen van communicatie over het internet versleutelt persoonlijke of gevoelige informatie zoals credit card gegevens, wachtwoorden, namen en adressen die worden verstuurd via uw website. Hierdoor is een SSL certificaat een belangrijk element in het verzekeren van de online veiligheid van uw bezoekers en het verlagen van het risico op fraude of phishing.

Algemene beschrijving SSL door een provider: Hostbasket


CSR (Certificate Signing Request) genereren

Vooraleer er van start kan gegaan worden met een SSL certificaat, moet er uiteraard zo’n certificaat aangevraagd worden bij een CA (Certificate authority). Hiervoor is een CSR vereist. Dit kan met OpenSSL in de command line.

$ openssl req -nodes -newkey rsa:2048 -keyout myserver.key -out server.csr

Deze CSR moet je opgeven aan de CA.  De certificate authority zal dan voor jou het SSL certificaat genereren. (Je kan ook zelf certificaten generen, maar dan krijgen alle bezoekers een melding dat de identiteit van het certificaat niet gecontroleerd kan worden.) Vergeet het myserver.key bestand niet te backuppen. Het is je eigen unieke private sleutel.


Bundle creëren

Je moet de site certificaten en root/intermediate certificaten samenvoegen (in omgekeerde volgorde: beginnen bij het server certificaat, en eindigen met de ROOT). Dit kan ook snel met de command line.

$ cat denbeke_be.crt COMODORSADomainValidationSecureServerCA.crt COMODORSAAddTrustCA.crt AddTrustExternalCARoot.crt > ssl_bundle.crt


Nginx configuratie

Je hebt nu twee bestanden: ssl_bundle.crt en myserver.key. Deze moet je nu toevoegen aan je Nginx configuratie. (Uiteraard moet je ook SSL activeren, en zien dat de firewall poort 443 open staat. )

server {
  listen  80;
  listen 443 default_server ssl;
  ssl_certificate      /etc/ssl/certs/ssl_bundle.crt;
  ssl_certificate_key  /etc/ssl/certs/myserver.key;
}