Dynamic Consistency Boundaries (DCB) for Event Sourcing

What if we could get rid of the aggregate in event sourcing? The aggregate gives strong consistency, and what happens the day a business rule has to reach across two of them. This post is about that, and about a pattern I’ve come to rely on called Dynamic Consistency Boundaries (DCB). The short version: instead of carving consistency into fixed structures at analysis time, you express it as a per-command predicate over your event log.

I’ll keep this at the level I’d want if I were picking this up myself: no safety net around event sourcing and aggregates, straight into the concurrency model, the storage side, and the trade-offs. There’s Go, because that’s what the store is written in. If you’d rather have the pitch first, this overview post about DCB (Dutch) walks the same idea without the code.

The aggregate as a static consistency boundary

In classic event sourcing you pick a bounded fragment of your domain (one customer, one order, one product) and give it its own event stream. The rule is simple:

The aggregate is the unit of strong consistency.

Enforcing it is straightforward. Every aggregate stream carries a monotonically increasing version. The command handler reads the stream up to version N, makes its decision against that snapshot, and appends new events only if the stream is still at version N. Plain optimistic concurrency:

append(stream, expectedVersion = N, events)
  succeeds only if head(stream).version == N
  otherwise Conflict, then reload and retry

That’s a compare-and-swap on a single stream head. Cheap, embarrassingly parallel (streams are independent), and it guarantees serializability of everything that touches one stream. The catch: two things that must always change together must live in the same aggregate. There’s no way around it.

The problem is that this boundary gets locked in during analysis, before any code runs. Whether a rule can be enforced atomically is decided by how you carved up your aggregates, not by the shape of the rule itself.

When the rule crosses the boundary

Take an order placement that has to check two things on its own:

  • this product still has stock (the product:123 aggregate)
  • this customer is still within their credit limit (the customer:456 aggregate)

Those live in separate aggregates. There’s no single stream head to compare-and-swap against, so you can’t express “append order events iff both of these still hold” in one atomic write. A decision that’s conceptually one transition has been split into two.

The usual workarounds are all compromises:

The God aggregate. Fold everything into one giant stream. Now the rule is checkable, but you’ve serialized the whole domain on one lock. Two unrelated customers now contend for the same stream head, parallelism evaporates, and the aggregate turns into an object nobody wants to maintain.

Sagas / two-phase commit. Coordinate the two boundaries with a saga. You add coordinating events, a temporary inconsistent intermediate state that other readers can observe, and a compensation path for when the second leg fails. It works, but the machinery is real: an invariant that’s naturally atomic has become a distributed transaction by construction.

Re-carving the boundaries. If you guessed your granularity wrong, fixing it means re-streaming your event history into new streams. That’s a migration you don’t want to run against a live system.

DCB: consistency as a predicate, not a partition

DCB keeps the optimistic-append mechanism from classic event sourcing but changes what you compare-and-swap against. The unit of concurrency stops being “a stream” and becomes a query over event tags.

Concretely:

  1. Every event is tagged when it’s written. A UserSignedUp event carries a tag like username:alice. Tags are the raw material of your boundaries.
  2. A consistency boundary is a predicate over tags (and event types). For a uniqueness rule, the predicate is “events tagged username:alice.”
  3. A command is a read-then-conditional-append. You read the events in scope up to position P, make your decision, and append your new events with the condition “fail unless nothing matching my predicate has been appended since position P.”

That last sentence is the whole trick, which is why the interface matters more than the plumbing.

The interface

Here’s the store interface the idea needs. It’s smaller than you’d expect, because the hard part lives entirely in AppendCondition:

package eventstore

import (
	"context"
	"errors"
	"iter"
)

// AppendCondition enforces optimistic concurrency: the append fails with
// ErrAppendConditionViolated if the store contains any event matching Query with
// a sequence number strictly greater than After, i.e. someone changed relevant
// state since you last read it. After 0 checks against all events.
//
// Query uses the usual semantics, so a nil/empty Query matches EVERY event: such
// a condition fails if any event at all was appended after After (a global
// "nothing changed since" guard, rarely what you want for a scoped boundary).
type AppendCondition struct {
	Query Query
	After uint64
}

// ErrAppendConditionViolated is returned by Append when the AppendCondition is
// violated, meaning relevant state changed since the caller last read.
var ErrAppendConditionViolated = errors.New("append condition violated")

// Store reads and appends events.
type Store interface {
	// Read returns an iterator over events matching the query with a sequence
	// number strictly greater than after. Pass 0 to read from the beginning.
	Read(ctx context.Context, query Query, after uint64) iter.Seq2[SequencedEvent, error]

	// Append atomically persists events. If condition is non-nil, the append
	// fails with ErrAppendConditionViolated when the store contains any event
	// matching condition.Query with a sequence number greater than condition.After.
	Append(ctx context.Context, events []Event, condition *AppendCondition) error
}

Three decisions are doing the work here, and they’re worth calling out:

1. The boundary is a Query, not a stream name. In classic event sourcing this type would be a stream ID plus an expected version; the boundary is baked into the data model. Here the boundary is an argument the caller constructs. The store has no notion of a “stream” at all, only tags and sequence numbers. That’s the whole point: the store can’t lock you into a fixed granularity because it never knew one.

2. After is a monotonic sequence, not a version. A per-stream version only tells you about that stream. A sequence number lets one condition cover events across many tags: you read “product:123 OR customer:456” and record a single high-water mark After. Classic optimistic concurrency would force you to check two version numbers separately, which is two races to worry about. Here the store compares After against any matching event; that’s the “did anything I depend on move?” check you actually want.

3. Query needs a scoped boundary. This isn’t hygiene, it’s a hard storage constraint. A nil or type-only query matches everything, which means there’s no boundary to lock on. Our store refuses those conditions, because enforcing them would serialize the whole type. Every condition has to carry at least one event-type-plus-tag combination you can lock on. I’ll come back to why in the storage section.

Making decisions with projections

The practical bit is that building a condition is usually driven by a projection, not by fiddling with raw events. We read the facts we need into a projection state, and BuildDecisionModel both fills that state and records the After position for us. The decision is then a plain check against the projection, and the append is guarded by the same boundary we read from.

Here’s user sign-up, where the invariant is “the username is unique”:

// signUp registers a new user, failing if the username is already taken.
func signUp(ctx context.Context, store eventstore.Store, username string) error {
	exists := usernameExistsProjection(username)
	condition, err := eventstore.BuildDecisionModel(ctx, store, &exists)
	if err != nil {
		return fmt.Errorf("could not build decision model: %w", err)
	}
	if exists.State {
		return fmt.Errorf("username %q is already taken", username)
	}
	event, err := eventstore.NewEvent("UserSignedUp", username, eventstore.NewTags("username", username))
	if err != nil {
		return fmt.Errorf("could not create event: %w", err)
	}
	return store.Append(ctx, []eventstore.Event{event}, condition)
}

Follow the concurrency through, because the pieces line up neatly:

  1. usernameExistsProjection(username) declares the query, scoped to the tag username:<this name>.
  2. BuildDecisionModel reads the matching events, folds them into the projection (exists.State), and captures the After position the append will check later.
  3. If exists.State is true, someone already signed up with this name and we reject. No conditional append needed.
  4. Otherwise we create the UserSignedUp event, tagged with the same username it guards, and append with the condition built in step 2.

The subtle part is that the event is tagged with exactly the same tag the uniqueness boundary locks on. Two concurrent signUp("alice") calls both read “no username:alice event present,” both build a condition with the same After, and only one wins the append. The loser gets ErrAppendConditionViolated and retries against a fresher read, where exists.State is now true. So “exactly one alice” falls out of the same guard that checks stock and credit. No reservation table, no separate uniqueness index, and atomicity spans however many tags the rule needs in a single guarded append.

The intro’s order example is the same pattern. Instead of a fixed aggregate that forces stock and credit into one stream, you model two projections (stock for product:123, outstanding credit for customer:456), build a decision model whose boundary spans both tags, decide against both states, and append the order event tagged with both product:123 and customer:456. Two invariants over two independent things, atomically enforced in one conditional append.

The storage contract

Everything above leans on a single guarantee, and the rest is implementation detail:

Atomic read-and-conditional-append. A command reads the events it needs, notes the position After, and appends its new events such that the guard “no event matching condition.Query has a sequence greater than condition.After” is evaluated atomically at the moment of write, with the event durably stored before the call returns. If relevant state changed since your read, Append returns ErrAppendConditionViolated and you retry.

If that guard is ever evaluated against something other than the point of write, DCB silently turns into an expensive per-event race. Keep that one sentence in mind and every storage design becomes an answer to “how do I make this atomic under concurrency without going slow?”

We implement it on Postgres. The wrinkle there is sequence-number assignment: give each boundary its own lock and positions commit out of order, which breaks a plain monotonic cursor. My Postgres benchmark post goes through the locking strategies (global, per-boundary, hybrid, and the staging + flusher design we use) and shows that spread, human-paced workloads get single-digit-thousands of appends per second on managed Postgres. If you want the “how,” that’s the place to read it. Here it’s enough to know the guarantee everything depends on.

One consequence of that guarantee does shape your code, so I’ll pull it into this article: an append condition must be scoped to a real boundary. It needs at least one event-type-plus-tag combination (like UserCreated tagged user:123) to serve as the lock key. A bare type-level condition such as “no UserCreated exists anywhere” has no boundary to lock on, so we disallow it; it would force a global lock over the whole type and kill the per-boundary concurrency every fast strategy relies on. When you build decision models, scope them to real tags.

What becomes trivial

Once uniqueness is just “append failed because something touched my tag,” a few things stop being problems:

  • Uniqueness constraints (at most one reservation for slot T, a username that can’t be registered twice) stop being separate reservation tables or read-model gymnastics. They’re a predicate over a tag (slot:Tusername:alice) that the append already checks. The signUp example above is the whole pattern.
  • Exactly-once / double-submit. Tag with the idempotency key; a replayed submit is just a conflicting append.
  • New invariants without re-streaming. A new rule over existing tags is a new query, not a new structure. Nothing to migrate. You only re-stream if you discover you failed to tag something you later need, which is why tag selection is design, not an afterthought. We measured this and it held up; see the DCB benchmark (Dutch).

The trade-offs

DCB isn’t free, and if you reach for it you should be able to say why it beats a saga for your particular invariant:

  • Read amplification and hot tags. The guard is a query over your tags. A customer:456 that participates in half your writes becomes a contention hot spot, exactly like a single stream would. The skill is tagging just precisely enough: the boundary should be the minimal set of tags the rule truly needs. Tag too broadly (“this busy customer’s everything must always move together”) and writers pile onto the same tag and retry in lockstep, and your parallel throughput collapses to aggregate-class serialization.
  • Boundary-scoped conditions are mandatory. An empty or type-only query has no lock key, so it’s disallowed. That’s a real constraint on how you write decision models, not a style preference, and it follows directly from the storage contract above.
  • The read and the append must share the atomicity boundary. If the position captured by BuildDecisionModel and the guard inside Append aren’t evaluated against the same moment of write, DCB silently degenerates into an expensive per-event race. Most of the painful production stories I’ve seen come from splitting this, not from the concept.
  • Retry is part of the contract. Because the guard can fail under real concurrency, handlers have to be written as read, decide, append, and on conflict re-read with idempotent decision logic. That’s a discipline, not a bug.
  • It doesn’t fix distributed systems. DCB gives you atomicity across tagged scopes on one log. It doesn’t hand you multi-node linearizable transactions for free; if your boundaries span physical partitions you’ve shipped a distributed transaction and all its problems, whatever you call the boundary. Within a single node, where most event-sourced systems actually live, this is a non-issue.

The log already is the tagged, append-only substrate a predicate needs, and the read model is just another projection (Dutch) over it. You don’t add a consistency engine to an event-sourced system; you add tags at write time and a scoped query plus an After at command time.

Wrapping up

Event sourcing gives you a memory that grows with your domain. DCB makes the rules spanning several parts of that memory reliably enforceable, with an interface small enough to fit on a slide: Read(query, after) and Append(events, &AppendCondition{Query, After}). The boundary is no longer a structure you committed to during analysis; it’s a predicate you choose per command, built from a projection and guarded by a scoped condition. For a business rule that’s genuinely dynamic, that’s where the decision belongs.

I keep coming back to a simple test for a pattern: does it remove machinery? If you find yourself building a saga to stitch together two aggregates that a single invariant actually binds, it’s worth asking whether the boundary should have been a scoped query all along. The spec has the full details if you want them.
Can DCB event sourcing be fast and flexible? A Postgres benchmark

Classic event sourcing has a rule: one aggregate, one stream, one consistency boundary. It is simple and it scales, but it is rigid. The moment you need an invariant that spans two aggregates, you are writing sagas and workarounds.

Dynamic Consistency Boundaries (DCB) are meant to remove that constraint. The recurring objection is that they are slow. So I built a small DCB framework in Go on top of Postgres and benchmarked the append path. All concurrency is handled in the database, not the application, so the Go side is stateless: you can run many instances in parallel and still get full consistency. And it is plain Postgres, so anyone can reproduce it.

What is wrong with classic event sourcing?

The aggregate is your consistency boundary. Strong consistency exists only inside one aggregate’s stream, enforced with a version number and optimistic locking. You get small transactions, no distributed locks, and clean concurrency control.

The cost is that the boundary is fixed at design time. You decide it while modelling your events: which event belongs to which stream. If two things must change together they have to share an aggregate, and a rule that spans separate aggregates cannot be enforced in one transaction. Getting it wrong means re-streaming events later, a migration you do not want to run on a live system.

What is DCB then?

DCB makes consistency a condition defined per command, as a query over the events, instead of a fixed boundary. You read the events your decision needs, record the position you read up to, and on append the store checks that no new matching events arrived in between. Same optimistic locking, dynamic boundary.

Events carry tags, and a boundary is a query over those tags. Boundaries therefore do not need to be known up front: a new requirement is a new query over tags that already exist, with no re-streaming. The one design-time commitment that remains is the tags themselves. Forget to tag something you later need, and you have to backfill it.

For the theory and the “Killing the Aggregate” talk behind it, see dcb.events.

The setup

The store is Scaleway Managed Database for PostgreSQL. I did not self-host Postgres on a VM; these are managed database nodes, so the numbers reflect the standard managed offering out of the box. Client to database round-trip was about 11 ms.

  • 10,000,000-event store.
  • 64 concurrent writers by default, plus a sweep over the number of users.
  • A real DCB append with condition=check: the in-lock condition check runs.
  • Overlap = the fraction of writes aimed at one shared boundary. 0% means every writer hits its own entity, 100% means all hit the same one.

Two managed-database node types appear in the charts:

  • Small node: PLAY2-PICO, 1 vCPU, 2 GB RAM. About €10/month.
  • Big node: general-purpose, 32 vCPU, 128 GB RAM. About €1,580/month (€2.17/hour).

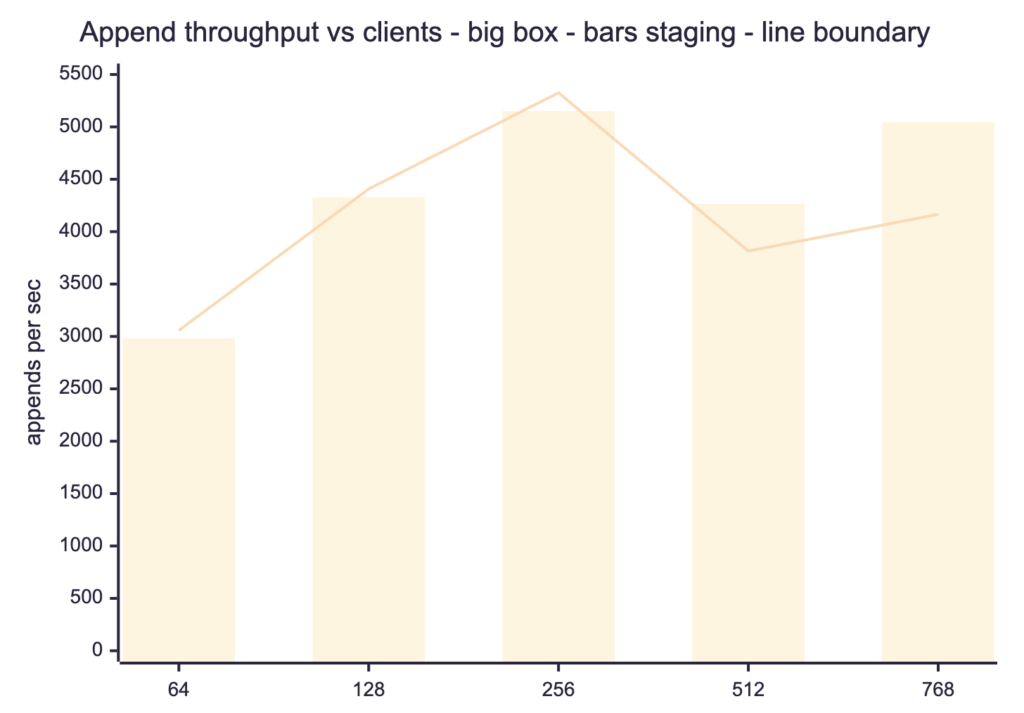
The small node does about 2,800 appends/s with staging; the big node reaches about 5,000/s. Roughly 150x the price for under 2x the throughput. The ceiling is the database write path, not the core count.

One caveat before the numbers: absolute throughput varied about 3x between hosts at identical spec, purely from commit fsync latency. Benchmark your own target and trust ratios over absolute values.

Four locking strategies I compared

  • Global lock. One advisory lock, every append serializes. Consistent, plain uint64 cursor, simple. Throughput-capped.
  • Per-boundary locks. A lock per (type, tag, value), so different entities append in parallel. Fast, but positions commit out of order, so it needs opaque xid8 cursors.
  • Hybrid. Per-boundary locks for the check, global lock for the insert. Gap-free, but lands at global speed.
  • Staging + flusher. Appends land concurrently in a staging buffer; a single flusher moves them to events in order.

There is one design rule that makes all of this lockable: an append condition must be scoped to a boundary. It needs at least one event-type-plus-tag combination, for example UserCreated tagged user:123, which becomes the lock key. A bare type-level condition like “no UserCreated exists anywhere” has no boundary to lock on, so I disallow it. It would force a global lock over the whole type and defeat the per-boundary concurrency the other strategies rely on.

The results

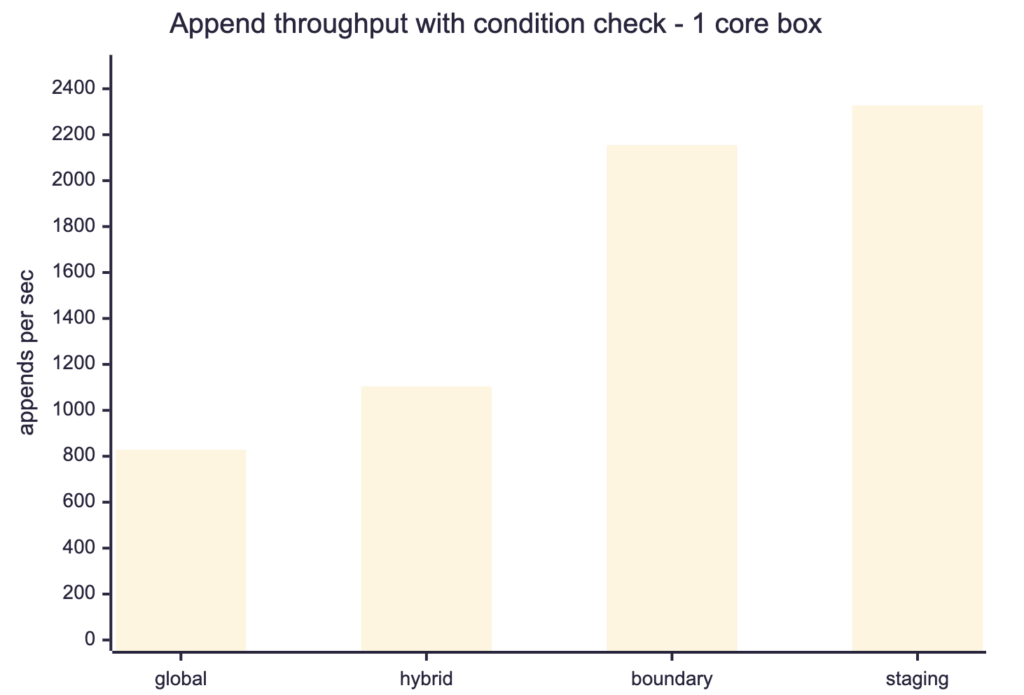
The global lock is flat across overlap (about 1,250 to 1,580 appends/s) and does not scale with cores. It serializes everything. That is the baseline.

Per-boundary runs 2x to 5x faster at 0% overlap, and the gap grows with cores and concurrency, up to about 6,900 appends/s at 512 users on the big node. At 100% overlap it decays back to global, because all keys collapse into one.

The hybrid lands at roughly global speed. It gives up parallel commits to stay gap-free, which is the whole reason per-boundary was fast. Skip it.

Four-way comparison on the small node, condition check on:

Throughput vs clients on the big node (bars staging, line boundary):

The ceiling is the database write path, not the lock: WAL plus hot-page index contention. 5K versus 15K IOPS made no difference, and disabling fsync did not raise the per-boundary ceiling.

The key insight

The problem with per-boundary locks is when the sequence number is assigned. It is allocated at insert time, before the transaction commits, and concurrent transactions commit in a different order than they took their numbers. So transaction B can grab sequence 101 and commit while transaction A still holds 100 uncommitted. A consumer tailing events by sequence number sees 101 become visible, advances its cursor past 100, and when A finally commits it has already skipped event 100. That is the gap, and it is why a plain monotonic cursor is no longer safe.

This is also why per-boundary is fast: the speed comes from many appends fsync-ing concurrently (group commit), and that concurrency is exactly what lets commit order diverge from assignment order. The hybrid serializes the commit to keep the sequence gap-free, and in doing so throws the speed away.

The per-boundary throughput is the parallel commits, and the parallel commits are the gap.

So the apparent choice is: consistency and a plain cursor (global, hybrid), or throughput (per-boundary, with opaque xid8cursors). Unless you stop serializing the write and serialize only the sequence assignment, which is what staging does.

Can we have all four properties?

That is the staging strategy. Appends land concurrently in a small staging buffer; a single flusher moves them into events in order. One writer into events keeps sequence_number gap-free and monotonic, so consumers keep a plain uint64 cursor. The condition check reads staging and events together, so it stays consistent across multiple boundaries.

propertyglobalboundaryhybridstaging
multi-boundary DCB
gap-free consistency
plain uint64 cursor
per-boundary concurrency

It is also fast: about 2.8x global on the small node, around 5,000 appends/s on the big node, and at high client counts it beats per-boundary (5,045 vs 4,165 at 768 clients), because each append hits the small staging buffer instead of the 10M-row events indexes. The flusher pays the big-index cost once per batch.

On a 100M-event table the numbers barely moved (staging peaked at 6,238/s at 256 clients) and the single flusher held the backlog at zero. The condition check short-circuits on the primary key regardless of history depth.

But it is not free

  • Eventual read-visibility, which is normal event sourcing. An append lands in staging and appears in events on the next flush, tens of milliseconds later. This is the eventual consistency you already have in CQRS: projections and read models always lag the write side. Staging adds a small constant to a lag you already design around. Strong-consistency decisions are unaffected, since the check reads staging and events together.
  • A flusher daemon. A single, always-on, leader-elected process. If it stops, staging fills.
  • About 2x write amplification. Every event is written twice. Fine for small and medium events; for large write-bound events the edge returns to per-boundary.
  • A conditional ceiling on hot boundaries. A conditional append to a boundary with a pending staging row conflicts until it flushes, so roughly one conditional append per flush cycle per hot boundary. A single hammered entity gave a 42% self-conflict rate. Fine for human-paced boundaries, not for a single hot counter.

Durability holds: staging is logged, so a successful append is on disk before it returns. A crash before the flush leaves the event in staging, flushed on restart.

What about the read side?

It is out of scope by design. In event sourcing the read side is decoupled from the write side: projections are separate consumers that tail the ordered event log at their own pace and scale independently. Staging changes nothing there, since consumers tail events by the same plain cursor. The only read on the write path is the decision read, which this benchmark exercises. The read side is a separate, well-understood concern, not a gap in these numbers.

So, is DCB fast enough to stay flexible?

Yes, with limits. For spread, human-paced workloads, which is most business event sourcing, you get flexible runtime constraints, single-digit-thousands of appends per second, and full consistency with a plain integer cursor, on managed Postgres. A single hot boundary still serializes everyone, “fast enough” depends on your workload, and staging adds a flusher daemon. But the claim that DCB cannot be fast on commodity infrastructure does not hold up.

The tech behind Adeptiq landing page. And why we rewrote everything in PayloadCMS

A few months ago I wrote about the tech stack behind Adeptiq. That post covered the backend, the AI, the infrastructure. This one covers the part I didn’t talk about: the landing page of Adeptiq.

Getting a good landing page up for a SaaS product shouldn’t be this hard. But we went through four tools and three real attempts before we found something that worked. Here’s what happened.

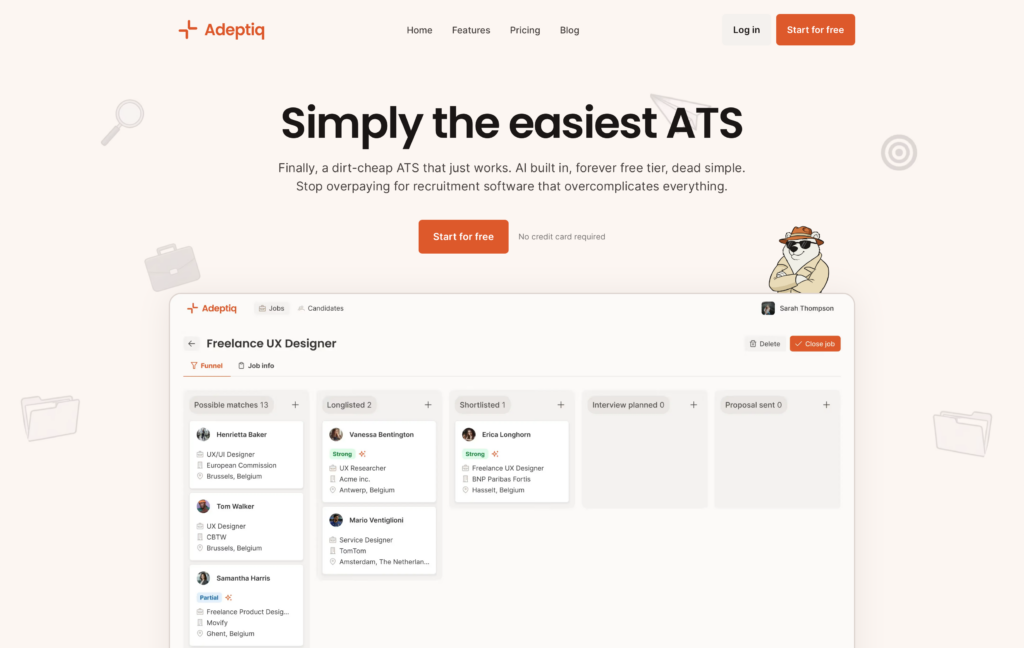
Screenshot of the current landing page of Adeptiq

Attempt 1: Vue.js + Contentful

Our app frontend is Vue.js, so the first instinct was: just build the landing page in Vue too, and use Contentful as a headless CMS so my non-technical co-founder could manage content.

It didn’t work out as well as I thought.

The fundamental problem was that a single-page application is the wrong architecture for a marketing site. Vue renders everything client-side, which means Google initially sees an empty page. SEO was bad. You can work around this with SSR or prerendering, but at that point you’re fighting the framework instead of using it. Or at least that was how I felt about it.

Contentful with Vue also did zero image optimization out of the box. Whatever image you uploaded was served at full size, in the original format. No resizing, no WebP, no AVIF. For a landing page where images matter, that’s a problem. I suppose I could have programmed all of that, but initially I didn’t want to spend too much time on the landing page.

Takeaway: headless CMS + SPA is good for apps. For a marketing site where SEO and page speed matter, it’s a mismatch.

The WordPress detour

Before moving to the next attempt, we gave WordPress a shot. Because hate it or love it, WordPress is king for SEO and theming.

We found a nice-looking SaaS theme, set it up, and… it was painfully slow. We’re talking multiple seconds of load time, even on a decent server.

We tried the usual things. Stripped unnecessary plugins, optimized images, configured caching. Didn’t help enough, the theme itself was just bloated. Pretty on the outside, heavy on the inside.

Attempt 2: Framer

After the WordPress disappointment, Framer felt like a breath of fresh air. Beautiful visual builder, gorgeous templates, and we had a good-looking landing page live within a day. My co-founder could edit content without asking me.

For a few months, it worked fine. Then we started noticing problems…

Cost. Framer limits you to 1 CMS collection on their plan. We needed separate collections for blog posts, feature pages, and legal pages. That means a Pro plan and paying per CMS. For what’s essentially a landing page with a blog, the cost adds up fast. Especially since they also charge extra per user.

CMS limitations. Maximum of 10 collections, 10,000 items per collection. No complex data relationships. Basic formatting only. No “updated date” field for blog articles — you can’t show readers or Google when a post was last refreshed. Fine for a portfolio, painful for a growing SaaS site with multiple content types.

SEO problems we actually hit. This is the big one. Framer’s heading hierarchy was broken: we had H2s jumping to H6s, which is semantically wrong and hurts SEO. Worse: Framer duplicates every content block 2–3 times in the DOM for responsive design. Google’s index showed all that repeated text, polluting our search snippets. The auto-generated sitemap.xml had no lastmod dates, so search engines couldn’t tell what was fresh.

No structured data. Framer had zero support for JSON-LD schema markup out of the box. No Organization schema, no SoftwareApplication schema, no FAQ markup. We had to manually write and inject all of it, and even then we were limited by what Framer lets you add via custom code.

SPA tracking was broken. Framer uses client-side routing, so our Matomo analytics only tracked the initial page load. Navigating between pages showed the same URL. We had to write custom JavaScript to intercept history.pushState and manually fire pageview events. Even that broke: Framer re-executes script blocks on every navigation, which meant the History API got wrapped multiple times, causing duplicate pageviews. We spent way too much time debugging this.

No MCP support for CMS operations. This one became relevant as we started using AI tools more in our workflow. Payload CMS has an official MCP plugin: you can connect Claude or other AI tools directly to your CMS and let them create posts, update pages, manage content programmatically. Framer has a third-party marketplace plugin that manipulates the design canvas, but that’s not the same thing. You can’t use it to manage your CMS content.

Framer is a great tool for getting a landing page up fast. But once you need real SEO control, structured data, multiple content types, and reliable analytics you start fighting it.

Attempt 3: Payload CMS + Next.js

This is what we’re on now, and what stuck.

Payload CMS is open-source, self-hosted, TypeScript-native, and has a first-class blocks field type. That last part is the killer feature for landing pages.

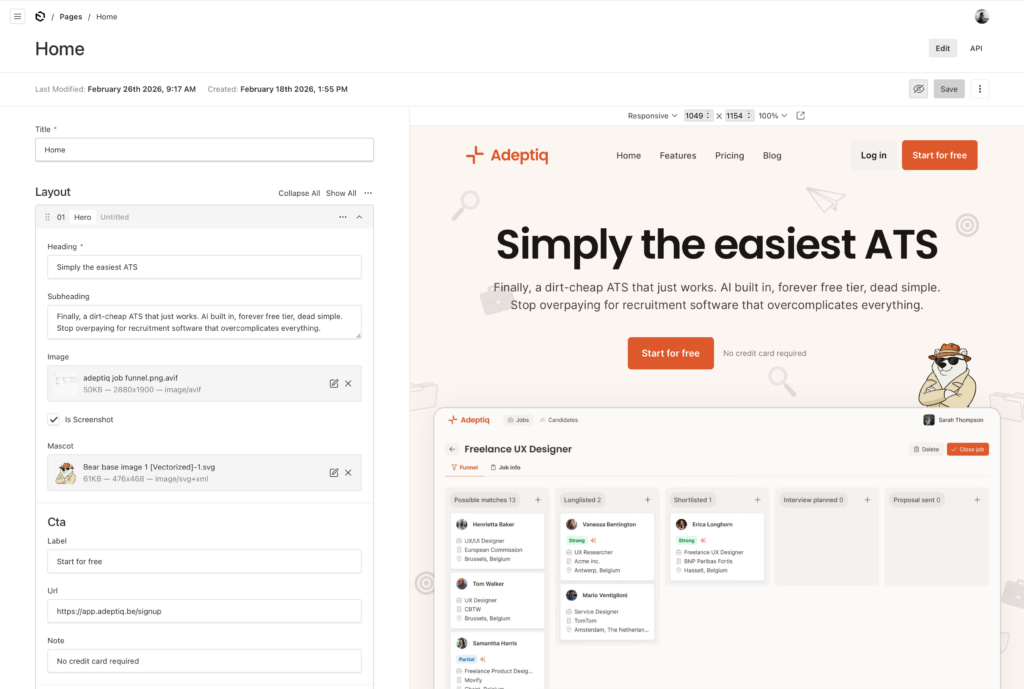
The idea is simple: as a developer, you define a set of reusable blocks: hero section, features grid, media-with-text, pricing table, FAQ, CTA banner. Each block has a fixed schema with specific fields. Your non-technical co-founder then assembles pages by picking blocks and filling in the fields. They don’t touch any styling or markup. The developer controls all rendering, all HTML output, all SEO.

It’s more work upfront than Framer. You need to design and build each block. But once they exist, building new pages is fast and the output is exactly what you want.

The frontend is Next.js, which gives us:

  • Proper server-side rendering. Clean, semantic HTML. View source and you see real content, not a JavaScript bundle. Google sees exactly what users see.
  • Built-in image optimization. Automatic AVIF/WebP conversion, responsive srcset, lazy loading. This alone was a big win over both Vue + Contentful and Framer.
  • Proper heading hierarchy. H1 → H2 → H3, as it should be. No duplicate blocks in the DOM for responsive design — just CSS doing its job.

What we built on top of Payload:

  • Rich structured data. Organization, SoftwareApplication, WebPage, FAQ, BlogPosting schemas, … all generated programmatically from our content. Every page gets the right JSON-LD automatically. No manual injection, no custom code blocks. This is something we really invested in and it was trivial to implement properly because we control the rendering.
  • Clean sitemaps with lastmod. We generate our own sitemap.xml with proper last-modified dates, because we control the build.
  • Full control over blog dates. Published date, updated date, author — all first-class fields in our blog collection.
  • MCP integration. Payload’s official MCP plugin lets us connect Claude Code to our CMS. Useful for content operations and bulk updates.
  • Self-hosted on Scaleway. Blazing fast and a fraction of the cost of Framer’s Pro plan. We were already running our infrastructure there anyway.
Admin interface in PayloadCMS allows visual editing with the predefined blocks.

The tradeoffs

I don’t want to pretend Payload is all upside. There are real tradeoffs.

You need a developer on the team. My co-founder can assemble pages and write blog posts, but adding a new block type or changing the structure requires code changes.

You’re responsible for everything Framer gave you for free: hosting, sitemaps, SSL, deployments. If you’re already comfortable with containers and infrastructure, this isn’t a big deal. If you’re not, it’s a real burden.

The initial setup takes more time. With Framer, we had something live in a day. With Payload, it took a bit longer to design the blocks, build the frontend, and set up structured data. But the ongoing maintenance is much easier.

Update after 6 months

6 months later and we still use PayloadCMS for the landing page of Adeptiq. Even more, for our landing page of Tandem Studio we also use Payload. And honestly, it just does what it needs to do. It allows us to quickly create new content, while preserving the good design and scoring good on SEO.

So 6 months later I can only stand by the recommendations I already did…

Conclusion

Don’t use an SPA framework for your marketing site. Server-rendered or static is the right call. Your app can be a SPA — your landing page shouldn’t be.

Be careful with WordPress themes. The pretty ones are often the slowest, and “optimizing” a bloated theme is a losing battle.

Visual builders like Framer are great for prototyping and getting something live fast. Use them to validate your messaging before investing in a custom setup. But expect to outgrow them once you need real SEO control, multiple content types, structured data, and reliable analytics.

The “boring” approach — code your own blocks, use a proper CMS, host it yourself — takes more time upfront but pays off as your site grows. If you have a developer on the team, it’s worth the investment.

And don’t underestimate how much your non-technical co-founder needs to own the marketing site. Whatever you build, they should be able to create pages, write blog posts, and update content without waiting on you. Payload’s block-based approach handles this well.

Four tools, three real attempts. The one that stuck was the one that gave us full control…

Building Adeptiq: tech stack of an AI-powered European ATS

Adeptiq mascotte building tech stack

A few months ago we launched Adeptiq, an applicant tracking system with AI features for CV parsing and candidate search. In this post I want to share the technical choices we made and why.

The short version: we built Adeptiq on a stack that is cloud-native, largely self-hosted, and European. For a product handling sensitive candidate data, this was a trivial choice — GDPR compliance, data sovereignty, and security aren’t afterthoughts when you’re processing people’s CVs.

The stack at a glance

  • Backend: Go + PostgreSQL + Echo
  • Frontend: Vue.js
  • Auth: Zitadel (self-hosted)
  • AI: Mistral
  • Infrastructure: Containers on Scaleway
  • CI/CD: Forgejo (self-hosted)

Backend: Go + Postgres + Echo

Go was a no-brainer for me. I’m a freelance Go developer and have been writing Go professionally for years — it’s my go-to language for backend services. The reasons are well-known: fast compile times, easy deployment (single binary), great concurrency, and a standard library that covers most needs.

For the web framework we use Echo. It’s lightweight, fast, and stays out of your way. Nothing fancy — just a solid foundation for a REST API.

PostgreSQL is the database. Boring choice, but boring is good. It handles our relational data well, and the jsonb type is useful for storing semi-structured candidate data.

Frontend: Vue.js

The frontend is a Vue.js single-page application. Vue is pleasant to work with and has a gentle learning curve. Not much else to say here — it does the job.

Authentication: self-hosted Zitadel

For authentication we use Zitadel, self-hosted. It’s a full OIDC provider that handles user management, login flows, and all the security features you don’t want to build yourself.

Why Zitadel over Auth0 or Clerk? A few reasons:

  • Security out of the box: Zitadel gives us SSO and MFA without having to implement it ourselves. For a product that stores sensitive candidate data, we wanted to lean on a battle-tested auth solution rather than roll our own.
  • Self-hosted: We control the data. No vendor lock-in, no usage-based pricing surprises.
  • Cloud-native: It’s designed to run in containers. Installation was straightforward.
  • Lightweight: It’s written in Go and doesn’t need a lot of resources.

The tradeoff is that you’re responsible for running it. But if you’re already comfortable with containers and infrastructure, it’s not a big burden.

AI: Mistral for the smart bits

Adeptiq has two AI-powered features: extracting structured data from CVs, and searching candidates using natural language queries. For both we use Mistral‘s completion models.

One thing worth noting: we do text extraction and OCR ourselves before sending anything to the LLM. PDFs are parsed and images are processed on our own infrastructure. This keeps token usage down and means we’re not paying for the LLM to read badly scanned documents.

Why Mistral over OpenAI? This one was easy:

  • European data residency: CVs contain personal data — names, addresses, phone numbers, work history. Under GDPR we have a responsibility to handle that data carefully. By using Mistral, we keep that data within Europe. No transatlantic transfers.
  • Performance: For our use case — structured extraction and semantic search — Mistral performs very well.
  • Pricing: Competitive, and predictable.

When solid European alternatives exist, why look elsewhere?

Infrastructure: containers on Scaleway

Everything runs in containers on Scaleway. We’re not using Kubernetes yet — just containers on managed instances, kept simple. Kubernetes will come once we need to scale further, but for now there’s no reason to add that complexity.

Scaleway is a French cloud provider. The pricing is transparent, the UI is clean, and European data residency is built-in. For a B2B SaaS handling candidate data under GDPR, knowing exactly where your data lives isn’t optional — it’s essential.

CI/CD: self-hosted Forgejo

For CI/CD we use Forgejo, self-hosted. Forgejo is a fork of Gitea, which itself is a lightweight Git hosting solution. It includes CI/CD runners that work well for our needs.

Why not GitHub Actions or GitLab? We already had Forgejo running for code hosting, and its built-in CI covers our use case. One less external dependency, one less place where our code leaves our infrastructure.

Wrapping up

Here’s the full picture:

LayerWhat we useThe “default” alternative
CloudScalewayAWS, GCP
AuthZitadel (self-hosted)Auth0, Clerk
LLMMistralOpenAI
CI/CDForgejo (self-hosted)GitHub Actions

Building on European infrastructure isn’t a compromise — it’s a competitive advantage. We get solid tools, GDPR compliance by default, and full control over where our users’ data lives. The tradeoff is more operational responsibility, but for a small team that knows its way around infrastructure, that’s a fair trade for independence.

If you’re curious about Adeptiq itself, check it out at adeptiq.be.

Introducing “La Trappe Melder”: Get notified when a new batch of La Trappe Quadrupel Oak Aged is released! 🍻

The last couple of days I spent on writing a web service to notify people of new La Trappe Quadrupel Oak Aged batches. Why did I spent my free time on that? Well… Reddit made me do it! And I also really like that beer 😜🍻

Where can I find this important service?

Go checkout the service at latrappemelder.denbeke.be. The source code is on Github.

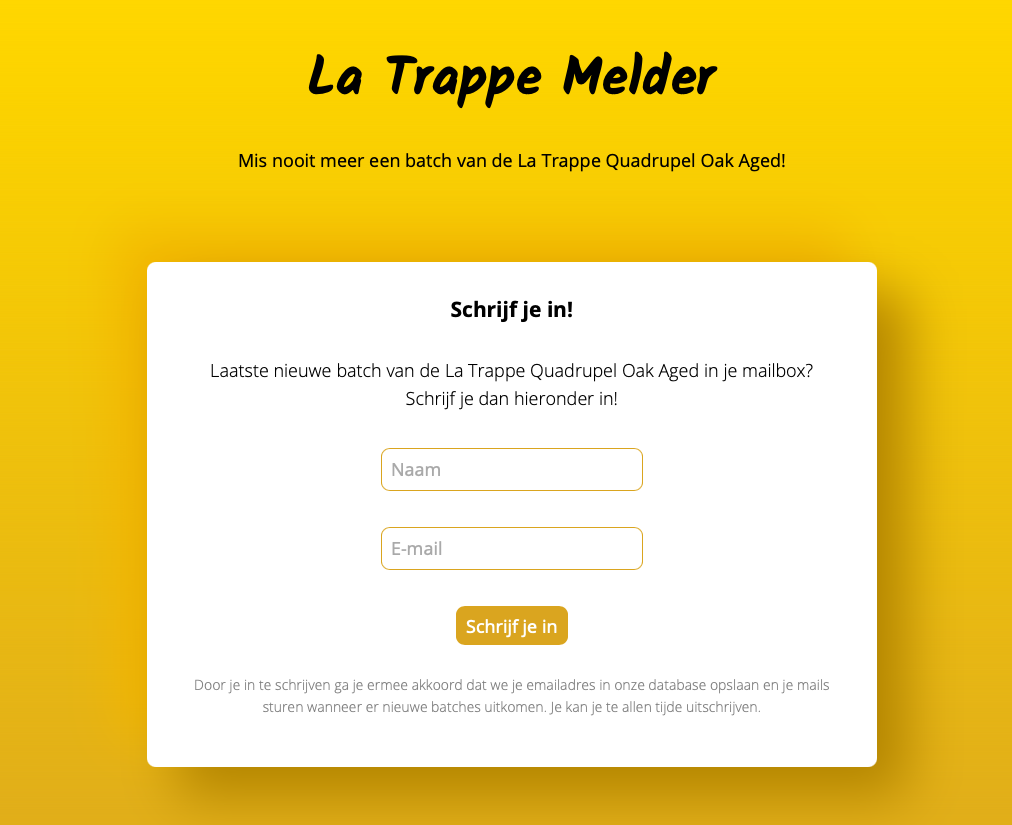
Screenshot of the frontpage.

How is the service written?

The service is written in Go. It contains an ever running job that checks the online store of La Trappe. Once the version number is incremented, the service sends out a mail to all people subscribed. It also contains a webserver to handle the front page and subscriptions.

  • Batches and subscribers are stored in a Sqlite database using Gorm as ORM.
  • Scraping is done with GoQuery.
  • Web service is written with with Echo.
  • Mails are sent through Mailgun. (But the the service itself can be configured to send through any SMTP gateway)
  • All html templates are compiled within the binary, so they are saved from memory. Alle CSS is included in the HTML, without any external assets (apart from Google fonts). So it should be fast and stable.
  • All is packed in a Docker image. In production it is served behind Traefik on a Scaleway instance.

This written in a very short amount of time, while drinking some La Trappe beers. So don’t take this as a textbook example of the perfect Go app. 😇

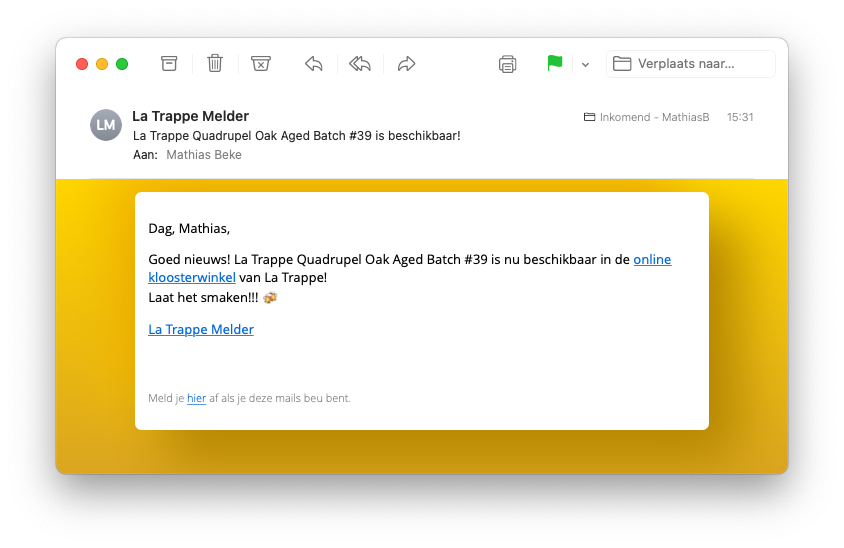
Screenshot of the email notification.

Conclusion

I probably spent too much time on a service that nobody will use. But at least it will be useful for myself and I had fun coding it!
If you find it useful, you can always offer me a beer as reward. 🙃

Using Docker on an M1 Mac by running Docker on an old Intel Mac

EDIT: There is now a Docker technical preview for M1 Macs. I checked it out, and it’s way more useful than this guide!

This guide is for you if you jumped on the Apple Silicon bandwagon and bought yourself a fancy new M1 Mac, but you need Docker from time to time.

It describes how I use an old Intel Mac as Docker host that runs all the Docker commands from my M1 MacBook Air. (You can use any remote Docker host for this, but for my setup an old Mac was more convenient.)

Install Docker

M1 (Apple Silicon) Mac: On your M1 Mac you should only install the Docker client. Since the Docker runtime won’t work on it (yet). Head over to the official Docker documentation if you haven’t go the client yet: https://docs.docker.com/engine/install/binaries/#install-client-binaries-on-macos

Intel Mac: On the Intel Mac you can follow the usual Docker installation guide: https://docs.docker.com/docker-for-mac/install/. In short: Download and follow the installation instructions in the .dmg.

Enable SSH access on the old Mac

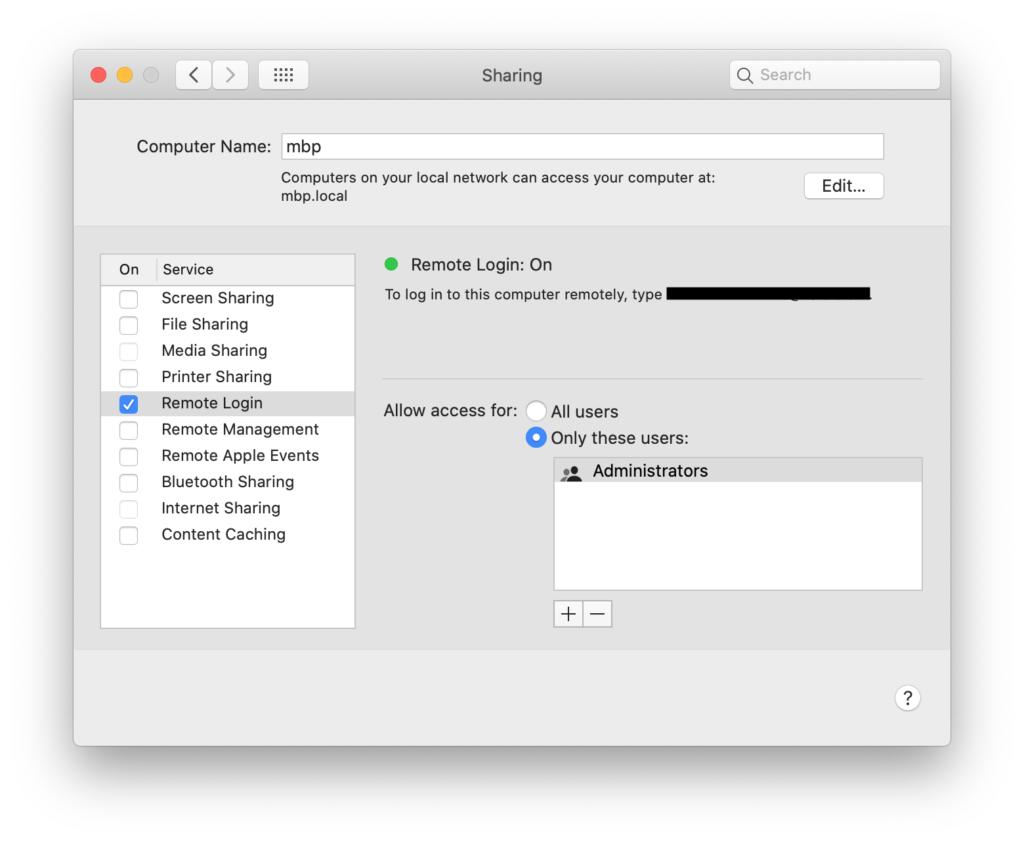
First you need to enable SSH. To do so, open System Preferences and go to Sharing.

Check the checkbox next to Remote Login to enable SSH.

In the same window I also set the computer name to something simple: e.g. mbp. That way I can easily access the machine on my local networking using: ssh myname@mbp.local. Or http://mbp.local/ for Docker services.

Screenshot 2020-12-10 at 16.01.13

In order to do passwordless login between the two Macs, you have to copy your public key to the old Mac.

First you have to generate a new key:

ssh-keygen

Just hit enter to autofill all the inputs.

Now copy the public key to the other Mac:

cat ~/.ssh/id_dsa.pub | ssh your-user@mbp.local 'cat >> ~/.ssh/authorized_keys'

This one time you will have to input your password manually.

If this step was successful, you can now SSH into the machine without entering your password. Try it out like this:

ssh your-user@mbp.local

ℹ️ Checkout this guide if you need for info: https://osxdaily.com/2012/05/25/how-to-set-up-a-password-less-ssh-login/

Enabling SSH Environments for Docker context

To allow Docker context to find the docker command on the remote machine, you have to configure the $PATH of the SSH sessions:

Edit the /etc/ssh/sshd_config file on the old Mac.

Uncomment the #PermitUserEnvironment no line and change it to PermitUserEnvironment yes

Then restart SSH by unchecking and checking the checkbox next to Remote Login in System Preferences, Sharing.

Then create a new file~/.ssh/environment with the following content:

PATH=$PATH:/usr/local/bin

ℹ️ Checkout this Github issue for more info: https://github.com/docker/for-mac/issues/4382#issuecomment-603031242

Using the Docker environment from the Intel Mac on your new M1 Mac

Last thing to do is configuring our Docker command on the M1 Mac to use the old Intel Mac. For this, we use Docker context.

First you have to create a new context:

docker context create my-old-mac --docker "host=ssh://your-user@mbp.local"

Then you can activate it using:

docker context use my-old-mac

Now you should be able to run a test container on your M1 Mac, which is actually run on your old Intel Mac behind the scenes:

docker run hello-world

Don’t forget that if you run webservices with Docker on the old Mac, that you can’t access them via localhost, but that you have to use the hostname of the Mac where Docker is running: mbp.local

Conclusion

It isn’t rocket science to run Docker on your old Mac, but it’s not the most pratical solution.
So let’s hope that the Apple Sillicon Macs get Docker support soon!

I built a portfolio website for a photographer: dylancalluy.com

A couple of months ago, Dylan Calluy — an aspiring Antwerp-based photographer — asked me to build a portfolio website for him. He wanted a nice-looking gallery to share his work with the world.

So we designed the website together. Then I handcrafted the responsive web application for him, combined with a sleek web interface where Dylan can manage all his beautiful content all by himself.

Go check it out at dylancalluy.com!

dylancalluy.com

For the more tech savvy people:

  • The front-end is a SPA, built with VueJS.
  • The back-end is a headless WordPress installation with custom admin pages and custom REST routes to allow Dylan for managing all his content.
  • For the contact form I use my own service called MailBear. It is an API to which you can send POST requests containing the form data. MailBear then sends it to the recipient (Dylan in this case).
  • All is served with Caddy webserver.
  • Everything is running in its own Docker container.

Configuring Wireguard VPN with wg-access-server

For years I have used IPSec and OpenVPN, but they are not always the easiest to setup. Recently I discovered how simple VPN config can be with Wireguard. If you follow this guide, you can have a VPN up and running in less than 10 minutes (given that you know Docker).

Introduction

Wireguard

If you’re reading this, you problably already know that Wireguard is an open source, modern VPN that aims to be performant and easy to configure.

Read more on their website about it if you don’t believe me 😉

WireGuard® is an extremely simple yet fast and modern VPN that utilizes state-of-the-art cryptography. It aims to be faster, simpler, leaner, and more useful than IPsec, while avoiding the massive headache. It intends to be considerably more performant than OpenVPN. WireGuard is designed as a general purpose VPN for running on embedded interfaces and super computers alike, fit for many different circumstances. Initially released for the Linux kernel, it is now cross-platform (Windows, macOS, BSD, iOS, Android) and widely deployable. It is currently under heavy development, but already it might be regarded as the most secure, easiest to use, and simplest VPN solution in the industry.

wg-access-server

Even though Wireguard is not hard to setup, there is something that makes the setup even simpler:

wg-access-server is an open source project that combines Wireguard with an admin interface in one easy to install binary:

wg-access-server is a single binary that provides a WireGuard VPN server and device management web ui. We support user authentication, 1 click device registration that works with Mac, Linux, Windows, Ios and Android including QR codes. You can configure different network isolation modes for better control and more.

This project aims to deliver a simple VPN solution for developers, homelab enthusiasts and anyone else feeling adventurous.

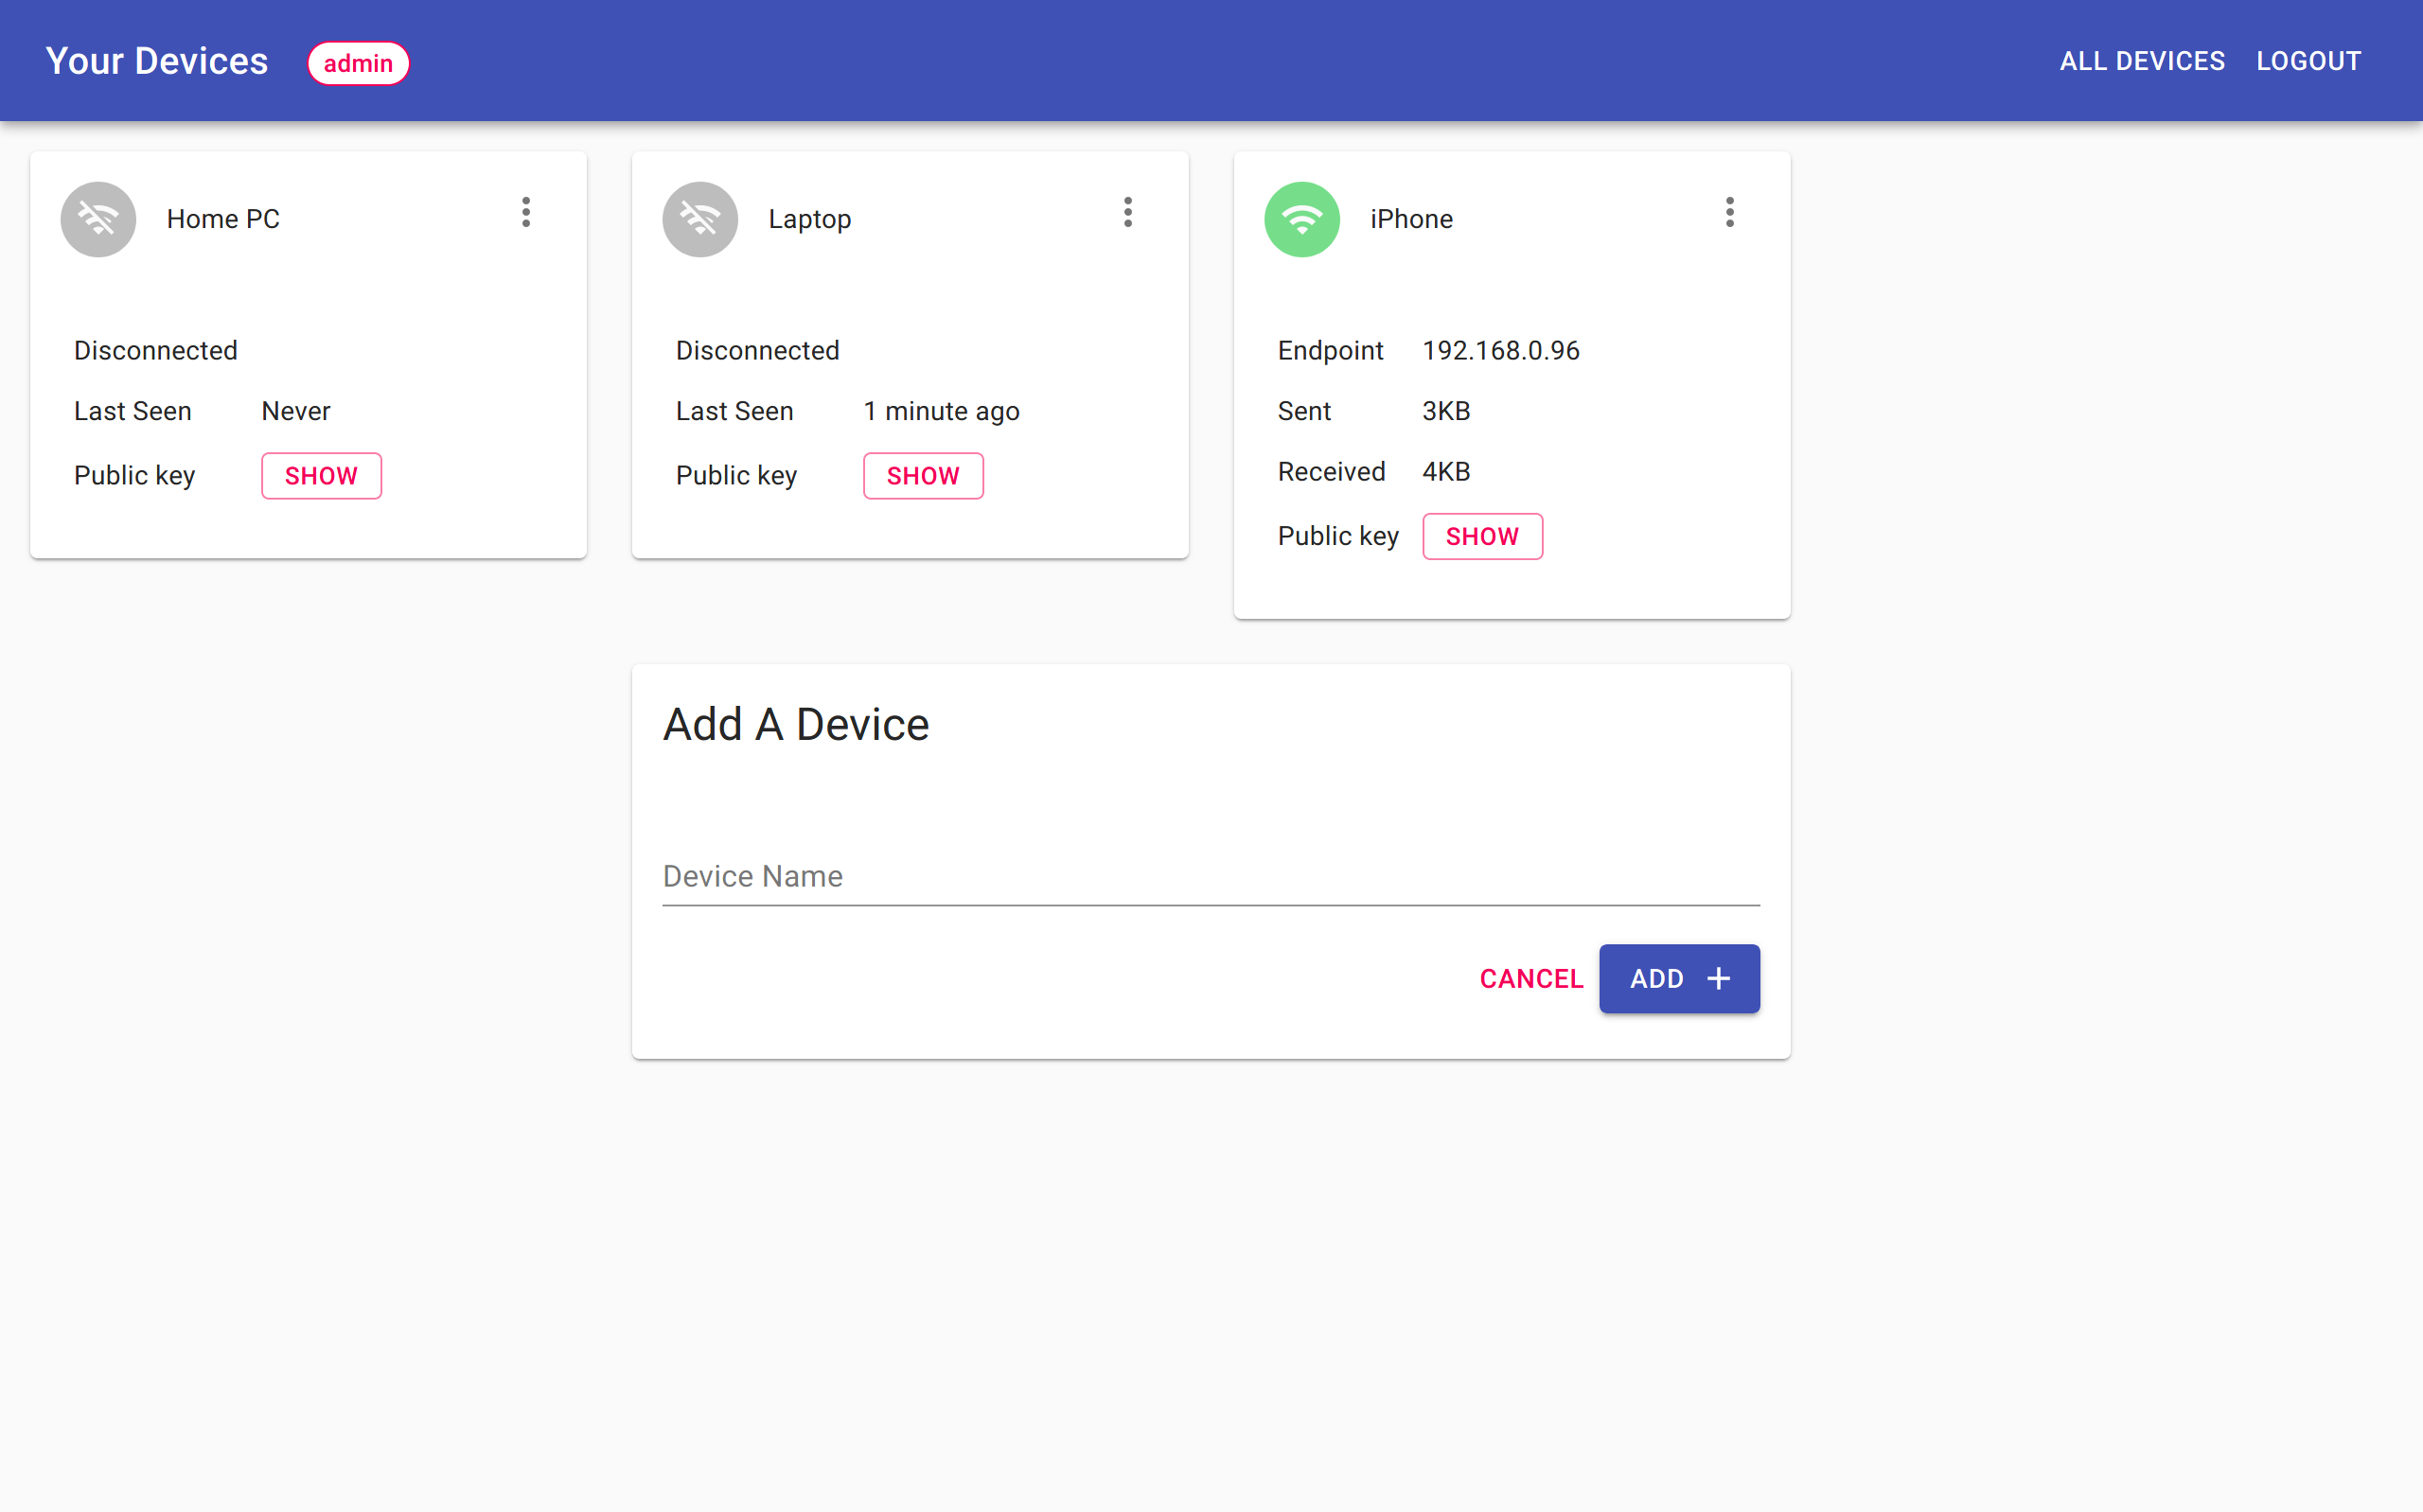
The admin interface looks like this:

wg-access-server admin interface

Running wg-access-server with Docker

The easiest way to run wg-access-server is by using Docker and docker-compose. If you are new to Docker and docker-compose, you might want to read some tutorials about it first.

I use the following docker-compose.yml config file for wg-access-server:

version: "3.4"
services: 
  wireguard:
    container_name: wireguard
    image: place1/wg-access-server
    cap_add:
      - NET_ADMIN
    environment:
      WG_WIREGUARD_PRIVATE_KEY: {put your private key here}
      WG_STORAGE: sqlite3:///wireguard-clients/db.sqlite3
      WG_EXTERNAL_HOST: my-host.com
      WG_CONFIG: "/config.yaml"
      WG_ADMIN_USERNAME: {put your admin username here}
      WG_ADMIN_PASSWORD: {put your plain text admin password here}
    volumes:
      - ./data/wg-access-server:/data"
      - ./data/wireguard-clients:/wireguard-clients
      - ./conf/wireguard/config.yaml:/config.yaml:ro # if you have a custom config file
    ports:
      - "8000:8000/tcp"
      - "51820:51820/udp"
    devices:
      - "/dev/net/tun:/dev/net/tun"
    restart: unless-stopped

⚠️ Note that if you don’t want to use a plaintext admin password, you have to specify it in the config file. It’s probably better than my plaintext config, but I don’t expose the admin interface anywhere, so I don’t really care.

ℹ️ You can generate the WireGuard private key with Docker: docker run -it place1/wg-access-server wg genkey

In ./conf/wireguard/config.yaml I specified the external host. By doing so, the generated client profiles contain the correct url. That way they can be used right away:

loglevel: info
wireguard:
  externalHost: "my-external-domain.com"

ℹ️ Don’t forget to open UDP port 51820 on your firewall.
ℹ️ If you want to expose the admin interface, you also have to open TCP port 8000 on your firewall (But in that case you better proxy it through an HTTPS web server like Treafik or Caddy).

Once everything is configured you can use the known docker commands to start the service:

sudo docker-compose up -d

Client device configuration for wg-access-server with WireGuard apps

Next step is to configure the client devices. Wireguard has apps for iOS, macOS, Android, Windows, any Linux flavour, … Check out the most up-to-date list on their website.

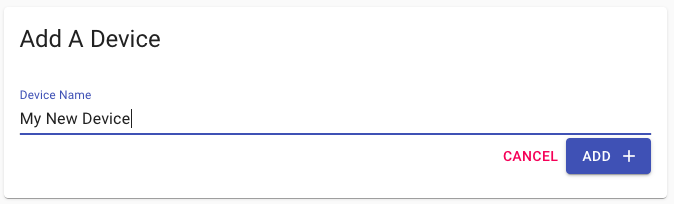
Adding a new client configuration is very easy. Navigate to your wg-access-server admin interface (e.g. local-ip-of-adguard-host:8000. Then you just specify the name of the device and click on Add.

Once it is created, the client configuration will be displayed in the admin interface.
⚠️ Note that you can only see this configuration once, afterwards it will be permanently deleted.

wg-access-server new client creation

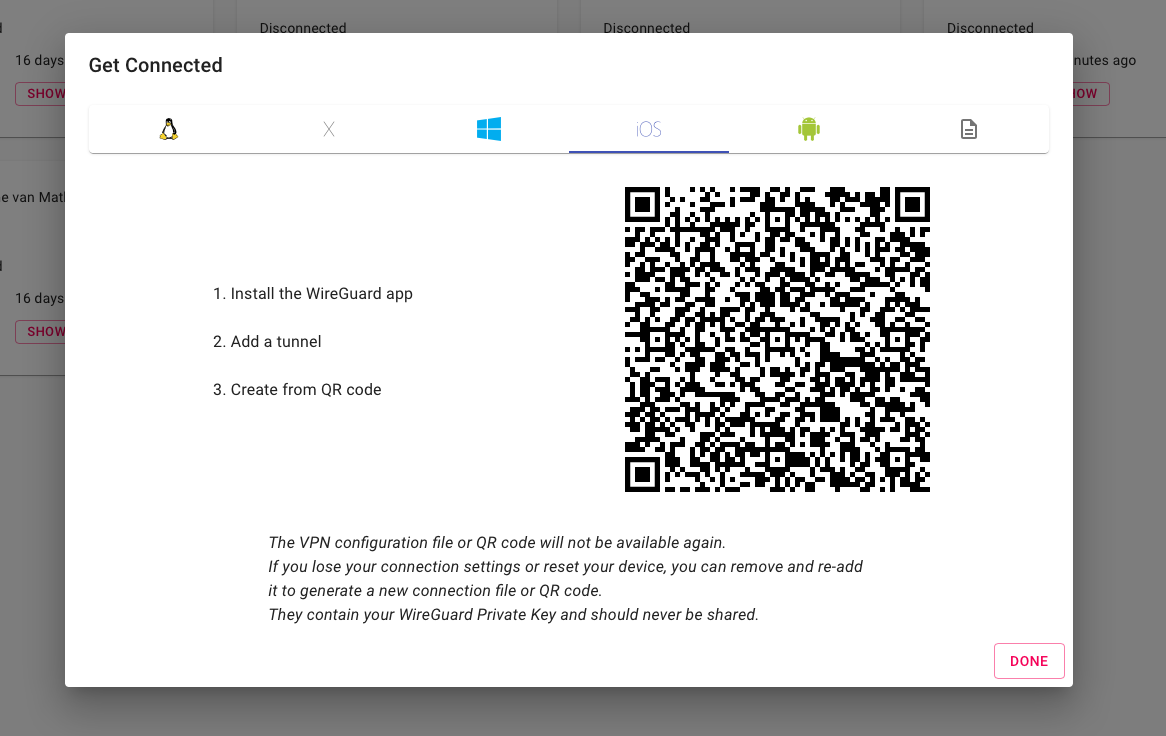
If you are configuring for a mobile device, you can scan the QR code with the Wireguard app for the most simple configuration.

wg-access-server client configuration with QR code

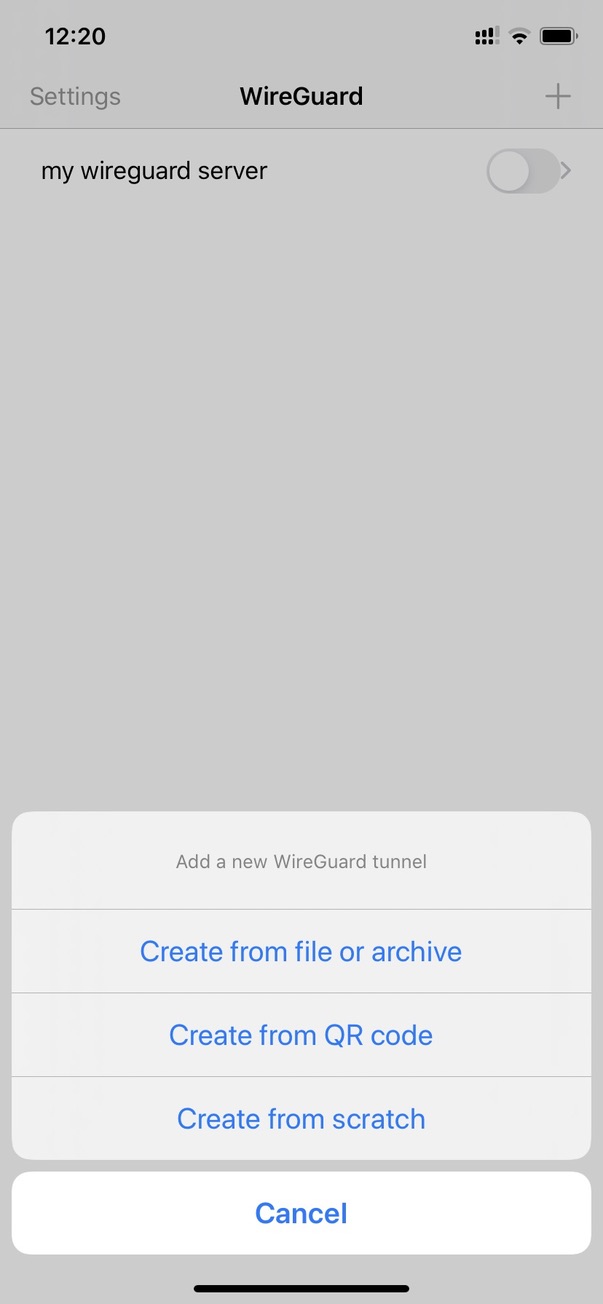
On your iPhone:

wg-access-server client configuration with config file (for macOS)
Wireguard app on iOS

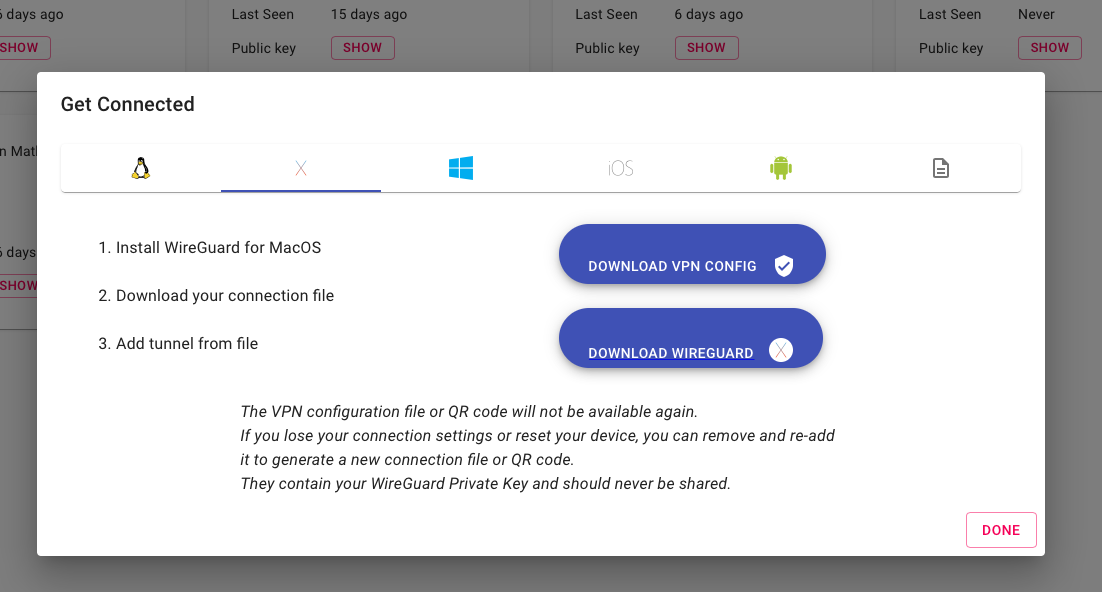
You can also just download the profile (for e.g. desktop clients):

wg-access-server client configuration with config file (for macOS)

Voila, your VPN is all setup!

Conclusion

Setting up your personal VPN with Wireguard, wg-access-server and Docker is stupidly simple.

Configure Fish with ‘bobthefish’ and ‘nerd fonts’ on Mac

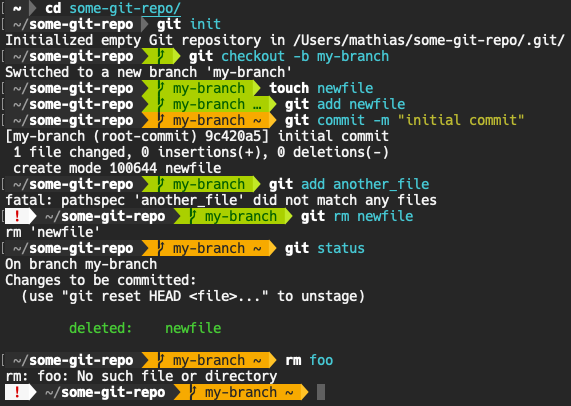
The first thing I do on a new Mac is configuring the terminal and shell. I always install Fish and bobthefish with patched nerd fonts. If you follow the steps in this blogpost, you will have a nice looking shell like mine:

Install Homebrew

If you haven’t installed Homebrew yet, head over to brew.sh to install it on your Mac.

Install Fish

$ brew install fish

In order to make fish your default shell, add /usr/local/bin/fish to /etc/shells , and execute chsh -s /usr/local/bin/fish . If not, then you can always type fish in bash .

Install Oh My Fish

$ curl -L https://get.oh-my.fish | fish

More info about Oh My Fish can be found here: github.com/oh-my-fish/oh-my-fish.

Install bobthefish

$ omf install bobthefish

To make best use of bobthefish you must nerd fonts patched font fonts. These fonts add icons and symbols to your shell:

$ set -g theme_nerd_fonts yes

More info about bobthefish can be found here: github.com/oh-my-fish/theme-bobthefish.

Install nerd fonts

To install the nerd fonts that we have activated for bobthefish we can use Homebrew:

$ brew tap homebrew/cask-fonts
$ brew cask install font-hack-nerd-font

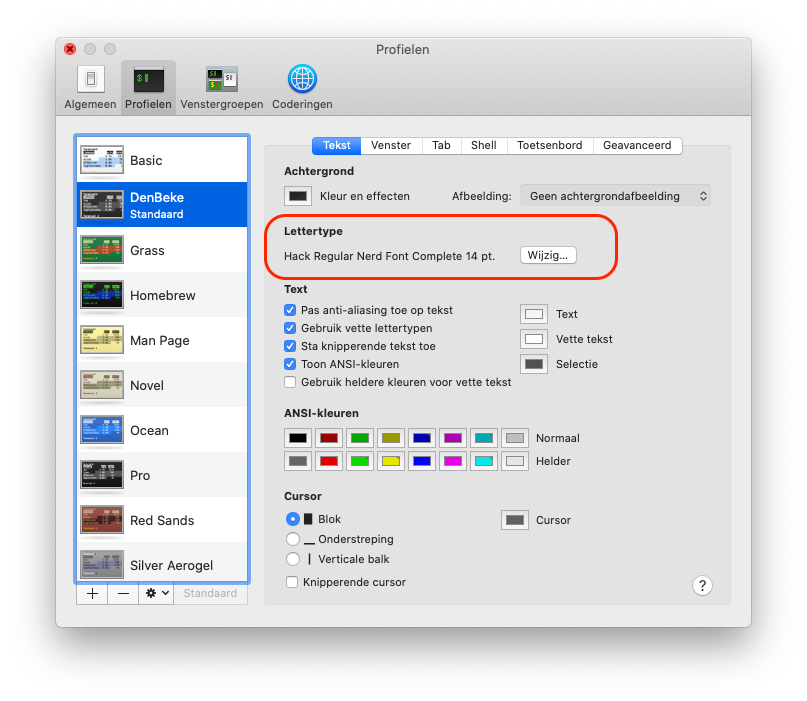
Enable nerd fonts in the terminal profile

Don’t forget to enable the patched nerd fonts in your terminal profile:

  1. Go to the preferences of the Terminal app.
  2. Choose your default profile.
  3. Change the font to Hack Nerd Font (regular).

Now you’re all set. Open a new terminal window and enjoy a good looking shell!

Data-Driven Testing in Go aka Table Testing or Parameterized Testing

When writing tests, we want to focus as much as possible on the actual test cases and test data, and not on implementing the individual cases. The less time you spend in writing code to implement a test-case, the more time you can spend on actual test data.

This is where data-driven testing comes in handy. Data-driven testing splits the test data from the test logic.

What is Data-Drive Testing?

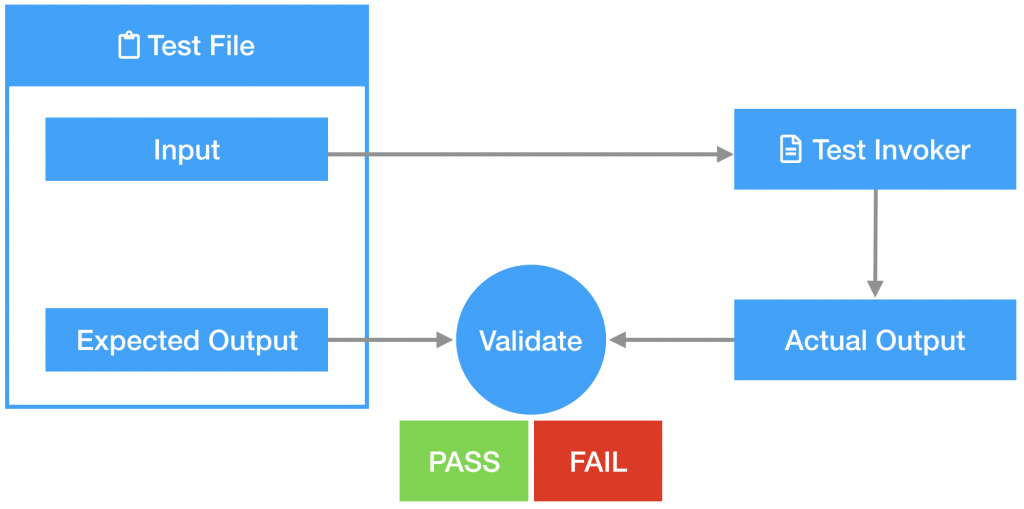
So what is data-driven testing exactly? In data-driven testing you reuse the same test script/invoker with multiple inputs.

To do so you need:

  • Have test-data in files. For each test you should have:
    • Description of the test
    • Input for the test
    • Expected output
  • Run the same test script on each of the input data.
  • Check whether the actual output of the test script matches the expected output you defined in the input file.
Overview of Data-Driven Testing

You probably know data-driven testing already as “Table Testing “or “Parameterized” testing

How to Do Data-Driven Testing in Go

But how do you implement data-driven testing in Go?

The examples I use originate from tests I wrote to test Sanity’s patching logic on documents. This means we need an input document, a patching function to apply on this document, and an expected output after the patching is applied.

Test Input File

I opted to put the test input in Yaml files. Each file contains a list of (related) test cases.

  • description of the test is string.
  • input, patch, expected_output, are multi-line strings, which contain JSON. This can be of course anything, but in my tests I needed JSON.

An example of such an input data file:

- description: inc
  input: |
    {
      "x": 0
    }

  patch: |
    {
      "patch": {
        "id": "123",
        "ifRevisionID": "666",
        "inc": {
          "x": 1
        }
      }
    }

  expected_output: |
    {
      "x": 1
    }

Parse File

Creating a datafile isn’t enough, it must also be parsed. To do so I created a custom UnmarshalYAML function to implement the Yaml Unmarshaller interface. So that it gets automatically picked up by the go-yaml/yaml package when trying to unmarshall it. I left this implementation out because it is very specific to what we do in our tests at Sanity.

The datafile is represented in Go with a type alias and a struct as follows:

// A TestFile contains a list of test cases
type TestFile []TestCase

// TestCase represents a single patch test case.
type TestCase struct {
    Description    string                `yaml:"description"`
    Input          attributes.Attributes `yaml:"input"`
    Patch          mutation.Patch        `yaml:"patch"`
    ExpectedOutput attributes.Attributes `yaml:"expected_output"`
}

Execute File

To test the patching mechanism we have a testing function which takes the input, patch and expected_output as parameters:

func testPatchPerform(
    t *testing.T,
    patch mutation.Patch,
    input attributes.Attributes,
    expectedOutput attributes.Attributes
) {

    // ...

}

So know we need to call it for each test case from each test data file.
To do so I created a test helper which parses a test file and runs all the test cases in it (with the above helper). For each test-case I added a t.Run() which discribes the test being executed. This simplifies debugging a lot.

func testPatchPerformFromFile(t *testing.T, file string) {

    yamlInput, err := ioutil.ReadFile(file)
    require.NoError(t, err)

    testFile := TestFile{}

    err = yaml.Unmarshal(yamlInput, &testFile)
    require.NoError(t, err)

    for _, testCase := range testFile {
        t.Run(file+"/"+testCase.Description, func(t *testing.T) {
            testPatchPerform(t, testCase.Patch, testCase.Input, testCase.ExpectedOutput)
        })
    }

}

Now we just need to go over all the test files in our data directory and execute the testPatchPerformFromFile for each file. So the actual top-level test function that will be executed by go test looks like this:

func TestPatchPerformFromTestDataDirectory(t *testing.T) {

    err := filepath.Walk("./testdata/", func(path string, info os.FileInfo, err error) error {

        if err != nil {
            return err
        }
        if info.IsDir() {
            return nil
        }

        if strings.Contains(info.Name(), "patch_") {
            testPatchPerformFromFile(t, path)
        }

        return nil
    })
    require.NoError(t, err)
}

Test Output

Test about in verbose mode looks like this:

--- PASS: TestPatchPerformFromTestDataDirectory (0.00s)
    patch_increment.yml/inc (0.00s)
    --- PASS: TestPatchPerformFromTestDataDirectory/testdata/patch_increment.yml/inc_variable_number (0.00s)
    --- PASS: TestPatchPerformFromTestDataDirectory/testdata/patch_increment.yml/dec (0.00s)
    --- PASS: TestPatchPerformFromTestDataDirectory/testdata/patch_increment.yml/dec_variable_number (0.00s)

Conclusion

With this data-driven testing approach we can easily write tests. We implement the test script only once, and after that we can add as many data files as possible. Need a new test case? Just create a new case in a Yaml file and run the tests again with go test.

Data-driven testing also makes it possible to reuse test-cases in other places/languages in your stack since the Yaml test input is language-independent.