Deze week heb ik de website voor de vioolbouwer Roland Eeckelaert gelanceerd.
Zo is ook deze Antwerpse luthier weer helemaal mee met de digitale wereld!

Je kan de website bekijken op eeckelaert-vioolbouw.be.
Mathias Beke
Deze week heb ik de website voor de vioolbouwer Roland Eeckelaert gelanceerd.
Zo is ook deze Antwerpse luthier weer helemaal mee met de digitale wereld!

Je kan de website bekijken op eeckelaert-vioolbouw.be.
I while ago I did a small experiment to run Caddy on my iPhone. I currently have no time to do something with it, and actually build a useful Caddy iOS app, but I wanted to do a quick writeup about how you can achieve this. So others can maybe do something with Caddy on iOS, because compiling a Go project for iOS is really easy!
You first need to install Xcode and the Xcode command line tools.
Then you can simply install Go Mobile with the following commands:
$ go get golang.org/x/mobile/cmd/gomobile
$ gomobile init # it might take a few minutes
More information can be found in the official docs.
Now you have to create a framework bundle of the Caddy project, which you can then use in your iOS application:
$ gomobile bind -target=ios github.com/mholt/caddy/caddy/caddymainThis will generate a framework called Caddymain.framework.
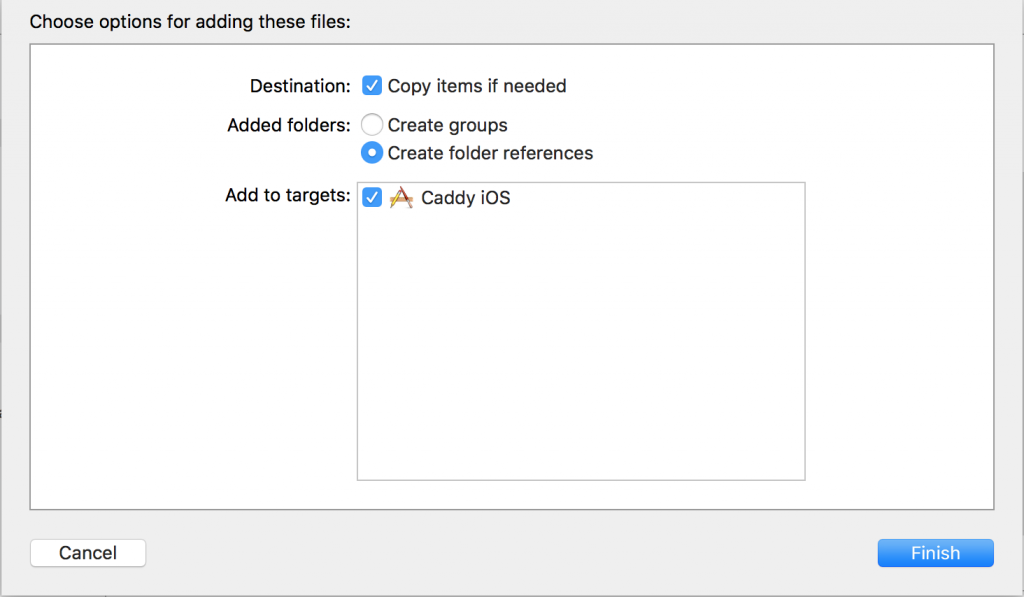
Now you can just drag and drop the compiled framework bundle to the Xcode project of the iOS app.
Check “Copy items if needed” if you want to include a copy of the framework bundle within the Xcode repo. Otherwise, modifying the Go package source code and rerunning gomobile bind ... will update the Caddymain.framework in the app.
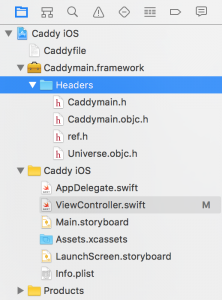
If everything went well, your Xcode project overview will look like this:
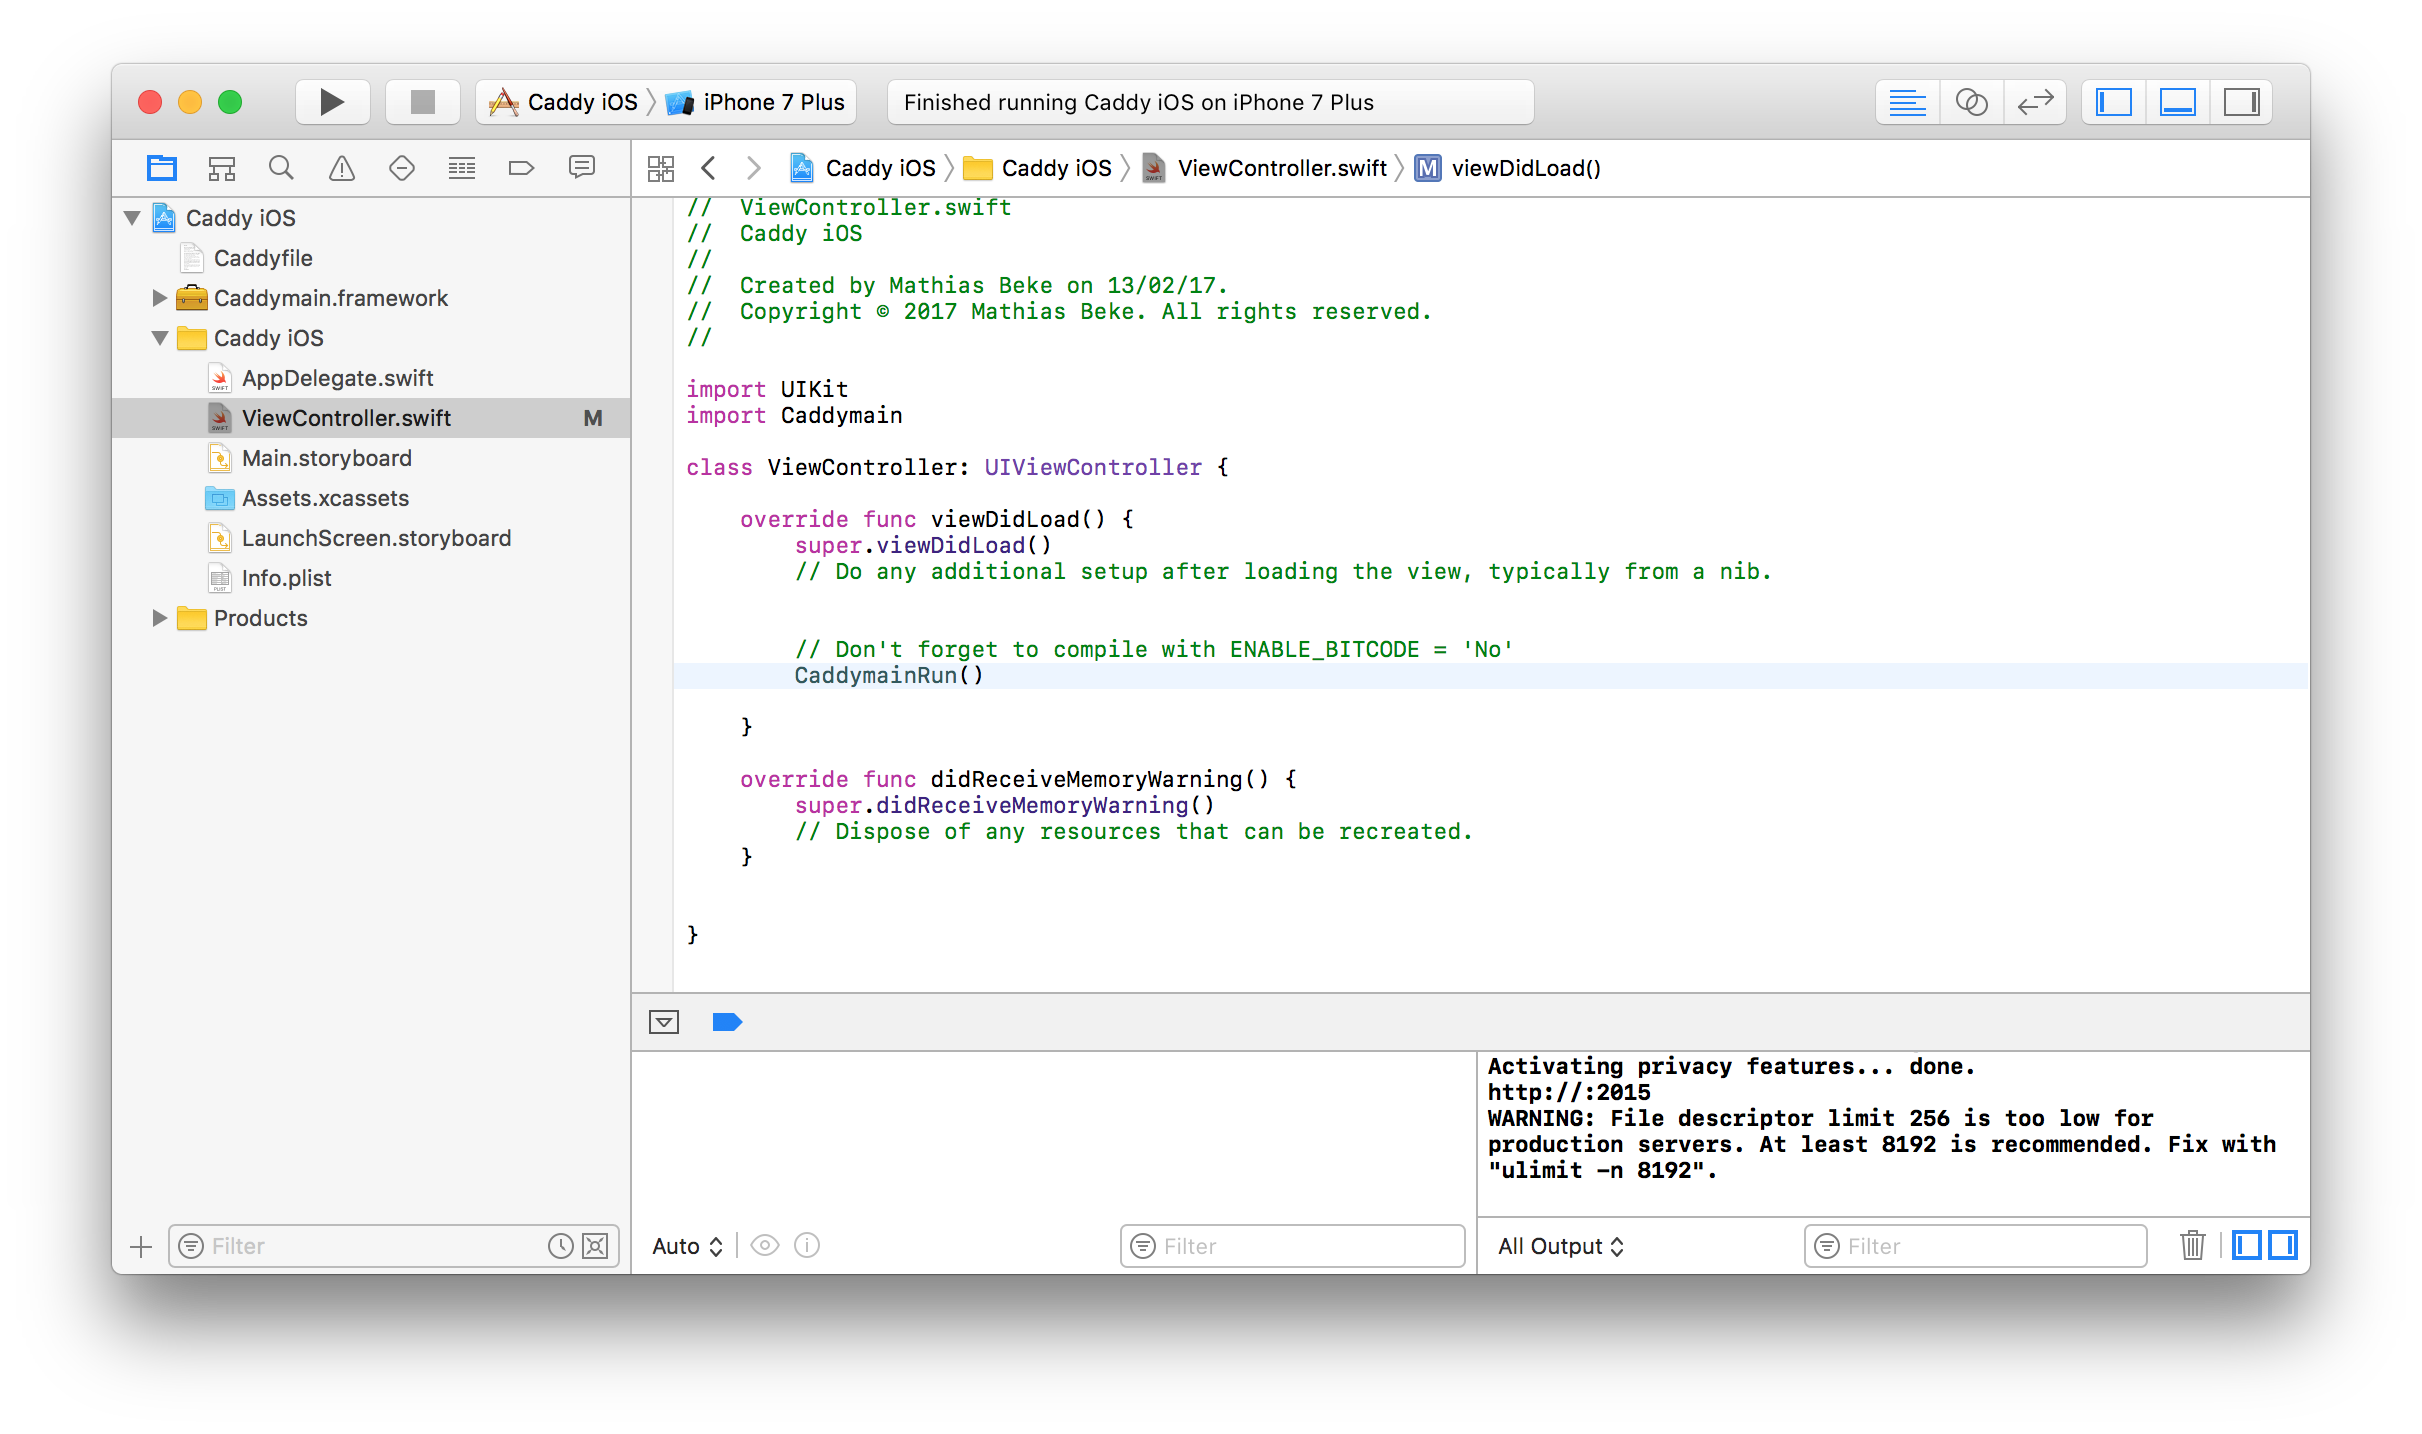
Once this is done, you can import the Caddymain framework in your Swift files and call the functions from the Caddy package and use them to start Caddy.
I put everything in my ViewController:
import UIKit
import Caddymain

class ViewController: UIViewController {

    override func viewDidLoad() {
        super.viewDidLoad()
        // Do any additional setup after loading the view, typically from a nib.

        // Don't forget to compile with ENABLE_BITCODE = 'No'
        // Startup Caddy...
        CaddymainRun()

    }

    override func didReceiveMemoryWarning() {
        super.didReceiveMemoryWarning()
        // Dispose of any resources that can be recreated.
    }


}
Now you can hit run, and you’ll be running Caddy on your iPhone!
Note: since Go mobile doesn’t compile frameworks with bitcode enabled, you have to turn bitcode off in the project settings in Xcode: Go to the Build Settings tab. Type bitcode in the search field and change the Enable Bitcode setting to No.
Running Go code on an iOS device is easy!
So don’t hesitate to do some useful stuff with it yourself!
 Invoice Ninja is an open-source platform which helps you take care of clients, invoices, payments, expenses, time-tracking, and more…
In this guide I explain how you can run Invoice Ninja on your own server with Caddy and PHP-FPM.
Download the latest version here: Download Invoice Ninja.
Open the MySQL console:
$ mysql -u root -pExecute the following SQL statements to create the database for Invoice Ninja, and grant a new user access to it:
CREATE DATABASE ninja;
CREATE USER 'ninja'@'localhost' IDENTIFIED BY 'ninja';
GRANT ALL PRIVILEGES ON ninja.* TO 'ninja'@'localhost';I use the following Caddyfile for Invoice Ninja:
invoiceninja.domain.com {
    root sites/invoiceninja/public
    fastcgi / unix:/var/run/php/php7.0-fpm.sock php
    log sites/invoiceninja/access.log
    errors sites/invoiceninja/error.log

    // Rewrite rules for Invoice Ninja (Laravel)
    rewrite {
        r .*
        ext /
        to /index.php?{query}
    }
}
invoiceninja.domain.com will automatically be served over HTTPS.
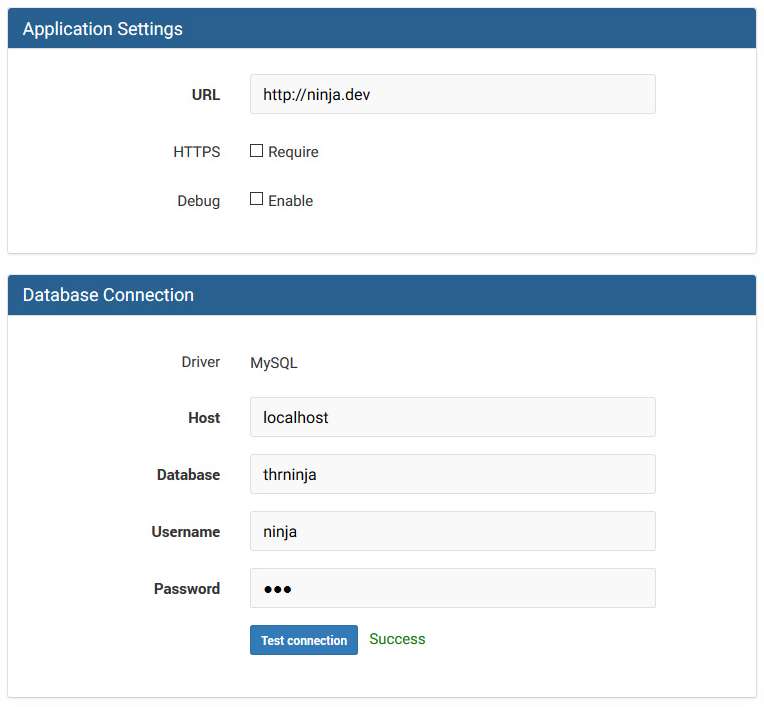
Installing Invoice Ninja is then straightforward: point your browser to invoiceninja.domain.com, and follow the on-screen steps.
I used Sendgrid as email provider, but you can also use your local mail server or any email service.
This week I needed database (RDBMS) and PHP (frameworks) benchmarks for the Scaleway C2M server. Whilst doing so, I thought it would be useful to fully benchmark the server and share it in a blogpost.
I tested the dedicated server (C2M) with 8 cores, 16GB ram and 50GB storage (running Ubuntu 16). At the time of writing, this server costs 17,99 euro/month.
This baremetal box runs an Intel Atom C2750 processor clocked at 2.4GHz
Geekbench 4 scores:
| Single-Core Score | Multi-Core Score |
|---|---|
| 1187 | 6031 |
De detailed Geekbench result can be found here: Scaleway C2M
Multi-Core SysBench CPU benchmark:
Test execution summary:
    total time:                          5.7415s
    total number of events:              10000
    total time taken by event execution: 45.8982
    per-request statistics:
        min:                                  4.59ms
        avg:                                  4.59ms
        max:                                 10.45ms
        approx.  95 percentile:               4.59ms

Threads fairness:
    events (avg/stddev):           1250.0000/1.12
    execution time (avg/stddev):   5.7373/0.00
MySQL performance benchmarks using SysBench on a test database with respectively 1M and 10M records:
| MySQL Benchmark | Transactions | Transactions/s | Records | Time (s) |
|---|---|---|---|---|
| 1 | 36528 | 608,73 | 1000000 | 60,0072 |
| 2 | 41212 | 686,29 | 1000000 | 60,0500 |
| 3 | 27503 | 458,34 | 10000000 | 60,0054 |
| 4 | 34156 | 569,19 | 10000000 | 60,0078 |
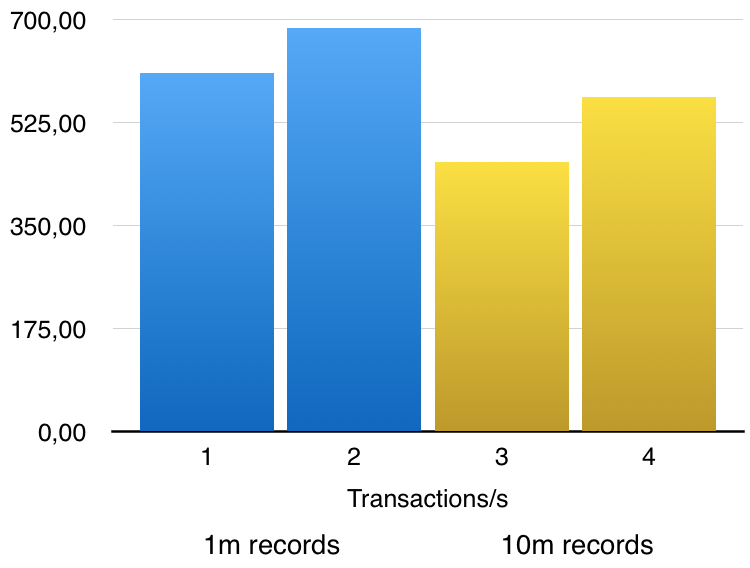
PHP requests per seconds using Apache 2 and a simple controller in the given framework (using PHP Framework Benchmark):
| Benchmark (requests/s) |
bear-1.0 | fuel-1.8 | symfony-2.7 | symfony-3.0 | laravel-5.2 | lumen-5.1 | zf-2.5 |
|---|---|---|---|---|---|---|---|
| 1 | 350,27 | 889,72 | 39,57 | 356,89 | 294,87 | 1239,55 | 143,75 |
| 2 | 512,64 | 926,63 | 125,72 | 373,66 | 321,85 | 1246,79 | 154,66 |
| 3 | 472,75 | 932,44 | 124,33 | 381,75 | 326,33 | 1233,77 | 155,71 |
| 4 | 569,57 | 927,51 | 124,47 | 380,31 | 321,88 | 1254,69 | 153,92 |
| avg | 476,3075 | 919,075 | 103,5225 | 373,1525 | 316,2325 | 1243,7 | 152,01 |
Network speed tested with Speedtest.net to different locations around the world:
| Speedtest | Ping (ms) | Download (Mbps) | Upload (Mbps) | Distance (Km) | |
|---|---|---|---|---|---|
| France | Paris | 2,126 | 933,77 | 450,86 | 1,88 |
| Netherlands | Haarlem | 12,643 | 803,83 | 313,28 | 423,92 |
| Russia | Moscow | 61,75 | 316,53 | 126,94 | 2487,01 |
| United States | New York | 131,036 | 146,30 | 41,29 | 5836,26 |
| United Arab Emirates | Dubai | 160,098 | 98,37 | 29,97 | 5246,32 |
| United States | San Francisco | 191,342 | 99,96 | 49,63 | 8952,54 |
| Singapore | Singapore | 233,212 | 35,85 | 28,26 | 10732,95 |
| Australia | Sydney | 365,136 | 52,51 | 19,59 | 16960,81 |
Disk I/O benchmark with freevps.us:
| # | I/O speed |
|---|---|
| 1 | 106 MB/s |
| 2 | 136 MB/s |
| 3 | 88 MB/s |
| avg | 110 MB/s |
Disk I/O benchmark with vpsbench:
| # | I/O speed |
|---|---|
| 1 | 153 MB/s |
Disk I/O benchmark with Sysbench:
Extra file open flags: 0
128 files, 320Mb each
40Gb total file size
Block size 16Kb
Number of random requests for random IO: 0
Read/Write ratio for combined random IO test: 1.50
Periodic FSYNC enabled, calling fsync() each 100 requests.
Calling fsync() at the end of test, Enabled.
Using synchronous I/O mode
Doing random r/w test
Threads started!
Time limit exceeded, exiting...
Done.

Operations performed:  73500 Read, 49000 Write, 156744 Other = 279244 Total
Read 1.1215Gb  Written 765.62Mb  Total transferred 1.8692Gb  (6.3795Mb/sec)
  408.29 Requests/sec executed

Test execution summary:
    total time:                          300.0315s
    total number of events:              122500
    total time taken by event execution: 42.8032
    per-request statistics:
         min:                                  0.00ms
         avg:                                  0.35ms
         max:                                 11.18ms
         approx.  95 percentile:               1.07ms

Threads fairness:
    events (avg/stddev):           122500.0000/0.00
execution time (avg/stddev): 42.8032/0.00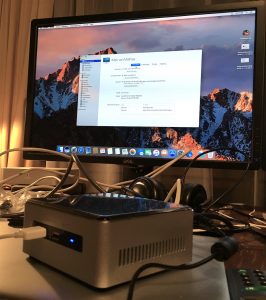 Last week I built a hackintosh server for macOS server. This machine replaces an old Intel Atom server running Ubuntu.
For this project I bought an Intel NUC 6i3SYH with 8GB DDR4 ram and a Western Digital 256GB m2 SSD. The box version of the NUC allowed me to add another 2,5″ SATA disk for storage.
For the Time Machine backup service I used external harddisks.
I downloaded the latest macOS Sierra from the Mac App Store and installed it using Unibeast and Clover.
I followed this Hackintosh guide. The tutorial is very complete, so it useless for me to try and reproduce it in this blogpost. (Make sure to use the correct tutorial for your hardware. The tutorial I linked is for the Skylake version.)
Once macOS was successfully installed, I could download the Server app from the App Store and configure everything on the machine.
Don’t forget to disable auto sleep in the System preferences or your Mac will go in standby after a short period of inactivity.
You can manage your headless Mac server with the Server app from another Mac. Just download de Server app on the other Mac and select the server. This will give you a nice interface from which you can manage your server.
Creating a shared volume is very easy. Go to File sharing in the navigation and do it yourself! ? It’s very intuitive, like all Apple products, so I won’t explain it here…
You can easily add a Time Machine volume in the server interface: Go to the Time Machine service in the left column. Then add a volume (set the correct permissions and limitations if you want) and enable Time Machine.
On your client Mac, go to Time Machine in the System Preferences, select Add backup disk and choose your new network volume. I had to restart my MacBook before the network drive showed up in the Time Machine settings.
Configuring the VPN server can sometimes be a bit harder because you don’t always get relevant error messages when the client can’t connect to the server.
I generated a new shared secret (make sure that it has the correct length, otherwise you might end up with useless error message). Then I choose IP addresses which are not in the range of the DHCP IP’s of my router. The DNS server are by default the same as your server, but you can add any reachable DNS server in there. You could e.g. use Google DNS (8.8.8.8 and 8.8.4.4).
If you’ve configured everything, you can start the VPN server and connect to it with your Mac or iPhone. The VPN type you need to choose is L2TP.
I had unfortunately no luck yet configuring the Caching server. Everywhere on the internet I read it’s a piece of cake: just enable the service and it should work. Well… my clients aren’t downloading through the caching server ?.
The second part contains all the ‘expert’ ? configuration I did, i.e. anything which isn’t provided through the Server app config panel.
First you must enable SSH access in the OS X server panel. You can do this in the main settings. You can connect to SSH using your username and password, but if you’re server is accessible outside your homenetwork, it’s a lot safer to disable passwords and use SSH keys. If you don’t need SSH keys, you can skip the rest of this section. Else you keep reading…
If you haven’t yet generated a key pair, you can do it using this command:
$ ssh-keygen -t rsa -b 4096 -C "your_email@example.com"Now copy your public key to the server:
$ cat ~/.ssh/id_rsa.pub | ssh user@192.168.0.184 'umask 0077; mkdir -p .ssh; cat >> .ssh/authorized_keys && echo "Key copied"'Then disablee password login for SSH: Edit the file /etc/ssh/sshd_config and add the following directives at the end of the file:
PermitRootLogin no
PasswordAuthentication no
PermitEmptyPasswords no
ChallengeResponseAuthentication no
Then restart the SSH (or Remote login as Apple calls it) service.
First you need to install Xcode from the Mac App Store. Once installed, you also need the Command Line Tools, you can initiate the download process by executing $ xcode-select --install in the Terminal.
Download MacPorts from the official website. And install it.
$ sudo port install fishManually set your PATH correctly for Fish so it finds MacPorts binaries. Add the following line to ~/.config/fish/config.fish:
set -xg PATH /opt/local/bin /opt/local/sbin $PATHI created an shared iTunes library on my server in which I save YouTube movies I can then play from other Macs in the network. To download a youtube movie and automatically add it to that library, you need the following command:
$ cd /Volumes/Arry/iTunes\ Youtube/iTunes\ Media/Automatically\ Add\ to\ iTunes.localized/
$ youtube-dl -f "[ext=mp4]" "https://www.youtube.com/watch?v=BzqjhC2OYnM"
Don’t forget to run iTunes as a login item.
If you want to run your own web server, you must stop Apache on port 80 and 443:
$ sudo launchctl unload -w /Applications/Server.app/Contents/ServerRoot/System/Library/LaunchDaemons/com.apple.serviceproxy.plistI run Caddy server on my Mac. Read this blogpost about running it as a service: Running Caddy as a service on macOS X server
If you are hosting the server at home, your IP might sometimes change. You can solve this by buying a domain name and using dynamic DNS for it. To do so you need to execute a script which your DNS provider gives you. For ClouDNS the command looks like this:
$ wget -q --read-timeout=0.0 --waitretry=5 --tries=400 --background https://ipv4.cloudns.net/api/dynamicURL/?q=...With cron you can create a job which executes the command for your dynamic DNS on your given time interval. This opens the crontab editor:
$ crontab -eTo host my git repositories I run Gogs on my Mac. More info in this blogpost: Running Gogs (Go Git Service) as a service on macOS X server.

Download Caddy from the official website.
Give the executable root permissions1:
$ chown root ./caddy
$ chmod +s ./caddyCaddy reads it configuration for the Caddyfile. More information can be found in the official documentation.
Create a launchd plist file: ~/Library/LaunchAgents/com.caddyserver.web.plist. This file should look like this:
<?xml version=”1.0" encoding=”UTF-8"?>
<!DOCTYPE plist PUBLIC “-//Apple Computer//DTD PLIST 1.0//EN” “http://www.apple.com/DTDs/PropertyList-1.0.dtd">
<plist version=”1.0">
    <dict>
        <key>Label</key>
        <string>com.caddyserver.web</string>
        <key>EnvironmentVariables</key>
        <dict>
            <key>HOME</key>
            <string>/Users/mathias</string>
        </dict>
        <key>ProgramArguments</key>
        <array>
            <string>sh</string>
            <string>-c</string>
            <string>launchctl unload -w /Applications/Server.app/Contents/ServerRoot/System/Library/LaunchDaemons/com.apple.serviceproxy.plist; ulimit -n 8192; cd /Users/mathias/Sites; ./caddy -agree -email my_email@domain.com -conf=/Users/mathias/Sites/Caddyfile</string>
        </array>
        <key>UserName</key>
        <string>www</string>
        <key>RunAtLoad</key>
        <true/>
        <key>KeepAlive</key>
        <true/>
        <key>WorkingDirectory</key>
        <string>/Users/mathias/Sites</string>
        <key>StandardOutPath</key>
        <string>/Users/mathias/Sites/caddy.log</string>
        <key>StandardErrorPath</key>
        <string>/Users/mathias/Sites/caddy_error.log</string>
    </dict>
</plist>
The launchd script will stop the built-in Apache server on macOS X, set the ulimit and execute Caddy. The Caddy command line arguments are quite trivial:
-agree: agree to the CA’s (Let’s Encrypt) Subscriber Agreement.-email: your email address used for the certificates authority.-conf: full path to your Caddyfile.The launchd file will make sure that Caddy is started at boot and kept alive.
Start and Stop Caddy launchd service using the following commands:
$ launchctl load ~/Library/LaunchAgents/com.caddyserver.web.plist
$ launchctl unload ~/Library/LaunchAgents/com.caddyserver.web.plistsetcap doesn’t exist on macOS. Since Caddy won’t be touching any files, and Caddy doesn’t execute shell script, there is not a lot that can go wrong in this case. If you feel uncomfortable running Caddy as root, you could use portforwarding in your firewall and listen on a port >= 1024, for which you won’t need root privileges. This can be done using this command:
echo "
rdr pass inet proto tcp from any to any port 80 -> 127.0.0.1 port 8080
" | sudo pfctl -ef -![]() This guides explains how you can run Gogs git server as a service on your Mac using launchd.
This guides explains how you can run Gogs git server as a service on your Mac using launchd.
First you need to install Xcode from the Mac App Store. Once installed, you also need the Command Line Tools, you can initiate the download process by executing $ xcode-select --install in the Terminal.
The command line tools include Git.
You also need a database server for Gogs. You can install MySQL using MacPorts. A good tutorial can be found here.
You can alternatively run MariaDB instead of MySQL. My blogposts about MAMP (using MacPorts) includes a section about MariaDB.
I could try to write a good tutorial here, but the developers of Gogs already made a very nice tutorial about how you can install and configure Gogs. Read it here.
Create a launchd config file ~/Library/LaunchAgents/io.gogs.web.plist
<?xml version=”1.0" encoding=”UTF-8"?>
<!DOCTYPE plist PUBLIC “-//Apple Computer//DTD PLIST 1.0//EN” “http://www.apple.com/DTDs/PropertyList-1.0.dtd">
<plist version=”1.0">
    <dict>
        <key>Label</key>
        <string>io.gogs.web</string>
        <key>EnvironmentVariables</key>
        <dict>
            <key>HOME</key>
            <string>/Users/mathias</string>
        </dict>
        <key>ProgramArguments</key>
        <array>
            <string>sh</string>
            <string>-c</string>
            <string>cd /Users/mathias/Sites/gogs; ./gogs web</string>
        </array>
        <key>UserName</key>
        <string>mathias</string>
        <key>RunAtLoad</key>
        <true/>
        <key>KeepAlive</key>
        <true/>
        <key>WorkingDirectory</key>
        <string>/Users/mathias</string>
        <key>StandardOutPath</key>
        <string>/Users/mathias/Sites/gogs/launchd.log</string>
        <key>StandardErrorPath</key>
        <string>/Users/mathias/Sites/gogs/launchd_error.log</string>
    </dict>
</plist>
You can now start and stop Gogs using the following commands:
$ launchctl load ~/Library/LaunchAgents/io.gogs.web.plist
$ launchctl unload ~/Library/LaunchAgents/io.gogs.web.plistI then run Caddy in front of Gogs to use Caddy’s built-in automated HTTPS support. My git subdomain is then a reverse proxy to Gogs:
git.my-domain.com {
    proxy / http://localhost:3000
}
More info about running Caddy as a service can be found in this blogpost: Running Caddy as a service on macOS X server.
Yesterday I accidentally deleted an important sms conversation from my Mac (for which I didn’t have a Time Machine backup). I thought it would be fairly easy to copy all my messages from my iPhone to my Mac, but it wasn’t that easy…
This guides helps you copy all your messages from iOS to OS X. You could invert the process to copy your messages from OS X to iOS.
Before continuing, quit Messages app on your Mac.
First you need sms.db and Attachments folder from the iPhone. You can use a backup extractor tool to restore the file structure.
You can also manually find the backup folder in ~/Library/Application Support/MobileSync/Backup. The files in that backup folder are named with the SHA-1 hash of the original file in the iOS filesystem. The file for sms.db is called 3d0d7e5fb2ce288813306e4d4636395e047a3d28. Just rename it to sms.db and you have your SMS database. (I extracted the attachments folder with a third-party app)
Now backup ~/Library/Messages on your Mac and replace all its contents with sms.db and Attachments from your iPhone. Rename sms.db to chat.db.
Remove the ~/Library/Containers/com.apple.iChat folder.
On iOS, the messages are stored in ~/Library/SMS/ directory. This is not the case on OS X, where they are stored in ~/Library/Message/. This results in your attachments not showing op in Messages on Mac. In order to solve this, we need to execute a Sqlite query to rename SMS to Messages for each attachment:
UPDATE attachment
SET
  filename = replace(filename, '/Library/SMS/Attachments/', '/Library/Messages/Attachments/')
WHERE
  filename LIKE '%/Library/SMS/Attachments/%';
I used DB Browser for SQLite to browse and edit the SQL database. You can execute the above SQL query by going to the Execute SQL tab.
It is also possible that you need to update the Sqlite version number. Otherwise Messages.app will mark the database file as incompatible. Again, we do this by executing a query:
UPDATE _SqliteDatabaseProperties
SET
    value = '9007'
WHERE key = '_ClientVersion';
I got the 9007 value from the chat.db database.
Once all of this is done, restart your Mac and verify that your messages have arrived in Messages app.
Deze vakantie nogmaals tot in Rome geraakt!
Hieronder enkele foto’s van wat we allemaal konden beleven…
Naar jaarlijkse gewoonte ben ik weer twee weken op taalkamp geweest als monitor. Zie hier het resultaat van een workshop ‘Vidéo’ na 12 dagen Roeland kamp in Bergues.
Comme d’habitude j’ai fait deux semaines de camp de langue. Voila le résultat de 12 jours à Roeland. Un atelier Vidéo réalisé par 10 jeunes à Bergues.