Introducing “La Trappe Melder”: Get notified when a new batch of La Trappe Quadrupel Oak Aged is released! 🍻

The last couple of days I spent on writing a web service to notify people of new La Trappe Quadrupel Oak Aged batches. Why did I spent my free time on that? Well… Reddit made me do it! And I also really like that beer 😜🍻

Where can I find this important service?

Go checkout the service at latrappemelder.denbeke.be. The source code is on Github.

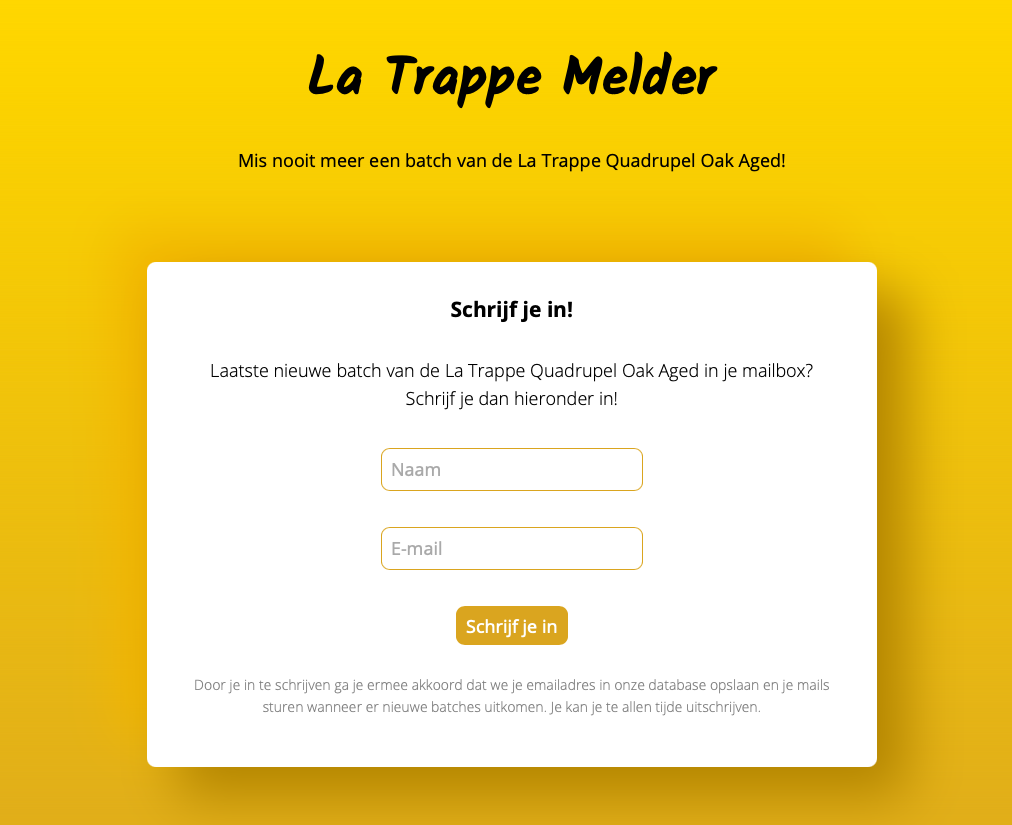
Screenshot of the frontpage.

How is the service written?

The service is written in Go. It contains an ever running job that checks the online store of La Trappe. Once the version number is incremented, the service sends out a mail to all people subscribed. It also contains a webserver to handle the front page and subscriptions.

  • Batches and subscribers are stored in a Sqlite database using Gorm as ORM.
  • Scraping is done with GoQuery.
  • Web service is written with with Echo.
  • Mails are sent through Mailgun. (But the the service itself can be configured to send through any SMTP gateway)
  • All html templates are compiled within the binary, so they are saved from memory. Alle CSS is included in the HTML, without any external assets (apart from Google fonts). So it should be fast and stable.
  • All is packed in a Docker image. In production it is served behind Traefik on a Scaleway instance.

This written in a very short amount of time, while drinking some La Trappe beers. So don’t take this as a textbook example of the perfect Go app. 😇

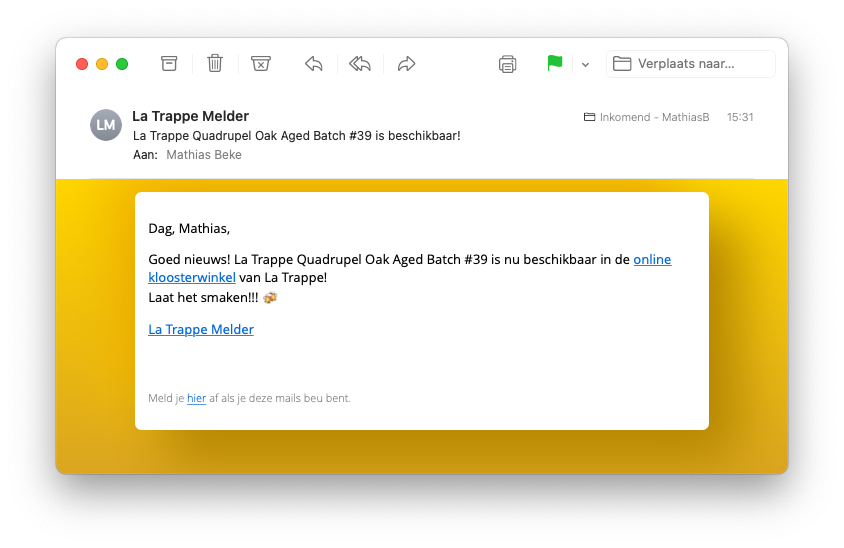
Screenshot of the email notification.

Conclusion

I probably spent too much time on a service that nobody will use. But at least it will be useful for myself and I had fun coding it!
If you find it useful, you can always offer me a beer as reward. 🙃

Using Docker on an M1 Mac by running Docker on an old Intel Mac

EDIT: There is now a Docker technical preview for M1 Macs. I checked it out, and it’s way more useful than this guide!

This guide is for you if you jumped on the Apple Silicon bandwagon and bought yourself a fancy new M1 Mac, but you need Docker from time to time.

It describes how I use an old Intel Mac as Docker host that runs all the Docker commands from my M1 MacBook Air. (You can use any remote Docker host for this, but for my setup an old Mac was more convenient.)

Install Docker

M1 (Apple Silicon) Mac: On your M1 Mac you should only install the Docker client. Since the Docker runtime won’t work on it (yet). Head over to the official Docker documentation if you haven’t go the client yet: https://docs.docker.com/engine/install/binaries/#install-client-binaries-on-macos

Intel Mac: On the Intel Mac you can follow the usual Docker installation guide: https://docs.docker.com/docker-for-mac/install/. In short: Download and follow the installation instructions in the .dmg.

Enable SSH access on the old Mac

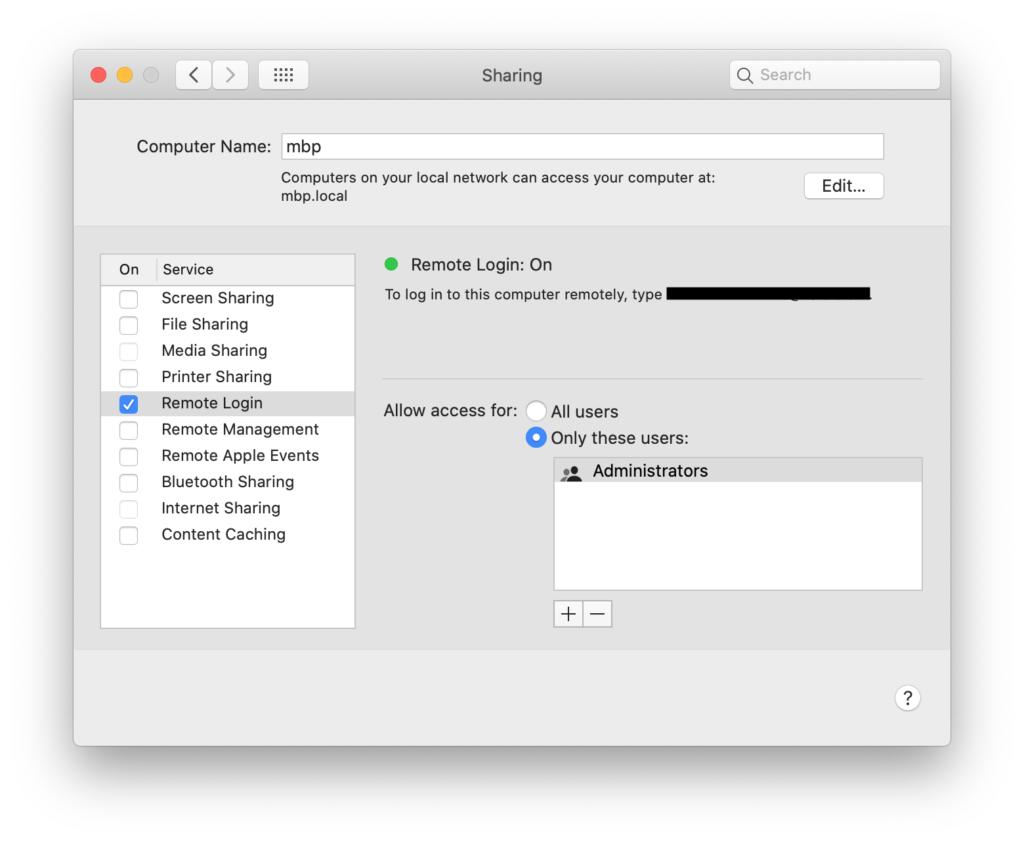
First you need to enable SSH. To do so, open System Preferences and go to Sharing.

Check the checkbox next to Remote Login to enable SSH.

In the same window I also set the computer name to something simple: e.g. mbp. That way I can easily access the machine on my local networking using: ssh myname@mbp.local. Or http://mbp.local/ for Docker services.

Screenshot 2020-12-10 at 16.01.13

In order to do passwordless login between the two Macs, you have to copy your public key to the old Mac.

First you have to generate a new key:

ssh-keygen

Just hit enter to autofill all the inputs.

Now copy the public key to the other Mac:

cat ~/.ssh/id_dsa.pub | ssh your-user@mbp.local 'cat >> ~/.ssh/authorized_keys'

This one time you will have to input your password manually.

If this step was successful, you can now SSH into the machine without entering your password. Try it out like this:

ssh your-user@mbp.local

ℹ️ Checkout this guide if you need for info: https://osxdaily.com/2012/05/25/how-to-set-up-a-password-less-ssh-login/

Enabling SSH Environments for Docker context

To allow Docker context to find the docker command on the remote machine, you have to configure the $PATH of the SSH sessions:

Edit the /etc/ssh/sshd_config file on the old Mac.

Uncomment the #PermitUserEnvironment no line and change it to PermitUserEnvironment yes

Then restart SSH by unchecking and checking the checkbox next to Remote Login in System Preferences, Sharing.

Then create a new file~/.ssh/environment with the following content:

PATH=$PATH:/usr/local/bin

ℹ️ Checkout this Github issue for more info: https://github.com/docker/for-mac/issues/4382#issuecomment-603031242

Using the Docker environment from the Intel Mac on your new M1 Mac

Last thing to do is configuring our Docker command on the M1 Mac to use the old Intel Mac. For this, we use Docker context.

First you have to create a new context:

docker context create my-old-mac --docker "host=ssh://your-user@mbp.local"

Then you can activate it using:

docker context use my-old-mac

Now you should be able to run a test container on your M1 Mac, which is actually run on your old Intel Mac behind the scenes:

docker run hello-world

Don’t forget that if you run webservices with Docker on the old Mac, that you can’t access them via localhost, but that you have to use the hostname of the Mac where Docker is running: mbp.local

Conclusion

It isn’t rocket science to run Docker on your old Mac, but it’s not the most pratical solution.
So let’s hope that the Apple Sillicon Macs get Docker support soon!

I built a portfolio website for a photographer: dylancalluy.com

A couple of months ago, Dylan Calluy — an aspiring Antwerp-based photographer — asked me to build a portfolio website for him. He wanted a nice-looking gallery to share his work with the world.

So we designed the website together. Then I handcrafted the responsive web application for him, combined with a sleek web interface where Dylan can manage all his beautiful content all by himself.

Go check it out at dylancalluy.com!

dylancalluy.com

For the more tech savvy people:

  • The front-end is a SPA, built with VueJS.
  • The back-end is a headless WordPress installation with custom admin pages and custom REST routes to allow Dylan for managing all his content.
  • For the contact form I use my own service called MailBear. It is an API to which you can send POST requests containing the form data. MailBear then sends it to the recipient (Dylan in this case).
  • All is served with Caddy webserver.
  • Everything is running in its own Docker container.

Configuring Wireguard VPN with wg-access-server

For years I have used IPSec and OpenVPN, but they are not always the easiest to setup. Recently I discovered how simple VPN config can be with Wireguard. If you follow this guide, you can have a VPN up and running in less than 10 minutes (given that you know Docker).

Introduction

Wireguard

If you’re reading this, you problably already know that Wireguard is an open source, modern VPN that aims to be performant and easy to configure.

Read more on their website about it if you don’t believe me 😉

WireGuard® is an extremely simple yet fast and modern VPN that utilizes state-of-the-art cryptography. It aims to be faster, simpler, leaner, and more useful than IPsec, while avoiding the massive headache. It intends to be considerably more performant than OpenVPN. WireGuard is designed as a general purpose VPN for running on embedded interfaces and super computers alike, fit for many different circumstances. Initially released for the Linux kernel, it is now cross-platform (Windows, macOS, BSD, iOS, Android) and widely deployable. It is currently under heavy development, but already it might be regarded as the most secure, easiest to use, and simplest VPN solution in the industry.

wg-access-server

Even though Wireguard is not hard to setup, there is something that makes the setup even simpler:

wg-access-server is an open source project that combines Wireguard with an admin interface in one easy to install binary:

wg-access-server is a single binary that provides a WireGuard VPN server and device management web ui. We support user authentication, 1 click device registration that works with Mac, Linux, Windows, Ios and Android including QR codes. You can configure different network isolation modes for better control and more.

This project aims to deliver a simple VPN solution for developers, homelab enthusiasts and anyone else feeling adventurous.

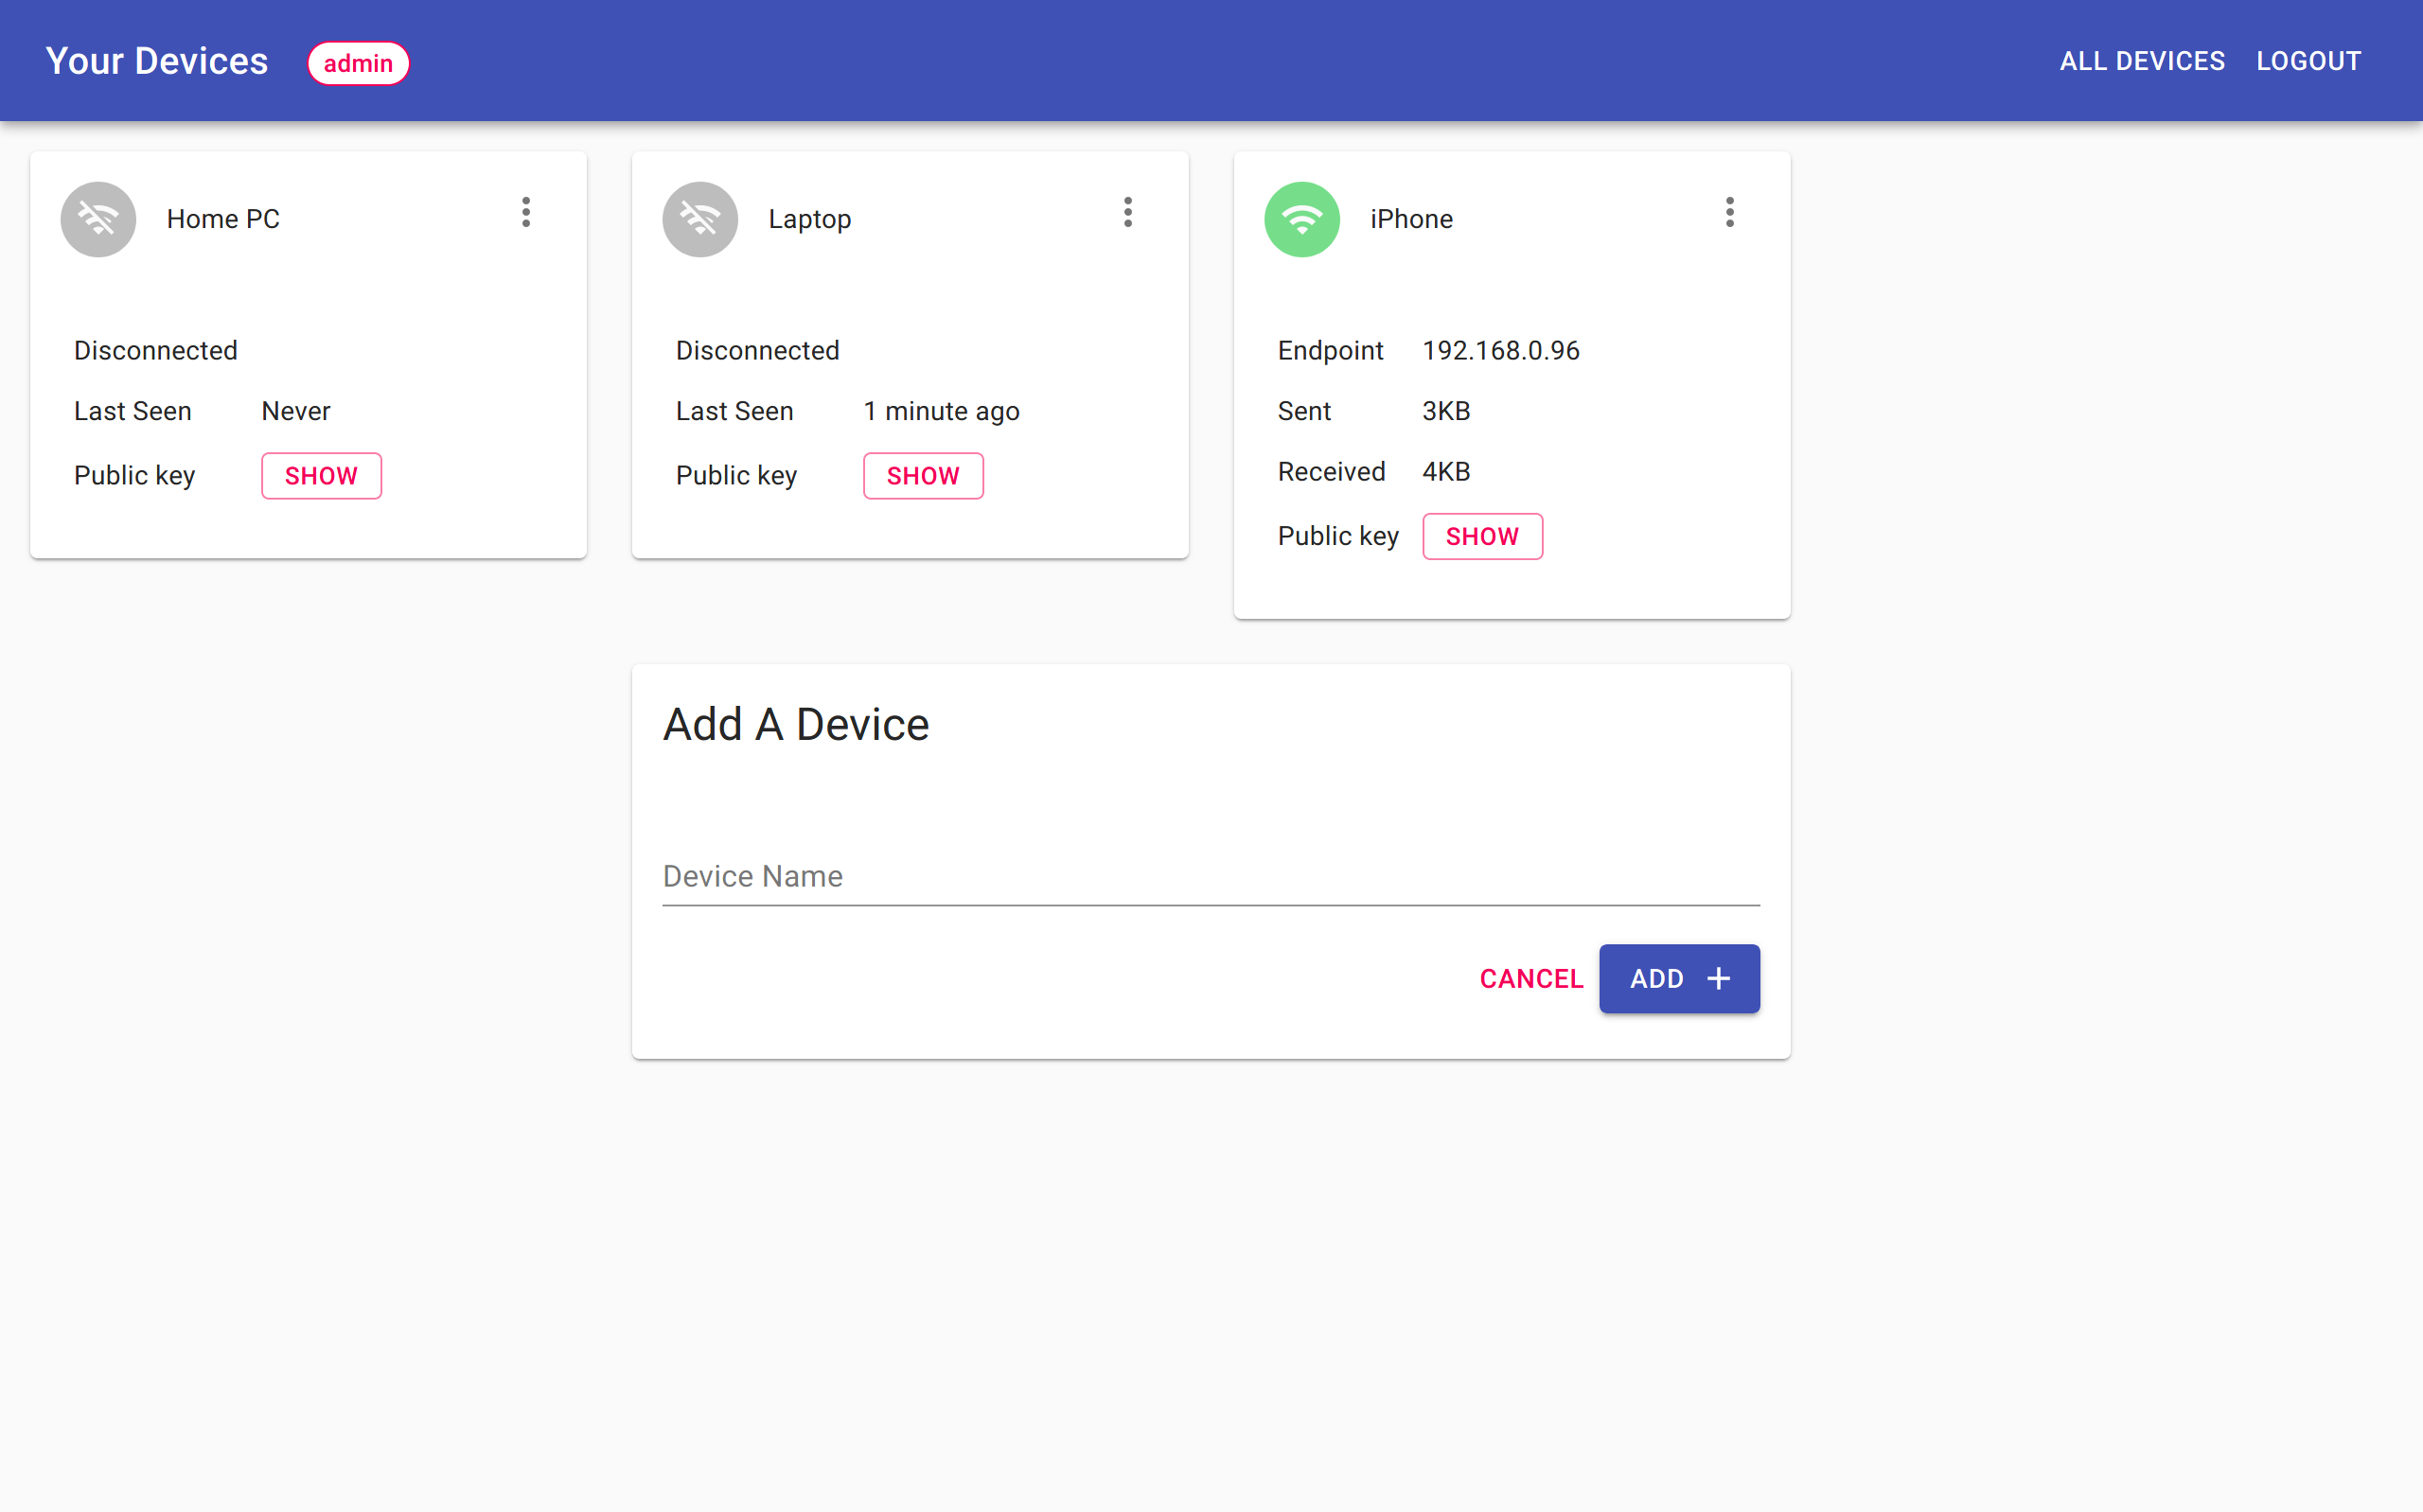
The admin interface looks like this:

wg-access-server admin interface

Running wg-access-server with Docker

The easiest way to run wg-access-server is by using Docker and docker-compose. If you are new to Docker and docker-compose, you might want to read some tutorials about it first.

I use the following docker-compose.yml config file for wg-access-server:

version: "3.4"
services: 
  wireguard:
    container_name: wireguard
    image: place1/wg-access-server
    cap_add:
      - NET_ADMIN
    environment:
      WG_WIREGUARD_PRIVATE_KEY: {put your private key here}
      WG_STORAGE: sqlite3:///wireguard-clients/db.sqlite3
      WG_EXTERNAL_HOST: my-host.com
      WG_CONFIG: "/config.yaml"
      WG_ADMIN_USERNAME: {put your admin username here}
      WG_ADMIN_PASSWORD: {put your plain text admin password here}
    volumes:
      - ./data/wg-access-server:/data"
      - ./data/wireguard-clients:/wireguard-clients
      - ./conf/wireguard/config.yaml:/config.yaml:ro # if you have a custom config file
    ports:
      - "8000:8000/tcp"
      - "51820:51820/udp"
    devices:
      - "/dev/net/tun:/dev/net/tun"
    restart: unless-stopped

⚠️ Note that if you don’t want to use a plaintext admin password, you have to specify it in the config file. It’s probably better than my plaintext config, but I don’t expose the admin interface anywhere, so I don’t really care.

ℹ️ You can generate the WireGuard private key with Docker: docker run -it place1/wg-access-server wg genkey

In ./conf/wireguard/config.yaml I specified the external host. By doing so, the generated client profiles contain the correct url. That way they can be used right away:

loglevel: info
wireguard:
  externalHost: "my-external-domain.com"

ℹ️ Don’t forget to open UDP port 51820 on your firewall.
ℹ️ If you want to expose the admin interface, you also have to open TCP port 8000 on your firewall (But in that case you better proxy it through an HTTPS web server like Treafik or Caddy).

Once everything is configured you can use the known docker commands to start the service:

sudo docker-compose up -d

Client device configuration for wg-access-server with WireGuard apps

Next step is to configure the client devices. Wireguard has apps for iOS, macOS, Android, Windows, any Linux flavour, … Check out the most up-to-date list on their website.

Adding a new client configuration is very easy. Navigate to your wg-access-server admin interface (e.g. local-ip-of-adguard-host:8000. Then you just specify the name of the device and click on Add.

Once it is created, the client configuration will be displayed in the admin interface.
⚠️ Note that you can only see this configuration once, afterwards it will be permanently deleted.

wg-access-server new client creation

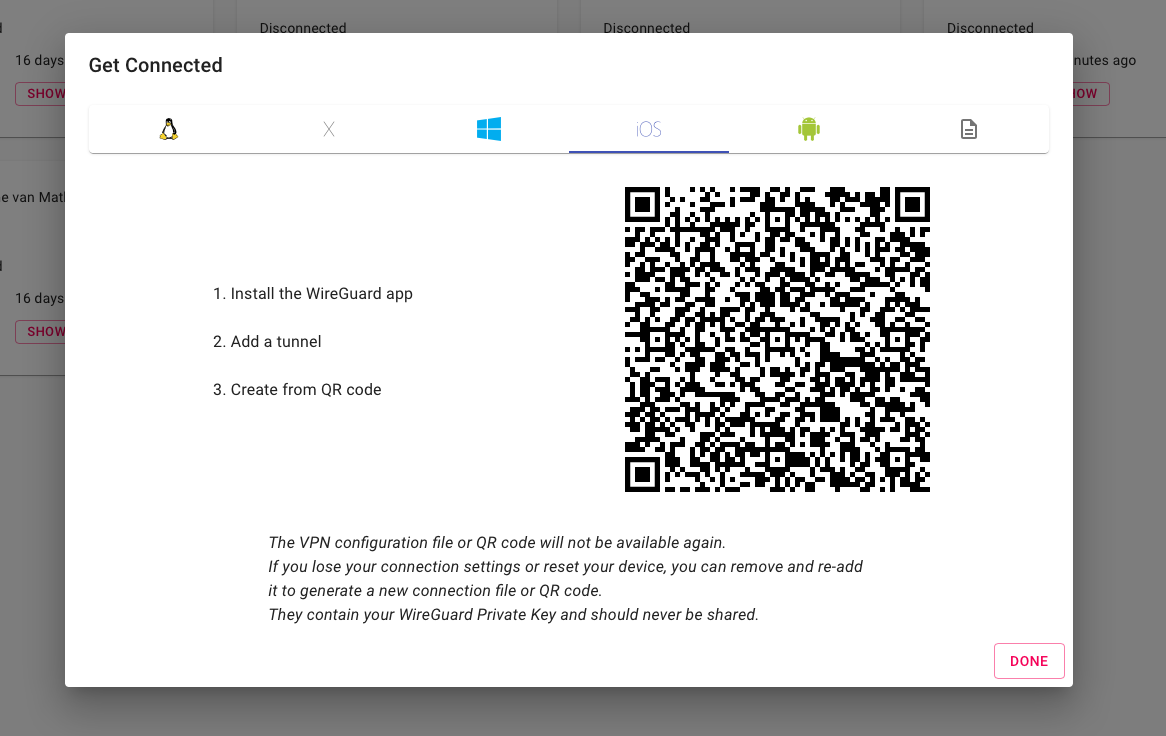
If you are configuring for a mobile device, you can scan the QR code with the Wireguard app for the most simple configuration.

wg-access-server client configuration with QR code

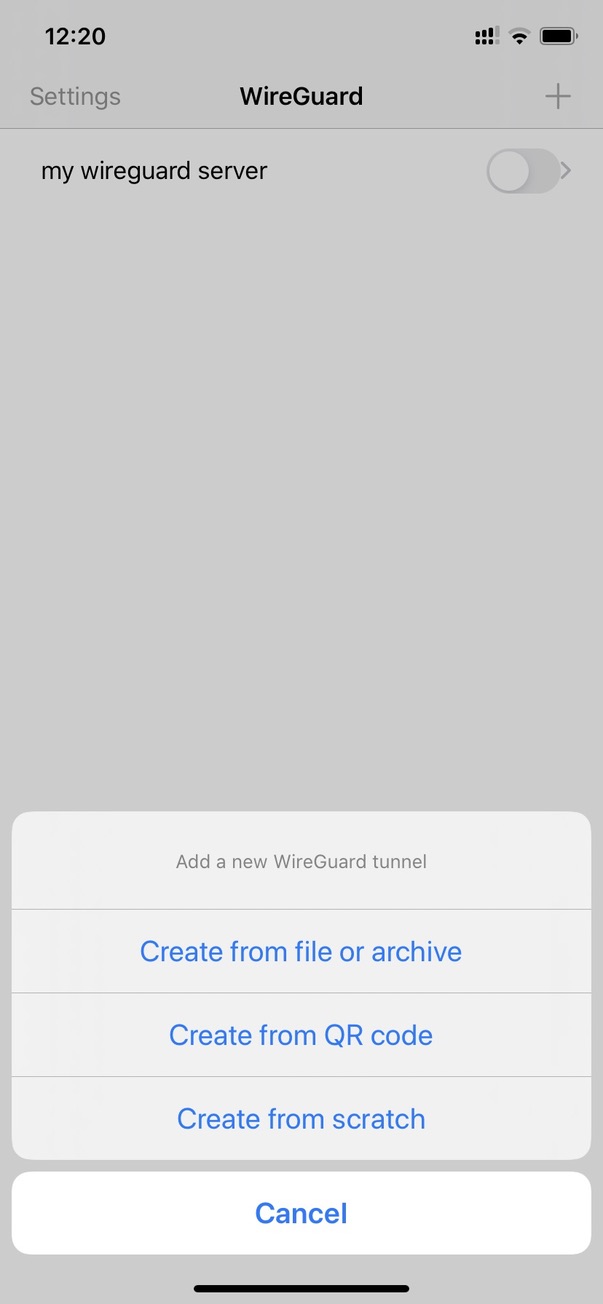
On your iPhone:

wg-access-server client configuration with config file (for macOS)
Wireguard app on iOS

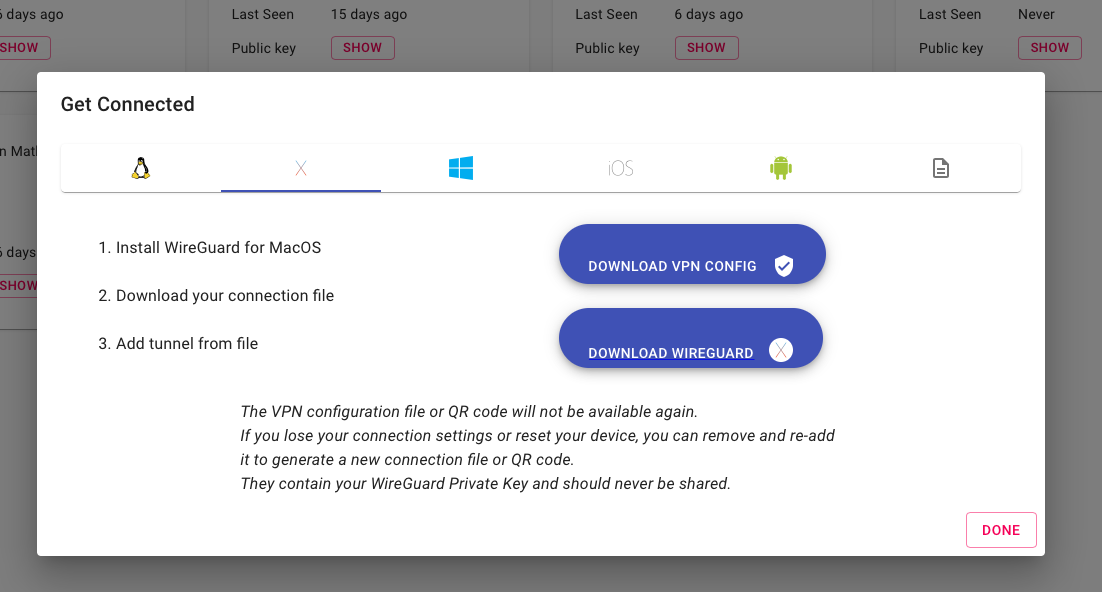
You can also just download the profile (for e.g. desktop clients):

wg-access-server client configuration with config file (for macOS)

Voila, your VPN is all setup!

Conclusion

Setting up your personal VPN with Wireguard, wg-access-server and Docker is stupidly simple.

Configure Fish with ‘bobthefish’ and ‘nerd fonts’ on Mac

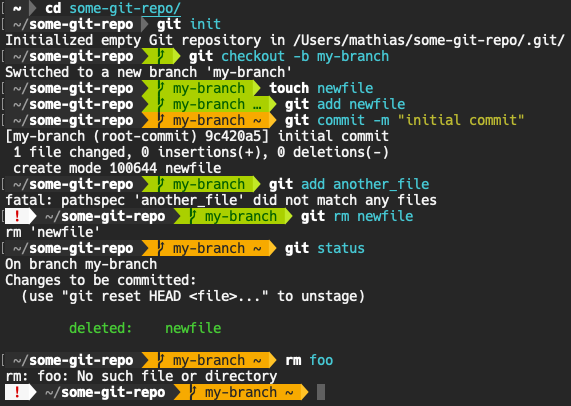
The first thing I do on a new Mac is configuring the terminal and shell. I always install Fish and bobthefish with patched nerd fonts. If you follow the steps in this blogpost, you will have a nice looking shell like mine:

Install Homebrew

If you haven’t installed Homebrew yet, head over to brew.sh to install it on your Mac.

Install Fish

$ brew install fish

In order to make fish your default shell, add /usr/local/bin/fish to /etc/shells , and execute chsh -s /usr/local/bin/fish . If not, then you can always type fish in bash .

Install Oh My Fish

$ curl -L https://get.oh-my.fish | fish

More info about Oh My Fish can be found here: github.com/oh-my-fish/oh-my-fish.

Install bobthefish

$ omf install bobthefish

To make best use of bobthefish you must nerd fonts patched font fonts. These fonts add icons and symbols to your shell:

$ set -g theme_nerd_fonts yes

More info about bobthefish can be found here: github.com/oh-my-fish/theme-bobthefish.

Install nerd fonts

To install the nerd fonts that we have activated for bobthefish we can use Homebrew:

$ brew tap homebrew/cask-fonts
$ brew cask install font-hack-nerd-font

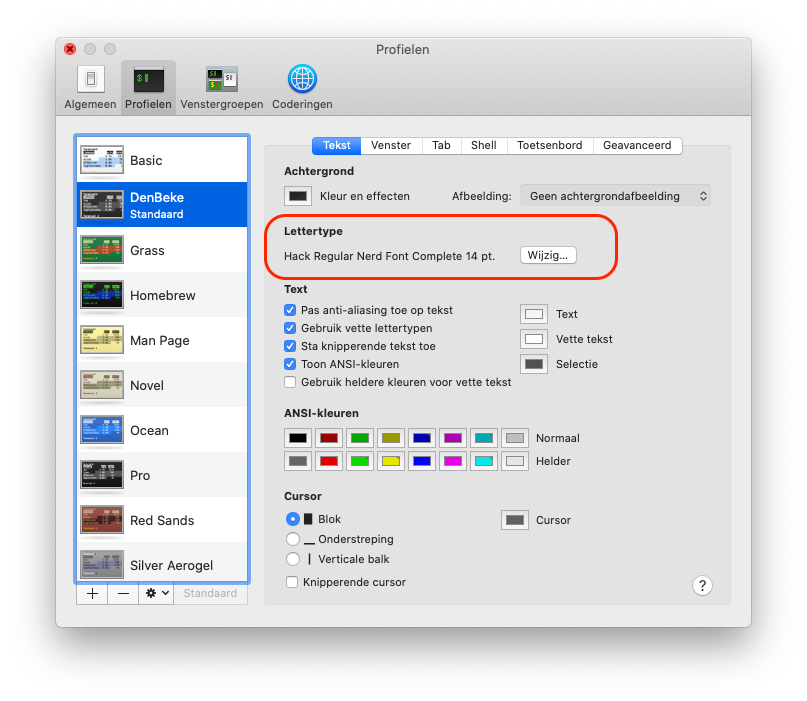
Enable nerd fonts in the terminal profile

Don’t forget to enable the patched nerd fonts in your terminal profile:

  1. Go to the preferences of the Terminal app.
  2. Choose your default profile.
  3. Change the font to Hack Nerd Font (regular).

Now you’re all set. Open a new terminal window and enjoy a good looking shell!

Data-Driven Testing in Go aka Table Testing or Parameterized Testing

When writing tests, we want to focus as much as possible on the actual test cases and test data, and not on implementing the individual cases. The less time you spend in writing code to implement a test-case, the more time you can spend on actual test data.

This is where data-driven testing comes in handy. Data-driven testing splits the test data from the test logic.

What is Data-Drive Testing?

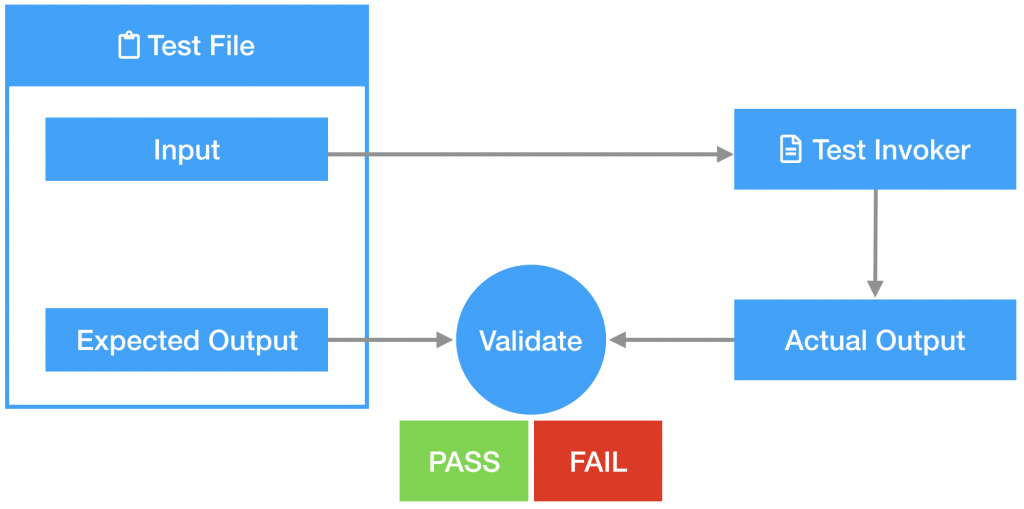
So what is data-driven testing exactly? In data-driven testing you reuse the same test script/invoker with multiple inputs.

To do so you need:

  • Have test-data in files. For each test you should have:
    • Description of the test
    • Input for the test
    • Expected output
  • Run the same test script on each of the input data.
  • Check whether the actual output of the test script matches the expected output you defined in the input file.
Overview of Data-Driven Testing

You probably know data-driven testing already as “Table Testing “or “Parameterized” testing

How to Do Data-Driven Testing in Go

But how do you implement data-driven testing in Go?

The examples I use originate from tests I wrote to test Sanity’s patching logic on documents. This means we need an input document, a patching function to apply on this document, and an expected output after the patching is applied.

Test Input File

I opted to put the test input in Yaml files. Each file contains a list of (related) test cases.

  • description of the test is string.
  • input, patch, expected_output, are multi-line strings, which contain JSON. This can be of course anything, but in my tests I needed JSON.

An example of such an input data file:

- description: inc
  input: |
    {
      "x": 0
    }

  patch: |
    {
      "patch": {
        "id": "123",
        "ifRevisionID": "666",
        "inc": {
          "x": 1
        }
      }
    }

  expected_output: |
    {
      "x": 1
    }

Parse File

Creating a datafile isn’t enough, it must also be parsed. To do so I created a custom UnmarshalYAML function to implement the Yaml Unmarshaller interface. So that it gets automatically picked up by the go-yaml/yaml package when trying to unmarshall it. I left this implementation out because it is very specific to what we do in our tests at Sanity.

The datafile is represented in Go with a type alias and a struct as follows:

// A TestFile contains a list of test cases
type TestFile []TestCase

// TestCase represents a single patch test case.
type TestCase struct {
    Description    string                `yaml:"description"`
    Input          attributes.Attributes `yaml:"input"`
    Patch          mutation.Patch        `yaml:"patch"`
    ExpectedOutput attributes.Attributes `yaml:"expected_output"`
}

Execute File

To test the patching mechanism we have a testing function which takes the input, patch and expected_output as parameters:

func testPatchPerform(
    t *testing.T,
    patch mutation.Patch,
    input attributes.Attributes,
    expectedOutput attributes.Attributes
) {

    // ...

}

So know we need to call it for each test case from each test data file.
To do so I created a test helper which parses a test file and runs all the test cases in it (with the above helper). For each test-case I added a t.Run() which discribes the test being executed. This simplifies debugging a lot.

func testPatchPerformFromFile(t *testing.T, file string) {

    yamlInput, err := ioutil.ReadFile(file)
    require.NoError(t, err)

    testFile := TestFile{}

    err = yaml.Unmarshal(yamlInput, &testFile)
    require.NoError(t, err)

    for _, testCase := range testFile {
        t.Run(file+"/"+testCase.Description, func(t *testing.T) {
            testPatchPerform(t, testCase.Patch, testCase.Input, testCase.ExpectedOutput)
        })
    }

}

Now we just need to go over all the test files in our data directory and execute the testPatchPerformFromFile for each file. So the actual top-level test function that will be executed by go test looks like this:

func TestPatchPerformFromTestDataDirectory(t *testing.T) {

    err := filepath.Walk("./testdata/", func(path string, info os.FileInfo, err error) error {

        if err != nil {
            return err
        }
        if info.IsDir() {
            return nil
        }

        if strings.Contains(info.Name(), "patch_") {
            testPatchPerformFromFile(t, path)
        }

        return nil
    })
    require.NoError(t, err)
}

Test Output

Test about in verbose mode looks like this:

--- PASS: TestPatchPerformFromTestDataDirectory (0.00s)
    patch_increment.yml/inc (0.00s)
    --- PASS: TestPatchPerformFromTestDataDirectory/testdata/patch_increment.yml/inc_variable_number (0.00s)
    --- PASS: TestPatchPerformFromTestDataDirectory/testdata/patch_increment.yml/dec (0.00s)
    --- PASS: TestPatchPerformFromTestDataDirectory/testdata/patch_increment.yml/dec_variable_number (0.00s)

Conclusion

With this data-driven testing approach we can easily write tests. We implement the test script only once, and after that we can add as many data files as possible. Need a new test case? Just create a new case in a Yaml file and run the tests again with go test.

Data-driven testing also makes it possible to reuse test-cases in other places/languages in your stack since the Yaml test input is language-independent.

Running `go fmt`, `goimports` and `golangci-lint` on save with GoLand

Recently I started using GoLand for Go development. This means that I’m constantly adapting to this new editor and looking up how to do certain things.

One of the things I really liked in Visual Studio Code was the formatting/linting/goimports on save. It appears that it is super simple to enable this in GoLand.

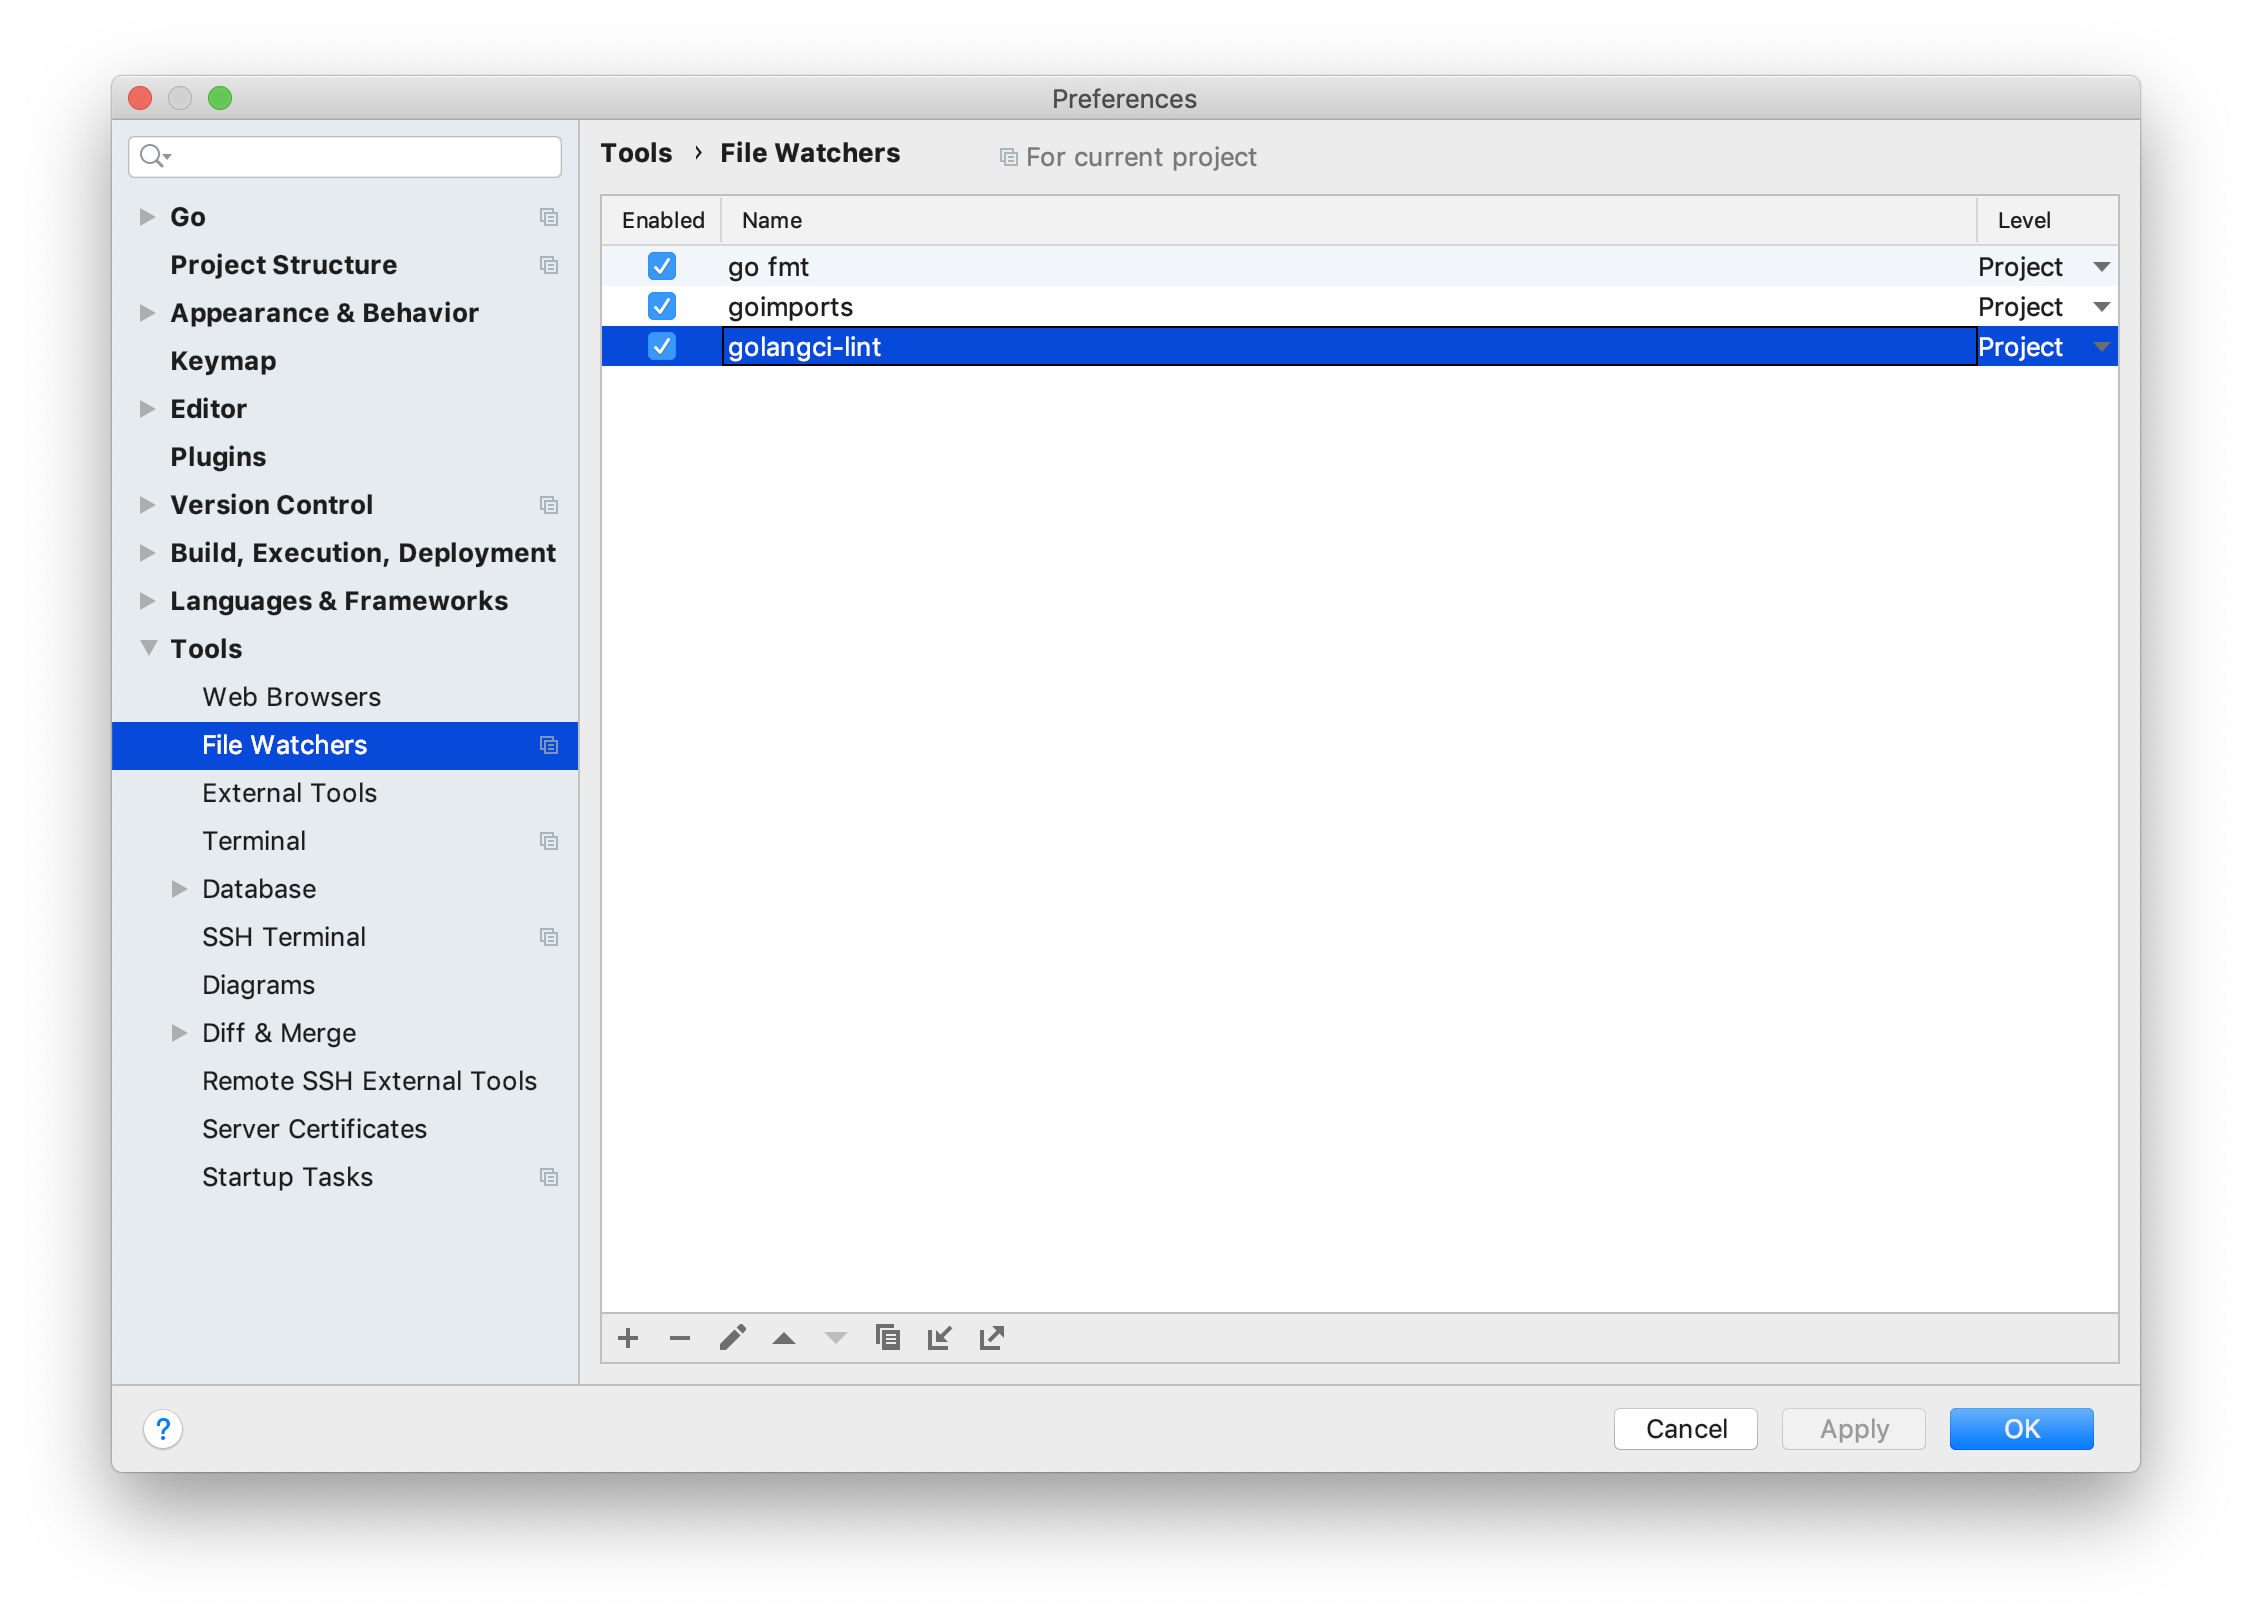
Go to Preferences, Tools, File Watchers. Click on the plus sign and add the wanted Go tools there:

How to convert all your old AppleWorks and ClarisWorks documents to PDF?

Recently someone asked me if I could help him open old documents on his Mac. Those documents were made in 1997 with ClarisWorks (ClarisWorks is de predecessor of AppleWorks) and can’t be opened with any version of Pages (not even the oldest iWork version that runs on Intel Macs).

Luckily, there is still a way to open these documents.

How to open old AppleWorks and ClarisWorks documents?

How do you actually open old .cwk files on your new Mac? AppleWorks will surely not work, because it requires a PPC Mac or Rosetta Code, which doesn’t ship anymore for ages. Luckily you can open any old AppleWorks and ClarisWorks file with LibreOffice.

Converting all the old .cwk documents on your Mac to PDF

But it is very inconvenient to do this by hand for all the old documents on your Mac. That is why I programmed a small Python script which converts all the .cwk suffixed documents in a folder (or any of its subfolders) to PDF using LibreOffice.

So how to use it?

Install LibreOffice first in the /Applications folder.

Download my cwk_to_pdf.py script from Github.

Then open the Terminal application on your Mac and execute the script while passing a the folder with the .cwk files to it.

$ python cwk_to_pdf.py /some/folder/with/cwk/files

If you don’t know how to navigate in the Terminal or work with relative directories in the Terminal, you can simplify the process by:

  1. Open the Terminal application
  2. Type python
  3. Type a space
  4. Drag and drop the cwk_to_pdf.py file in the terminal
  5. Type another space
  6. Drag and drop the folder you want to run the script on in the terminal
  7. Hit enter

While executing, the cwk_to_pdf.py script will go through all files and subfolders in the specified directory, and will convert all files ending with .cwk to PDF. It will save those files in the the same directory.

Don’t forget to backup your files before running scripts like this! (And in fact you should always backup, not only when you run stuff!!!)

What I learned from working as an expat in Paris

Enjoying a last glass of wine in Paris at one of my favorite spots.

Starting a new professional adventure is the ideal moment to look back on a previous experience. In my case, I worked during the last year for Scaleway in Paris.

“Scaleway is an Iliad Group brand supplying a range of pioneering cloud infrastructure covering a full range of services for professionals. Scaleway is growing its reputation around the world and currently serving business clients in four datacenters located in France and one in the Netherlands.”

Working in Paris taught me some things about the French culture…

Taking things easy

In France, they take things easy. Every meetings starts with at least ten minutes delay. This can be frustrating if you are used to starting on time. But the French way of living also has its advantages: sweet lunch break where you can take your time to enjoy freshly made meals. During the heatwave my manager even told me “Take another glass of rosé wine and take it easy in this hot weather”.

Sadly though, the cassiers in the supermarket also take it easy when you don’t necessarily have a lot of patience 🙂

Working together with people from different backgrounds is nice

The fact that in France they take things more at ease is not the only difference. Working in France, I quickly noticed that most French need a lot more words to express the same information. This makes meetings sometimes cumbersome or tiring due to long discussions. But this also makes that my colleagues by default could express themselves with more nuances.

French ❤️ Paperwork

French companies and governmental agencies really do like paperwork. They want a ‘justificatif’ prove for everything. Obtaining a bank account and social security quickly took some months due to the severity on the necessary paperwork.

Language will always be a limiting factor

Even tough my French is very good (people in France sometimes ask me where in France/Belgium I come from with my accent), I eventually stumbled upon a language barrier. Calling with bad quality to the French social security or bank when they speak very quickly can be a challenge. Or understanding all the jokes of my colleagues when they speak with the typical Parisian ‘verlan’ slang words. But luckily, my French has even gotten better, I learned a lot of new words and expressions!

Working at Scaleway was both challenging and fun

I really enjoyed working at Scaleway. I had the possibility to learn a lot of new technologies on interesting projects. This all while working with passionate and smart people.

Paris is an awesome city

Hell yeah, Paris is an awesome city. I had visited Paris plenty of times before moving there. But even after a year, I was still discovering cool places, nice dishes and fancy restaurants. Paris is one of those cities where you have always plenty of stuff to do and visit. Paris never sleeps.

HTTP Test Recording with Go and go-vcr

When testing code that interacts with HTTP APIs, it is often cumbersome to test them, and especially to automatically test them with real data as part of a continuous deployment process.

To tackle this, it is useful to record your API requests and responses. This can be done in Go by using go-vcr, which gives you a http.Transport you can use in a custom http.Client.

go-vcr uses the concept of a recorder and a cassette. The recorder will save a request-response mapping. This is stored in a cassette.

Creating http.Transport with go-vcr

Creating a custom http.Transport is very straightforward. In fact, the recorder struct implements the http.Transport interface. So it suffices to create a recorder.
In my example I change the mode of the recorder (recording vs replaying) based on whether the UPDATE environment flag is set.
The cassette is stored in testdata/go-vcr, because testdata directories are ignored by Go.

// UpdateCassette ENV variable so we know when to update the cassette.
_, UpdateCassette := os.LookupEnv("UPDATE")

recorderMode := recorder.ModeReplaying
if UpdateCassette {
    recorderMode = recorder.ModeRecording
}

// Setup recorder
r, err := recorder.NewAsMode("testdata/go-vcr", recorderMode, nil)
if err != nil {
    return nil, nil, err
}

Deleting Sensitive Information

Since your tests are version controlled, it is very important to delete all sensitive data from the cassette. This can be done by adding filters to the recorder. Below, I delete the x-auth-token and authorization headers. But depending on the HTTP API you are testing you might need to delete more sensitive data.

// Add a filter which removes Authorization and x-auth-token headers from all requests
r.AddFilter(func(i *cassette.Interaction) error {
    delete(i.Request.Headers, "x-auth-token")
    delete(i.Request.Headers, "authorization")
    return nil
})

Doing HTTP Requests with the Custom Transport

Now you have a recording transport, you can start writing tests. First create a HTTP client with the custom transport. Once you have done this, performing HTTP requests and performing tests on them is business as usual…

// Create new http.Client where transport is the recorder
httpClient := &http.Client{Transport: r}

req, err := http.NewRequest("GET", "http://api.example.com/some/object", nil)
if err != nil {
    // handle error
}
resp, err := httpClient.Do(req)
if err != nil {
    // handle error
}

// perform tests on the response...