Heel veel geluk gehad aan de bocht van de Schelde in Bath. Er passeerde net op dat moment een groot containerschip van MAERSK.


Mathias Beke
Heel veel geluk gehad aan de bocht van de Schelde in Bath. Er passeerde net op dat moment een groot containerschip van MAERSK.
wget -q -O - https://jenkins-ci.org/debian/jenkins-ci.org.key | sudo apt-key add -
sudo sh -c 'echo deb http://pkg.jenkins-ci.org/debian binary/ > /etc/apt/sources.list.d/jenkins.list'
sudo apt-get update
$ sudo apt-get install jenkins
Once installed, Jenkins will run at port 8080 on your server.
Before doing anything else, you must secure your installation.
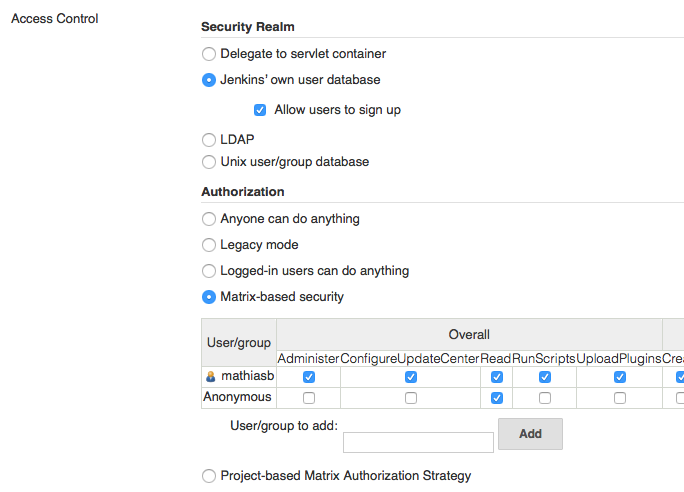
Navigate to Jenkins, Manage Jenkins, Configure Global Security.
On this page you can specify all security settings. The most simple case is to use Jenkins’ own user database.
If you refresh the page after enabling this option, you will see a Register button in top right corner of the page. Create an account before proceeding.
Now you have an account, you can select Matrix-based security. This will show a list (matrix) of all security options. You can restrict the access for the anonymous user there.
You should add your account to the security matrix with administrator access before saving. Otherwise you will lock yourself out!
You can eventually add new users there with their own permissions.
If you lock yourself out, you can manually disable security in /var/lib/jenkins/config.xml.
Change <useSecurity>true</useSecurity> to <useSecurity>false</useSecurity> and restart Jenkins: sudo service jenkins restart.
On some Jenkins installations you must install the Git plugin before you can use git as SCM.
We also need to configure SSH keys for Bitbucket so we don’t have to use plain text passwords.
$ ssh-keygen
Generating public/private rsa key pair.
Enter file in which to save the key (/Users/Mathias/.ssh/id_rsa):
/Users/Mathias/.ssh/id_rsa already exists.
Enter passphrase (empty for no passphrase):
Enter same passphrase again:
passphrase too short: have 3 bytes, need > 4
Saving the key failed: /Users/Mathias/.ssh/id_rsa.
The key fingerprint is:
4c:72:6c:3a:7f:a6:45:80:92:e7:39:b7:73:7b:c6:51 Mathias@Mac-Pro-van-Mathias.local
The key's randomart image is:
+--[ RSA 2048]----+
|       . 0..E    |
|      o.o...     |
|      .+B. o.    |
|       *+oo.+    |
|      C So.=+    |
|          o=.    |
|         ..o     |
|                 |
|                 |
+-----------------+
On Bitbucket go to Manage account, click SSH keys.
The SSH Keys page displays. If you have any existing keys, those appear on this page.
Back in your terminal, copy the contents of your public key file.
$ cat ~/.ssh/id_rsa.pub
More information on working with SSH keys (and Bitbucket) can be found here.
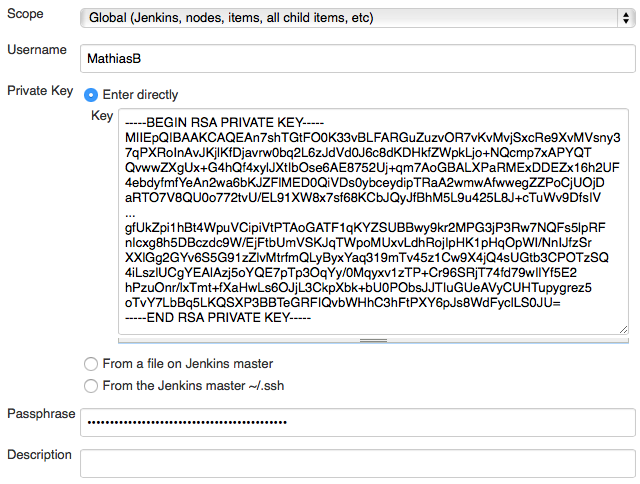
Now we have generated keys for our Git authentication, we can add them to the credentials in Jenkins.
On the built configuration screen select SSH username with private key for credentials.
Select your username, and Enter directly for the private key.
Again, you can get the key from the console, but this time we need the private key:
$ cat ~/.ssh/id_rsa
-----BEGIN RSA PRIVATE KEY-----
MIIEpQIBAAKCAQEAn7shTGtFO0K33vBLFARGuZuzvOR7vKvMvjSxcRe9XvMVsny3
7qPXRoInAvJKjlKfDjavrw0bq2L6zJdVd0J6c8dKDHkfZWpkLjo+NQcmp7xAPYQT
QvwwZXgUx+G4hQf4xylJXtIbOse6AE8752Uj+qm7AoGBALXPaRMExDDEZx16h2UF
4ebdyfmfYeAn2wa6bKJZFlMED0QiVDs0ybceydipTRaA2wmwAfwwegZZPoCjUOjD
aRTO7V8QU0o772tvU/EL91XW8x7sf68KCbJQyJfBhM5L9u425L8J+cTuWv9DfsIV
...
gfUkZpi1hBt4WpuVCipiVtPTAoGATF1qKYZSUBBwy9kr2MPG3jP3Rw7NQFs5lpRF
nIcxg8h5DBczdc9W/EjFtbUmVSKJqTWpoMUxvLdhRojIpHK1pHqOpWI/NnIJfzSr
XXlGg2GYv6S5G91zZlvMtrfmQLyByxYaq319mTv45z1Cw9X4jQ4sUGtb3CPOTzSQ
4iLszlUCgYEAlAzj5oYQE7pTp3OqYy/0Mqyxv1zTP+Cr96SRjT74fd79wIlYf5E2
hPzuOnr/lxTmt+fXaHwLs6OJjL3CkpXbk+bU0PObsJJTIuGUeAVyCUHTupygrez5
oTvY7LbBq5LKQSXP3BBTeGRFIQvbWHhC3hFtPXY6pJs8WdFyclLS0JU=
-----END RSA PRIVATE KEY-----
You also need to specify the passphrase (if you set one before).
Choose for Trigger builds remotely and specify a really random authentication token.
You can for example generate a random token using OpenSSL: $ openssl rand -base64 16.
You also need the API key from your Jenkins account. Go to your profile page and click on Configure. On the configuration page click on Show API Token.
Finally you can add trigger on Bitbucket. Go the repository’s settings page, and navigate to Services. Add a new Jenkins service with the following details:
http://username:apitoken@your-jenkins-url.com/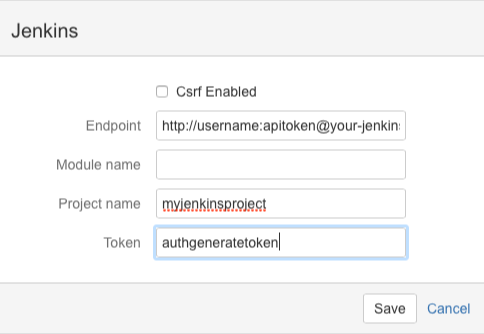
If you now do a push to your Bitbucket remote repo, it will automatically trigger a Jenkins build.
If you want to build the project with CMake, you might have to install the CMake plugin (and you need CMake on your server).
Maybe you also need the Build Environment plugin.
Once installed, you click on Add build step and you choose CMake Build. You can also specify a Shell invocation if you want to use your own make file or build commands.
I won’t dig deeper into specific build settings, since that’s irrelevant for you particular project…
If you use GoogleTest, you can create a test output report with Jenkins. Execute gTest with this flag: --gtest_output=xml:gtestresults.xml.
You also need to replace notun by skipped since Jenkins doesn’t like the first one.
awk '{ if ($1 == "<testcase" && match($0, "notrun")) print substr($0,0,length($0)-2) "><skipped/></testcase>"; else print $0;}' gtestresults.xml > gtestresults-skipped.xml
mv gtestresults.xml gtestresults.off
Now you have the xml report file, you must add the Publish JUnit test result report Post-build action with the gtestresults-skipped.xml file.
Fotoreeks van het dorpsplein te Nisse (Zeeland).
Nisse heeft een beschermd dorpsgezicht en is daarmee één van de zeventien beschermde stads- en dorpsgezichten in Zeeland. Het geldt als een van de mooiste dorpen van Zuid-Beveland en wordt gedomineerd door de karakteristieke 14e eeuwse kerktoren, die in de wijde omgeving te zien is.

![]()
Update: I added rewrite rules for WordPress permalinks to the Caddyfile. I also removed all unnecessary bits which are not needed anymore since Caddy now has built-in HTTPS support with Let’s Encrypt.
Recently I discovered an amazing open source project: Caddy, a fully functional HTTP/2 webserver, written in Go.
Caddy is a lightweight, general-purpose web server for Windows, Mac, Linux, BSD, and Android. It is a capable alternative to other popular and easy to use web servers.
The most notable features are HTTP/2, Virtual Hosts, TLS + SNI, and easy configuration with a Caddyfile. Usually, you have one Caddyfile per site. Most directives for the Caddyfile invoke a layer of middleware which can be used in your own Go programs.
In this tutorial I will explain how to run WordPress with Caddy server (on Ubuntu), using Caddy’s FastCGI support and PHP-FPM (i.e. PHP FastCGI Process Manager). Of course you also need MySQL/MariaDB to run WordPress.
I assume that you have a MySQL server up and running (or that you have the knowledge to do so) .
Install PHP-FPM:
$ sudo apt-get install php5-fpmPHP-FPM listens to FastCGI requests on a unix socket by default (on Ubuntu and Arch Linux): unix:/var/run/php5-fpm.sock (or unix:/var/run/php/php7.0-fpm.sock for PHP 7). So we’ll have to tell the webserver to pass the PHP requests to it.
You could also use a regular UDP socket if you want: change listen in /etc/php5/fpm/pool.d/www.conf to 127.0.0.1:9000. On some operating systems (e.g. FreeBSD), PHP-FPM listens on this UDP socket by default.
Now we need to configure Caddy so it will use PHP-FPM. We also need to specify virtual hosts for the domain(s) we will be using.
The following Caddyfile contains everything you need to run WordPress with PHP-FPM on HTTP/2.
www.my-wordpress-blog.com {
    redir https://my-wordpress-blog.com{uri}
}

my-wordpress-blog.com {
    root wordpress
    log access.log
    errors error.log

    # PHP-FPM with Unix socket
    fastcgi / /var/run/php5-fpm.sock php

    # PHP-FPM with regular udp socket
    # fastcgi / 127.0.0.1:9000 php

    # Routing for WordPress
    rewrite /{
        to {path} {path}/ /index.php?{query}
    }
}
Caddy will use the wordpress folder as document root, and will pass all PHP requests to a FastCGI process (which is the PHP-FPM process). It will also automatically install SSL certificates (from Let’s Encrypt) and serve the website over HTTPS. HTTP requests will be redirected to the HTTPS domain.
The Caddy documentation contains more detailed information on the available directives. Checkout my other blogposts if you need help Running Caddy Server as a service or Creating a self-signed certificate.
Now it’s time to install WordPress. Simple download WordPress and copy the files to the wordpress folder. To install WordPress you can just follow the steps on the screen like any other easy WordPress configuration.
If you want to use HTTP/2, you should configure WordPress with HTTPS enabled. You can do this in Settings, General: change http in the urls to https.
Most browsers only speak HTTP/2 when using TLS. Although TLS only is not marked as mandatory in the RFC 7540, Firefox and Chrome development teams have no actual intents to implement HTTP/2 without TLS.
The exact commands for generating a self-signed SSL certificate on Linux is something I always forget, so here they are:
First you need to generate a private key. This private key will be the only key that can decrypt your SSL traffic.
$ openssl genrsa -des3 -passout pass:x -out server.pass.key 2048
$ openssl rsa -passin pass:x -in server.pass.key -out server.key
$ rm server.pass.keyUsing the private key you’ve generated seconds ago, you must now create a CSR (Certificate Signing Request). In most cases you can just use the default values for everything except the common name. The common name is usually the domain of your website.
$ openssl req -new -key server.key -out server.csrNormally you would pass the CSR to a CA (Certificate Authority) who would sign it for you. But using the following command you sign the certificate yourself.
$ openssl x509 -req -days 365 -in server.csr -signkey server.key -out server.crtUpdate: Need to run Caddy as service with systemd? Checkout this blogpost!
Recently I discovered a very promising webserver (written in Go) called Caddy.
Now, Caddy is just an executable, which I wanted to turn into a service on my Ubuntu server.
Running any executable as a service can be done using Upstart. Once you’ve created a config file in /etc/init/my_service.conf, you can use some simple commands like service my_service start, service my_service stop, … and the service will run at boot time.
The output of the program will be logged to /var/log/upstart/my_service.log.
To allow a non-root user to listen on port 80, you must allow the executable to do so:
$ sudo setcap cap_net_bind_service=+ep ./caddyMy configuration file looks like this:
description "Caddy Server startup script"
author "Mathias Beke"

start on runlevel [2345]
stop on runlevel [016]


setuid some-caddy-user
setgid some-caddy-group

respawn
respawn limit 10 5

limit nofile 4096 4096

script
    cd /home/mathias/
    exec ./caddy
end script
Explanation of the commands:
start on runlevel [2245] specifies the job needs to be started after the basic facilities are up.stop on runlevel [016] is used for a normal shutdown.setuid and setgid can be used to run the job under a specific user account. Set this to an account that is less privileged than the root user. You don’t want to run a webserver with root access!respawn will automatically restart (well… ‘respawn’) the process when it stops for any reason.respawn limit COUNT INTERVAL | unlimited specifies a limit for the automatic respawn of the process.Respawning is subject to a limit. If the job is respawned more than COUNT times in INTERVAL seconds, it will be considered to be having deeper problems and will be stopped. Default COUNT is 10. Default INTERVAL is 5 seconds.
To have the job respawn indefinitely, specify an argument of “unlimited”. However, care should be taken using this option: does your service really stop that frequently? Should it?
exec executes the actual command.When passing holidays in the mountains one often wants to know the altitude. Well… what’s better than writing an altitude app yourself? That’s what I’ve done:
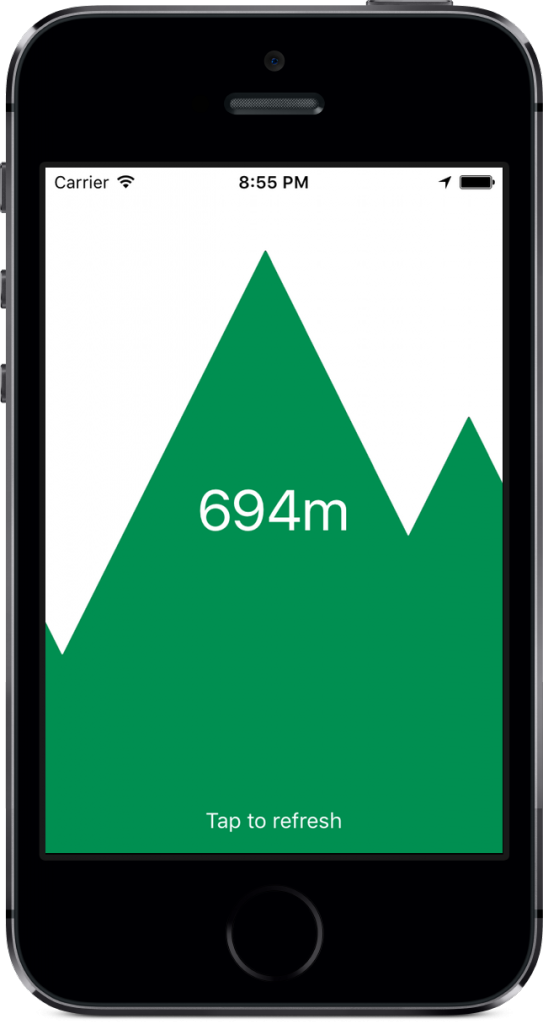
It took me no more than 2 hours to complete the job and to come up with the above application. The source code is freely available on Github: Altitude.
One of the cool things of games on smartphones, is that you can control objects using the device motion. But how do you move an object using device tilt (using Swift 2)?
To do so you need to use the CMMotionManager (which is part of Apple’s CoreMotion framework). So don’t forget to include the framework at the top of your code: import CoreMotion.
You must also create one (single) CMMotionManager instance.
let motionManager: CMMotionManager = CMMotionManager()And start the motion manager in the didMoveToView() function:
motionManager.startAccelerometerUpdates()Once the motion manager is up and running, we can retrieve motion data from it using the accelerometerData member.
// Get node of object to move
let paddle = childNodeWithName(PaddleCategoryName) as! SKSpriteNode

// Get MotionManager data
if let data = motionManager.accelerometerData {

    // Only get use data if it is "tilt enough"
    if (fabs(data.acceleration.x) > 0.2) {

        // Apply force to the moving object
        paddle.physicsBody!.applyForce(CGVectorMake(40.0 * CGFloat(data.acceleration.x), 0))

    }
}
If you want to actually move the object, you need to make sure that the object has some physical properties:
// Rectangular physics body around the object
paddle.physicsBody = SKPhysicsBody(rectangleOfSize: paddle.frame.size)

// Make it dynamic
paddle.physicsBody!.dynamic = true

// We don't want the object to fall of the screen
paddle.physicsBody!.affectedByGravity = false

// Add some mass to it
paddle.physicsBody!.mass = 0.02
The data.acceleration member is a struct of type CMAcceleration which contains the acceleration along the x-, y- and z-axis.
struct CMAcceleration {
    var x: Double
    var y: Double
    var z: Double
}
The following image (source) explains the orientation of those axes.

Naar jaarlijkse gewoonte ben ik weer een maand op taalkamp geweest als monitor. Zie hier het resultaat van een workshop ‘Vidéo’ na 12 dagen Roeland kamp in Virton.
Comme d’habitude j’ai fait un mois de camp de langue. Voila le résultat de 12 jours à Roeland. Un atelier Vidéo réalisé par 11 jeunes à Virton.
L’Église Saint-Étienne de Waha (of Sint-Stefanuskerk) is een kleine kerk uit de 11de eeuw, gelegen in het dorpje Waha, bij Marche-en-Fammene (provincie Luxemburg). In 2003 verwezenlijkte Jean-Michel Folon de nieuwe glasramen voor de kerk.


