Installing
wget -q -O - https://jenkins-ci.org/debian/jenkins-ci.org.key | sudo apt-key add -
sudo sh -c 'echo deb http://pkg.jenkins-ci.org/debian binary/ > /etc/apt/sources.list.d/jenkins.list'
sudo apt-get update
$ sudo apt-get install jenkins
Once installed, Jenkins will run at port 8080 on your server.
- Don’t forget to install a C/C++ compiler
- Don’t forget to install dependencies like QT, libc++ and Boost
Configuring
Security
Before doing anything else, you must secure your installation.
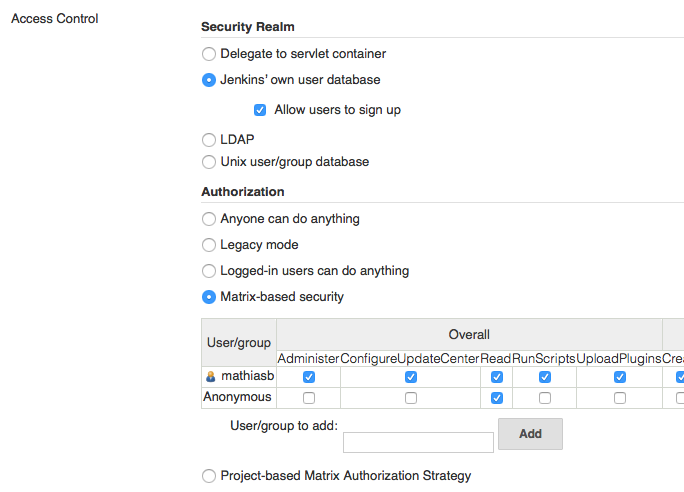
Navigate to Jenkins, Manage Jenkins, Configure Global Security.
On this page you can specify all security settings. The most simple case is to use Jenkins’ own user database.
If you refresh the page after enabling this option, you will see a Register button in top right corner of the page. Create an account before proceeding.
Now you have an account, you can select Matrix-based security. This will show a list (matrix) of all security options. You can restrict the access for the anonymous user there.
You should add your account to the security matrix with administrator access before saving. Otherwise you will lock yourself out!
You can eventually add new users there with their own permissions.
If you lock yourself out, you can manually disable security in /var/lib/jenkins/config.xml.
Change <useSecurity>true</useSecurity> to <useSecurity>false</useSecurity> and restart Jenkins: sudo service jenkins restart.
Adding build job
On some Jenkins installations you must install the Git plugin before you can use git as SCM.
SSH keys
We also need to configure SSH keys for Bitbucket so we don’t have to use plain text passwords.
$ ssh-keygen
Generating public/private rsa key pair.
Enter file in which to save the key (/Users/Mathias/.ssh/id_rsa):
/Users/Mathias/.ssh/id_rsa already exists.
Enter passphrase (empty for no passphrase):
Enter same passphrase again:
passphrase too short: have 3 bytes, need > 4
Saving the key failed: /Users/Mathias/.ssh/id_rsa.
The key fingerprint is:
4c:72:6c:3a:7f:a6:45:80:92:e7:39:b7:73:7b:c6:51 Mathias@Mac-Pro-van-Mathias.local
The key's randomart image is:
+--[ RSA 2048]----+
|       . 0..E    |
|      o.o...     |
|      .+B. o.    |
|       *+oo.+    |
|      C So.=+    |
|          o=.    |
|         ..o     |
|                 |
|                 |
+-----------------+
On Bitbucket go to Manage account, click SSH keys.
The SSH Keys page displays. If you have any existing keys, those appear on this page.
Back in your terminal, copy the contents of your public key file.
$ cat ~/.ssh/id_rsa.pub
More information on working with SSH keys (and Bitbucket) can be found here.
Add credentials to Jenkins
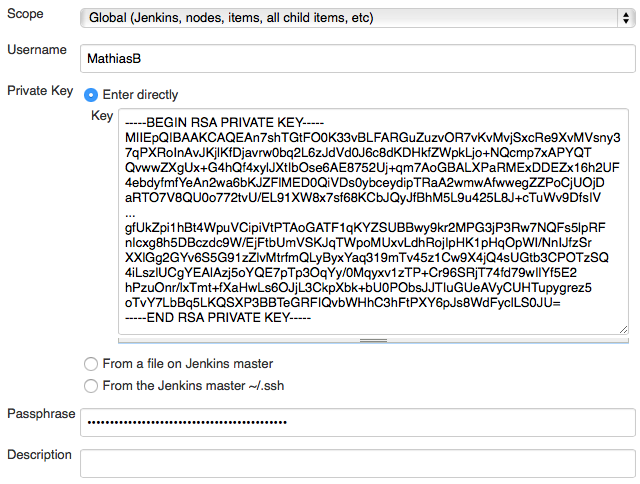
Now we have generated keys for our Git authentication, we can add them to the credentials in Jenkins.
On the built configuration screen select SSH username with private key for credentials.
Select your username, and Enter directly for the private key.
Again, you can get the key from the console, but this time we need the private key:
$ cat ~/.ssh/id_rsa
-----BEGIN RSA PRIVATE KEY-----
MIIEpQIBAAKCAQEAn7shTGtFO0K33vBLFARGuZuzvOR7vKvMvjSxcRe9XvMVsny3
7qPXRoInAvJKjlKfDjavrw0bq2L6zJdVd0J6c8dKDHkfZWpkLjo+NQcmp7xAPYQT
QvwwZXgUx+G4hQf4xylJXtIbOse6AE8752Uj+qm7AoGBALXPaRMExDDEZx16h2UF
4ebdyfmfYeAn2wa6bKJZFlMED0QiVDs0ybceydipTRaA2wmwAfwwegZZPoCjUOjD
aRTO7V8QU0o772tvU/EL91XW8x7sf68KCbJQyJfBhM5L9u425L8J+cTuWv9DfsIV
...
gfUkZpi1hBt4WpuVCipiVtPTAoGATF1qKYZSUBBwy9kr2MPG3jP3Rw7NQFs5lpRF
nIcxg8h5DBczdc9W/EjFtbUmVSKJqTWpoMUxvLdhRojIpHK1pHqOpWI/NnIJfzSr
XXlGg2GYv6S5G91zZlvMtrfmQLyByxYaq319mTv45z1Cw9X4jQ4sUGtb3CPOTzSQ
4iLszlUCgYEAlAzj5oYQE7pTp3OqYy/0Mqyxv1zTP+Cr96SRjT74fd79wIlYf5E2
hPzuOnr/lxTmt+fXaHwLs6OJjL3CkpXbk+bU0PObsJJTIuGUeAVyCUHTupygrez5
oTvY7LbBq5LKQSXP3BBTeGRFIQvbWHhC3hFtPXY6pJs8WdFyclLS0JU=
-----END RSA PRIVATE KEY-----
You also need to specify the passphrase (if you set one before).
Configuring build triggers
Choose for Trigger builds remotely and specify a really random authentication token.
You can for example generate a random token using OpenSSL: $ openssl rand -base64 16.
You also need the API key from your Jenkins account. Go to your profile page and click on Configure. On the configuration page click on Show API Token.
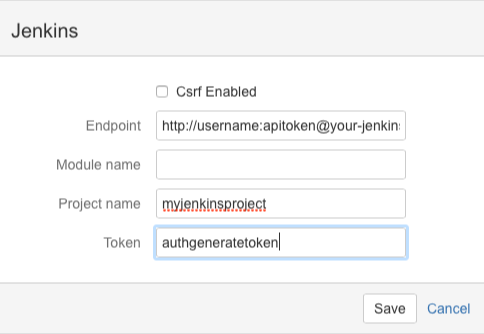
Finally you can add trigger on Bitbucket. Go the repository’s settings page, and navigate to Services. Add a new Jenkins service with the following details:
- Endpoint: Jenkins URL in the following format —
http://username:apitoken@your-jenkins-url.com/ - Project name: the project name that you’ve set in Jenkins
- Token: the authentication token of the project (that we generated earlier).
If you now do a push to your Bitbucket remote repo, it will automatically trigger a Jenkins build.
Configuring build
If you want to build the project with CMake, you might have to install the CMake plugin (and you need CMake on your server).
Maybe you also need the Build Environment plugin.
Once installed, you click on Add build step and you choose CMake Build. You can also specify a Shell invocation if you want to use your own make file or build commands.
I won’t dig deeper into specific build settings, since that’s irrelevant for you particular project…
Configuring unit test (gtest)
If you use GoogleTest, you can create a test output report with Jenkins. Execute gTest with this flag: --gtest_output=xml:gtestresults.xml.
You also need to replace notun by skipped since Jenkins doesn’t like the first one.
awk '{ if ($1 == "<testcase" && match($0, "notrun")) print substr($0,0,length($0)-2) "><skipped/></testcase>"; else print $0;}' gtestresults.xml > gtestresults-skipped.xml
mv gtestresults.xml gtestresults.off
Now you have the xml report file, you must add the Publish JUnit test result report Post-build action with the gtestresults-skipped.xml file.