When writing tests, we want to focus as much as possible on the actual test cases and test data, and not on implementing the individual cases. The less time you spend in writing code to implement a test-case, the more time you can spend on actual test data.
This is where data-driven testing comes in handy. Data-driven testing splits the test data from the test logic.
What is Data-Drive Testing?
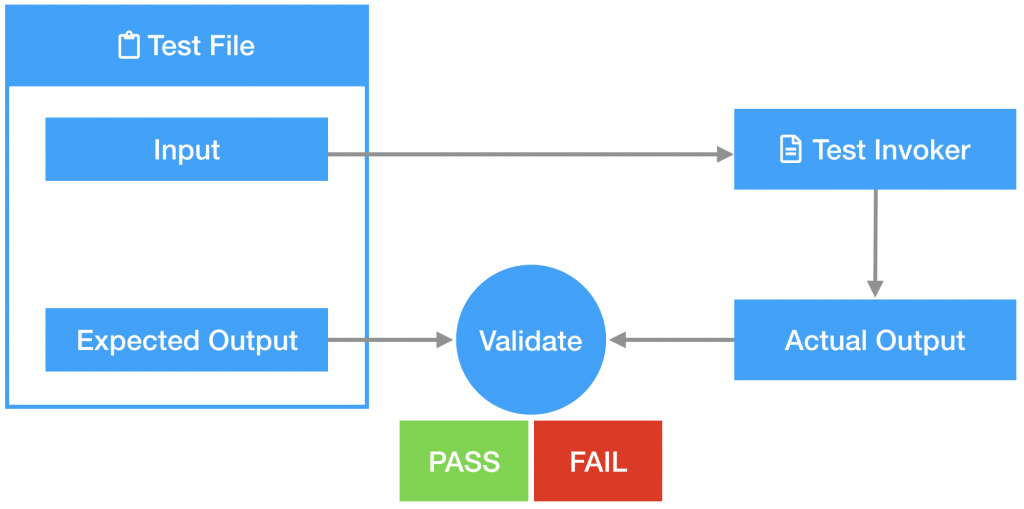
So what is data-driven testing exactly? In data-driven testing you reuse the same test script/invoker with multiple inputs.
To do so you need:
- Have test-data in files. For each test you should have:
- Description of the test
- Input for the test
- Expected output
- Run the same test script on each of the input data.
- Check whether the actual output of the test script matches the expected output you defined in the input file.
You probably know data-driven testing already as “Table Testing “or “Parameterized” testing
How to Do Data-Driven Testing in Go
But how do you implement data-driven testing in Go?
The examples I use originate from tests I wrote to test Sanity’s patching logic on documents. This means we need an input document, a patching function to apply on this document, and an expected output after the patching is applied.
Test Input File
I opted to put the test input in Yaml files. Each file contains a list of (related) test cases.
descriptionof the test is string.input,patch,expected_output, are multi-line strings, which contain JSON. This can be of course anything, but in my tests I needed JSON.
An example of such an input data file:
- description: inc
  input: |
    {
      "x": 0
    }

  patch: |
    {
      "patch": {
        "id": "123",
        "ifRevisionID": "666",
        "inc": {
          "x": 1
        }
      }
    }

  expected_output: |
    {
      "x": 1
    }
Parse File
Creating a datafile isn’t enough, it must also be parsed. To do so I created a custom UnmarshalYAML function to implement the Yaml Unmarshaller interface. So that it gets automatically picked up by the go-yaml/yaml package when trying to unmarshall it. I left this implementation out because it is very specific to what we do in our tests at Sanity.
The datafile is represented in Go with a type alias and a struct as follows:
// A TestFile contains a list of test cases
type TestFile []TestCase

// TestCase represents a single patch test case.
type TestCase struct {
    Description    string                `yaml:"description"`
    Input          attributes.Attributes `yaml:"input"`
    Patch          mutation.Patch        `yaml:"patch"`
    ExpectedOutput attributes.Attributes `yaml:"expected_output"`
}
Execute File
To test the patching mechanism we have a testing function which takes the input, patch and expected_output as parameters:
func testPatchPerform(
    t *testing.T,
    patch mutation.Patch,
    input attributes.Attributes,
    expectedOutput attributes.Attributes
) {

    // ...

}
So know we need to call it for each test case from each test data file.
To do so I created a test helper which parses a test file and runs all the test cases in it (with the above helper). For each test-case I added a t.Run() which discribes the test being executed. This simplifies debugging a lot.
func testPatchPerformFromFile(t *testing.T, file string) {

    yamlInput, err := ioutil.ReadFile(file)
    require.NoError(t, err)

    testFile := TestFile{}

    err = yaml.Unmarshal(yamlInput, &testFile)
    require.NoError(t, err)

    for _, testCase := range testFile {
        t.Run(file+"/"+testCase.Description, func(t *testing.T) {
            testPatchPerform(t, testCase.Patch, testCase.Input, testCase.ExpectedOutput)
        })
    }

}
Now we just need to go over all the test files in our data directory and execute the testPatchPerformFromFile for each file.
So the actual top-level test function that will be executed by go test looks like this:
func TestPatchPerformFromTestDataDirectory(t *testing.T) {

    err := filepath.Walk("./testdata/", func(path string, info os.FileInfo, err error) error {

        if err != nil {
            return err
        }
        if info.IsDir() {
            return nil
        }

        if strings.Contains(info.Name(), "patch_") {
            testPatchPerformFromFile(t, path)
        }

        return nil
    })
    require.NoError(t, err)
}
Test Output
Test about in verbose mode looks like this:
--- PASS: TestPatchPerformFromTestDataDirectory (0.00s)
    patch_increment.yml/inc (0.00s)
    --- PASS: TestPatchPerformFromTestDataDirectory/testdata/patch_increment.yml/inc_variable_number (0.00s)
    --- PASS: TestPatchPerformFromTestDataDirectory/testdata/patch_increment.yml/dec (0.00s)
    --- PASS: TestPatchPerformFromTestDataDirectory/testdata/patch_increment.yml/dec_variable_number (0.00s)
Conclusion
With this data-driven testing approach we can easily write tests. We implement the test script only once, and after that we can add as many data files as possible.
Need a new test case? Just create a new case in a Yaml file and run the tests again with go test.
Data-driven testing also makes it possible to reuse test-cases in other places/languages in your stack since the Yaml test input is language-independent.